The 1st Marine Raider Regiment "First and Finest" is a regiment in the United States Marine Raider Division consisting of one artillery and three infantry battalions.
Subordinate Units[]
1st Infantry Battalion 1st Marine Raider Regiment
2nd Infantry Battalion 1st Marine Raider Regiment
3rd Infantry Battalion 1st Marine Raider Regiment
1st Artillery Battalion 1st Marine Raider Regiment
1st Combat Engineer Battalion (attached)
1st Tank Battalion (attached)
1st Light Armor Battalion (attached)
Origins[]
The 1st Regiment is the oldest in the division, created in July 1775 shortly after the foundation of the Continental Army. The idea behind the regiment was to form a less numerous but elite unit capable of fighting in irregular formations with a heavy emphasis on personal combat capabilities and large amounts of supportive fire. Men were hand-picked from the trenches in Boston, where the war had been going on for months. Many of them included veterans of the French and Indian War, who were offered commissions as officers. With the first batch of recruits selected, the men underwent extensive training and combat maneuvers at the newly-created Fort Huntington in Plainsfield, Massachusetts. More recruits were added as veterans from the failed Quebec campaign returned. By late February 1776, the 1st Marine Raider Regiment had been fully formed, and the three infantry battalions along with an artillery battalion made an effective fighting force. They departed Plainsfield for the front lines in Boston in early March.
Combat Chronicle[]
American Revolutionary War (1775-1783)[]
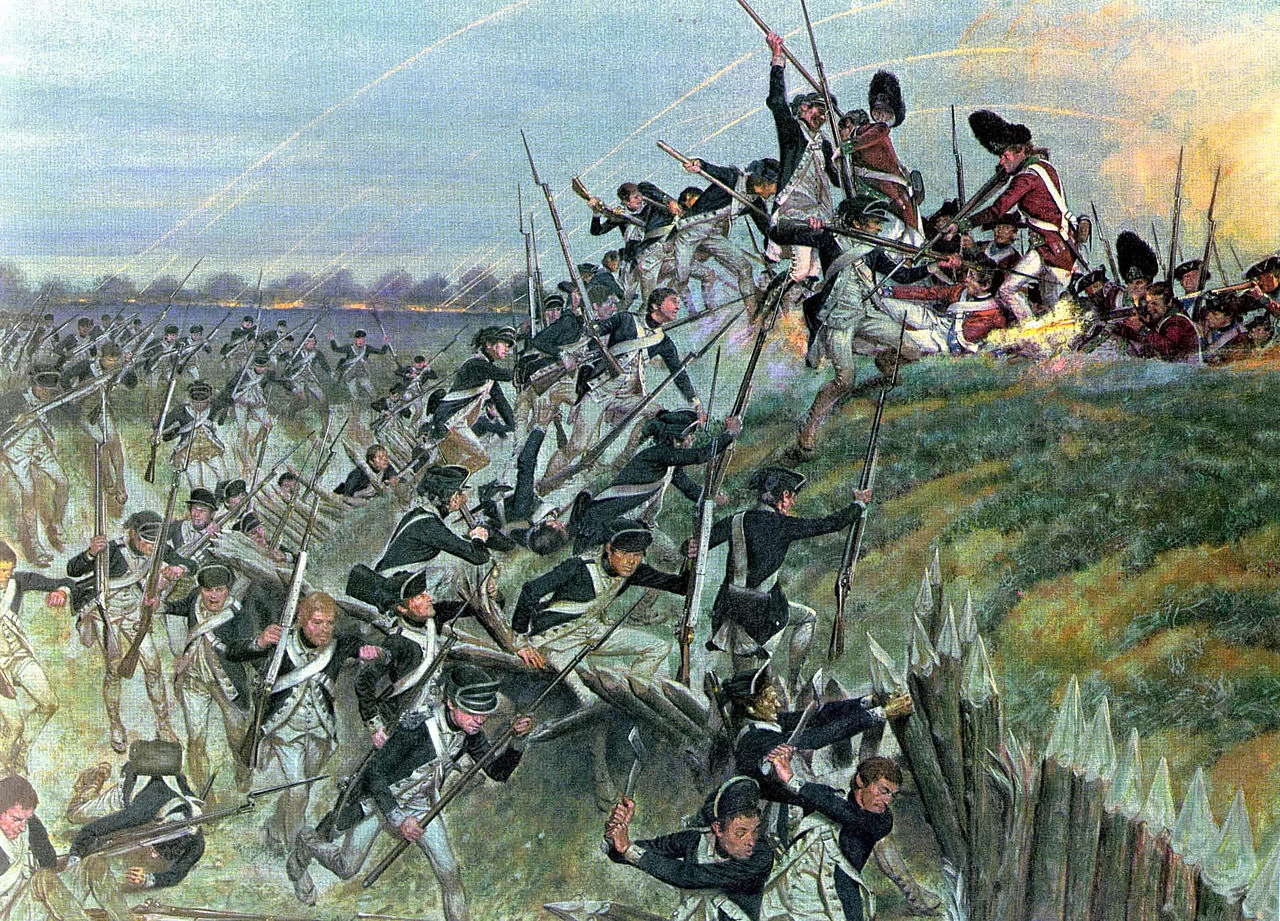
.jpg)
The 1st Infantry Battalion storms a British redoubt during the Siege of Yorktown (1781)
After training and equipping, the men of the 1st Marine Raider Regiment reentered the trenches towards the end of the Siege of Boston in the Boston Campaign. The first action they took was the Fortification of Dorchester Heights, where they moved to take the unoccupied hills with a view of Boston Harbor. In early March 1776, the marine raiders moved their heavy artillery to the heights and began fortifying them. Some days later, the infantry also dug in on the heights. The artillery began firing at the British positions, to little effect, and the enemy returned fire. Eventually, the earthworks had been completed, and the raiders prepared for a British attack. The 1st Infantry Battalion occupied the defenses, while the 2nd and 3rd Infantry Battalions planned an amphibious assault from Cambridge against the British positions in Boston. No attack came, however, and the British evacuated Boston later in the month. Following the victory at Boston, the raiders moved to defend New York City.
In May, the raiders began fortifying Brooklyn, moving their artillery into place and constructing earthworks. In July, British forces began landing on Staten Island, though the raiders did not move to oppose them. In late August, the raiders made contact with the British forces, beginning the Battle of Long Island. In late August 1776, a force of the raiders fought a skirmish with the enemy at the Red Lion Inn, but retreated up the Gowanus Road after a brief firefight. The 1st and 2nd Battalions were both in the vicinity, and moved to halt the British assault. A small force of the 2nd took positions on a small hill called Blokje Berg and opened fire on British forces from the hill and a nearby ditch, halting their advance on the Gowanus Road. To the southeast, the 1st moved to occupy a few hills to stop the enemy, including the highest, Battle Hill. Many of the hills had already been taken by the British forces, but the raiders attacked and pushed them off. As the raiders defended Battle Hill, they inflicted heavy casualties on the British. Eventually, the hill was outflanked, and the raiders were forced to retreat. The main enemy attack came at Battle Pass, where the 3rd Battalion, stationed at the pass, came under artillery fire. The Hessians attacked the raiders from the front, and the British attacked the rear. The raiders held the line for as long as they could, even resorting to hand to hand combat, but eventually retreated to Brooklyn Heights to save their forces. Meanwhile, the 2nd Battalion was still holding at the Vechte-Cortelyou House. The raiders successfully defended against the enemy for hours, but a reinforced British assault on the center, along with a Hessian attack on the left, overwhelmed them. With the British forces attacking at the rear, the raiders had to escape across Brouer's millpond on the Gowanus Creek. A small rearguard action stayed behind as the rest of the raiders retreated to Brooklyn Heights. They attacked a much more numerous British force near the Vechte-Cortelyou House twice, with both assaults failing but buying time for the main force. Eventually, the raiders fully retreated across the creek, and all battalions reformed the line in the trenches on the heights, protected by their siege guns. An expected British follow up attack on the heights did not come, and the regiment retreated across the East River at night to Manhattan, where they reformed their defenses. The first fighting of the New York and New Jersey Campaign had been a defeat, but the raiders had escaped to Manhattan relatively intact. In early September, the 1st and 3rd Battalions withdrew to Harlem while the 2nd remained to defend New York City. A small force of raiders had erected fortifications to defend the area, when the British attacked in the Landing at Kip's Bay. The British naval guns immediately opened fire on the raiders' position, and their fortifications were destroyed. The raiders shortly after retreated to Harlem due to lack of support, and the enemy occupied New York City. The regiment continued northeast and eventually stopped, digging in on Harlem Heights. The next day, a raider reconnaissance party discovered a British force in the area and fired on them, beginning the Battle of Harlem Heights. The raiders fought a skirmish with the enemy in the woods between two farms, eventually retreating to avoid being flanked. The raiders launched a counterattack to trap the British, with the 1st Battalion making a feint attack at the Hollow Way, an area of open ground. The 1st was engaged with the British all along the line, while the 2nd made a flanking attack. The raiders' attack forced back the British forces, who retreated to an open field. The raider battalions, all of which had been committed to the fighting, fired on the British at the field. The raiders pushed the British beyond their position at a fence towards the top of a hill. The fighting continued for hours until the raiders took the hill and pushed the British into a buckwheat field. The raiders continued to attack the British in the field and the surrounding hills until the enemy withdrew. They initially pursued, but withdrew themselves to avoid an enemy ambush. The raiders returned to their positions victorious. In October, the British forces made another landing at Throggs Neck with the objective of taking the bridge over Westchester Creek. The raiders deployed a small force of the 2nd Battalion which intercepted this movement, destroyed the bridge, and opened up a heavy small arms fire which forced the British to retreat. The enemy later attempted to ford the creek, but the raiders again forced them back, and the landing was aborted. Some days later, another enemy landing attempt was made northward at Pelham. At the Battle of Pell's Point, the raiders noticed the British and Hessian landing force and committed the 3rd Battalion to prepare an ambush. The raiders took cover behind the stone walls that lined the road inland from the beachhead. The raiders made contact with the enemy forces and immediately engaged them, briefly retreating and putting up rearguard actions that inflicted heavy casualties on the British. The enemy forces attacked again, this time with artillery. The raiders were relatively unaffected by the artillery and were able to stop the British infantry with heavy fire. Another strategic retreat by the raiders was attempted, and a rearguard action stopped the British and broke their lines several times. However, the raiders were heavily outnumbered, and they withdrew to the next defensive line behind a stone wall on the crest of a hill. They continued to engage the enemy forces before retreating again, crossing a bridge over the Hutchinson stream while raider artillery covered the withdrawal. Following the retreat, the regiment withdrew to White Plains, where they established a position. While the 3rd Battalion occupied the trenchline, the raiders of the 1st were sent to halt the enemy while the 2nd was sent to reinforce Chatterton Hill on the right flank. The 1st made contact with the enemy forces on the old York road, beginning the Battle of White Plains. The raiders engaged a group of Hessians at Hart's Corners, before retreating to avoid being flanked by the British forces. The raiders withdrew effectively across the Bronx River, with small rearguard actions supported by fire from Chatterton Hill. The 2nd Battalion repulsed a Hessian attack on the hill, forcing the enemy to halt their advance. After an enemy artillery barrage, the British and Hessians attacked the hill again, and all raider battalions down the line were engaged. The raiders stopped the British advance, but a reinforced push forced the raiders to make a fighting retreat. The raiders near the river were the first to withdraw, then the force on the left, and finally the raiders on Chatterton Hill withdrew. The raiders made their way to the hills at the end of October, establishing positions near North Castle. Following the captures of Fort Washington and Fort Lee in November, the raiders withdrew across the Hudson River into New Jersey, where the enemy advance forced a retreat across the Delaware River into Pennsylvania. By December, the raiders established positions near McKonkey's Ford on the river. Later in the month, a night crossing was planned, with the objective of attacking the Hessian garrison in Trenton, New Jersey. The raiders, with their equipment, successfully crossed the river under the cover of darkness. Upon moving out, they reached the Bear Tavern and crossed Jacobs Creek, moving next to Birmingham, where the 2nd Battalion split away from the rest of the regiment to conduct a flanking attack. The raiders made engaged a group of Hessians at a cooper shop on Pennington Road, while also blocking the road to Princeton and attacking the Hessian outpost there, beginning the Battle of Trenton. The raiders pursued the enemy, pushing them back farther into the town and securing the outposts. The raiders cut off the escape route to Princeton while the artillery formed at the head of King and Queen streets. They crossed over the Assunpink Creek and moved farther into Trenton via the River Road. Meanwhile, the 2nd Battalion was approaching from the north and clearing the enemy outposts there. The raiders of the 1st and 3rd attacked the Hessians at the Hermitage in the town, pushing them back to their barracks and routing them after a short firefight. The remainder of the guns of the 1st Artillery Battalion commenced firing across the Delaware, destroying the enemy positions. A Hessian counterattack against King and Queen streets were stopped by the raiders' small arms and artillery. The raiders continued pushing back the enemy, capturing their artillery and inflicting heavy casualties on another counterattack. The raiders pushed the Hessians into an orchard and captured the surviving enemy. After securing the town, the raiders crossed back over the Delaware River into Pennsylvania. Some days later, a British counterattack in the area was expected, and the raiders once more moved to Trenton, where they established defensive positions near the Assunpink Creek. In January 1777, the British assault came, beginning the Battle of the Assunpink Creek. When the British attacked, the raiders stopped them with rifle fire at Five Mile Run, later falling back and regrouping in the woods behind the south bank of Shabakunk Creek. They repulsed a British advance over the bridge before retreating again, providing delaying actions to the enemy while moving to their next defensive line, the ravine known as Stockton Hollow. The raiders there came under British artillery fire and fell back towards Trenton, delaying the enemy all the way. When the main British attack came over the creek bridge, the raiders stopped several advances with small arms and artillery fire, inflicting heavy casualties on the British and pushing them back. After firing shells into the British lines, the raiders regrouped for another attack, moving on the Quaker Bridge Road through Hamilton Township towards Princeton to attack the small British garrison there. They followed the Stony Brook stream and later destroyed the bridge over it, moving along a small path to the right of the Post Road into the town. Shortly after, the 1st Battalion, who had just destroyed the bridge, was engaged by a British force in an orchard near the town, marking the first fighting in the Battle of Princeton. The raiders held their ground and exchanged fire with the British, but an enemy attack pushed them a ways back. Upon the raiders' retreat, the artillery opened fire and halted the British advance, allowing the reinforced raiders to counterattack the enemy. With support from artillery, the raiders charged the British and forced them to retreat in disorder, chasing them towards the Post Road and defeating a cavalry attack. The raiders continued the assault, following the British to their new position on a ravine outside of town. They stopped a British flanking attack and scaled the ravine, driving the enemy back to their defenses. After a brief firefight, the enemy retreated into town, where they took shelter in the Nassau Hall. After an artillery barrage, the British surrendered and the raiders took the Nassau Hall. After entering and looting Princeton, the raiders moved to Somerset Courthouse, then Pluckemin, and finally Morristown, where they set up temporary headquarters.
The 1st and 3rd Infantry battalions and their artillery, still in New York, were posted at Fort Ticonderoga and Fort Stanwix, respectively. At the Siege of Fort Ticonderoga, the raiders skirmished with the British but retreated due to the indefensibility of their position. While on the road to Castleton, the British forces, then in pursuit, caught up with the raiders at the Battle of Hubbardton. They gave ground gradually, inflicting heavy losses on the enemy before retreating to catch up with the rest of the American force. Only Fort Stanwix, housing along with its garrison the 3rd Battalion, continued to hold. Continental efforts to break the siege were largely futile, but the garrison held out until they were relieved. The 1st and 3rd Battalions consolidated and entrenched with General Gates' Army. During the Battles of Saratoga, the raiders saw heavy fighting. During the action at Freeman's Farm, the raiders drove back several British attacks, but were forced to cede the field to the British. In the second action at Bemis Heights, the raiders were attacked by a large force of British regulars, Canadians, and Native Americans. The raiders completely routed the enemy and counterattacked in force towards the British line which was defended by two redoubts. The 1st Battalion attacked and captured one, and the 3rd Battalion forced the British off of the second. After Saratoga, the raiders in New York would see a brief respite.
The 2nd Infantry Battalion was then ordered to take part in the Philadelphia Campaign. At the Battle of Short Hills, they were attacked by a large British force and retreated, skirmishing with the enemy to delay them. Enemy speriority in numbers and artillery prevented the raiders from holding their ground, and they retreated even further. At the Battle of Brandywine, the raiders met the enemy and delayed their advance until they took up positions around Chadd's Ford. Thouugh the raiders initially held fast against the assault, they were eventually pushed back, fighting a rearguard action to allow the rest of the American troops to escape destruction. The raiders faced a similar predicament at the Battle of the Clouds, where they held the British back and bought enough time for General Washington's army to escape. When ordered to attack the enemy at the Battle of Germantown, they attempted to storm the enemy positions at the Cliveden house but were forced back every time. In their attacks on the main British and Hessian lines, they were able to take much ground but were pushed back by counterattacks. Later in the month, they reinforced Fort Mercer, which was then attacked by a large Hessian force at the Battle of Red Bank. The raiders held the Hessians back with small arms and artillery fire, counterattacking every time the enemy got a fooothold in the fort. The raiders in their defensive action not only held the fort from a far superior enemy force, but provided an important propaganda victory for the patriot cause. The regiment would see more fighting when they encountered the British again at the Battle of White Marsh. They skirmished with the enemy Chestnut and Edge Hills, but the lack of any decisive moves by either side led to an indecisive outcome. After the actions in Pennsylvania, the battered 2nd Infantry Battalion camped with Washington at Valley Forge.The battalion would again see victory before the end of the war.
All battalions of the regiment successfully consolidated with General Clinton with orders to reinforce New York City, when they were attacked at the Battle of Monmouth in the last major battle in the northern theatre. The 3rd Battalion took up positions behind the West Ravine and inflicted heavy casualties on the British, driving them back. The other raiders were hit hard in the center, but the raiders enfiladed the enemy and prevented any kind of advance. Though a largely indecisive engagement, the regiment performed commendably, with two raider companies of the 1st and 2nd Battalions routing an entire British battalion. Although this was the last northern battle, it would not be the last for the regiment. After being granted leave, the regiment was ordered south in 1780. The marines arrived just in time to take part in the Siege of Yorktown. After a massive artillery barrage, the raiders overran the British trenches, and stormed and captured redoubt 10. After the capture of the fort, the 1st Artillery Battalion moved up and continuing to hammer away at the British defenses until the enemy agreed to surrender. After General Cornwallis' surrender, which the regiment was present for, combat operations largely ceased.
By the end of the war in 1783, the regiment neared about 4,000 strong. They suffered casualties of 476 men killed, 1,210 wounded, and 341 taken prisoner. They claimed 784 enemy killed, 1,921 wounded, and took 403 prisoners.
In 1784, the 1st Marine Raider Regiment established its headquarters in Massachusetts.
Shays' Rebellion (1786-1787)[]
In response to the closing of courts and at the behest of the state government of Massachusetts, the 1st Marine Raider Regiment was called to order to stop the ongoing rebellion. In late September 1786, the raiders assembled a force which protected the Springfield courthouse, which had been threatened by the rebels. They saw a standoff with the rebels, but no fighting ensued. The raiders at the courthouse were reinforced and withdrew to the Springfield Armory, which was to be the target of a rebel attack. In response to the escalation of the rebellion, the raiders formed another, larger force, which were stationed in Worcester in late January 1787. When the rebels attacked the armory, the raiders, after firing warning shots, fired grape shot through artillery pieces and drove off the enemy. Immediately following the engagement at the armory, the raiders at Worcester began a pursuit of the fleeing rebel forces. On their way to the rebel camp at Petersham, the raiders stopped at Pelham in early February. They advanced on the camp at Petersham shortly after, scattering the rebels and taking most of them prisoner. After the end of large-scale rebellion, most of the raiders departed back to their bases. However, a small number remained to garrison Pittsfield. When a force of rebels crossed the border at New Lebanon, New York, and raided Stockbridge, the raiders were dispatched to meet the enemy. They caught up with the rebels near Sheffield, engaging and defeating them before being reinforced. The rebellion fully ended shortly after.
Northwest Indian War (1785-1795)[]
In late 1789, the 1st Marine Raider Regiment was deployed to the new Northwest Territory to suppress an uprising of the Native American Western Confederacy. The marine raiders were assigned to the Harmar Campaign, an expedition into the lands of the Shawnee and Miami tribes. The campaign, which began in October 1790, saw the raiders advance north along the Great Miami River, before moving to the village of Kekionga for a planned attack on an Indian force there. When no enemies were found, the raiders left the village. Other nearby villages were also found deserted. Later, a small force of the raiders was assigned to a scouting party to attack another village. The Battle of Heller's Corner began when the raiders pursued a fleeing Indian to a swamp, where they were surrounded and attacked by the enemy. The raiders held their ground against the Indians, but were forced to retreat to avoid destruction. The next day, despite the defeat of another American force, the raiders pulled back south of Kekionga with the rest of the army. The raiders then organized another force to attack the Indians again at Kekionga at the Battle of the Pumpkin Fields. The raiders attempted to flank the Indians, who attacked them first. The raiders again held off the enemy attacks, even inflicting many casualties in many instances, but had to retreat again from the larger Indian force. The expedition was a great defeat, but the raiders remained near their base of combat operations in modern-day Indiana. In January, the raiders moved to relieve the settlers who had been attacked at the Siege of Dunlap's Station, but the Indians retreated before the raiders arrived.
Soon after, an expedition was conceived with the objective of taking Indian villages along the Wabash River and its tributaries. The 2nd Battalion was selected for the offensive and departed Fort Washington in May, beginning the Blackberry Campaign. In June, the raiders reached a prairie near the settlement of Ouiatenon, and their position was discovered by the enemy. The Indians in the village fled across the Wabash, and the raiders were unable to pursue due to heavy enemy fire and the deepness of the river. The raiders sent two forces to find a place to ford the river. The first could not find any, but did find and kill a band of Indian warriors. The second found a crossing point, and conducted a successful raid against the Indians on the other side. The next day, the raiders advanced towards Kethtippecannunk, fought a brief firefight with the enemy, and burned the uninhabited village. The expedition ended in a victory, and the raiders crossed the White River while returning to Fort Washington.
Later in 1791, the raiders were attached to another prospective expedition against the Indians, with the 2nd Battalion conducting a smaller raid during the offensive. However, delays in the preparations meant that the 2nd would begin their attack first. In August, the raiders advanced, and came into contact with the Indians in the Battle of Kenapacomaqua. After defeating the enemy, the raiders launched raids against Ouiatenon and other villages. They returned in late August. The main part of the offensive departed in October, occasionally making contact and fighting skirmishes with the Indians. In November, the raiders established their camp on a large hill overlooking the headwaters of the Wabash River. In the morning, the Indians attacked, beginning St. Clair's Defeat, or the Battle of the Wabash. The raiders, initially surprised, retreated across a stream and directed fire at the Indians, forcing them back. However, they were outflanked and retreated. The raider artillery was forced to cease firing after coming under heavy enemy sniper fire. The raiders attempted to counterattack, but these attempts were unsuccessful. One final charge by the raiders got through the Indian lines, and the raiders retreated to Fort Jefferson. As Fort Jefferson was inadequate for the raiders, they retreated in turn to Fort Washington, badly defeated.
Another offensive was launched, this time better conceived, planned, and supplied. In 1793, the raiders marched west, where they assisted in erecting Fort Recovery, a forward base in the area. In June 1794, a Native force of the Western Confederacy attacked the fort, beginning the Siege of Fort Recovery. The raiders defeated the Indians in the ensuing fight with rifle and artillery fire, which weakened the enemy forces in the area. The raiders advanced further west, where they encountered a large force of Indians defending the Maumee River. The raiders attacked in August, at the Battle of Fallen Timbers. They pushed back the Indians with bayonets before outflanking and routing them. The raiders captured enemy supplies before returning to their base of operations. In 1796, the raiders accepted the surrender of all British forts which had been supplying the Indians, including Fort Niagara and Fort Miami. They also moved into Kekionga, the original objective of the war.
The 1st Marine Raider Regiment had lost 21 killed, 62 wounded, and 3 as prisoners of war. They killed 85 of the enemy, wounded 87, and captured 29 prisoners.
Whiskey Rebellion (1791-1795)[]
The 1st Marine Raider Regiment was called for service again during the Whiskey Rebellion, beginning with the federal response in September 1794. The raiders were called into Carlisle, Pennsylvania, where a liberty pole had been raised. They arrested the pole-raisers and continued on their way. The raiders marched with the federal army across Western Pennsylvania in October, conducting arrests of suspected rebels but seeing no combat. They arrived in Philadelphia in December, with the rebellion collapsing shortly after.
Quasi-War (1798-1800)[]
In 1798, the 1st Marine Raider Regiment was placed on high alert after the XYZ affair and the beginning of naval combat against revolutionary France. The raiders were to prepare for possible French invasion and a full-scale war with France. Plans were made to capture Spanish North American colonies, or to march south to Virginia and engage the French forces there. However, no French invasion materialized and the war was mostly fought at sea until its conclusion in 1800.
War of 1812 (1812-1815)[]
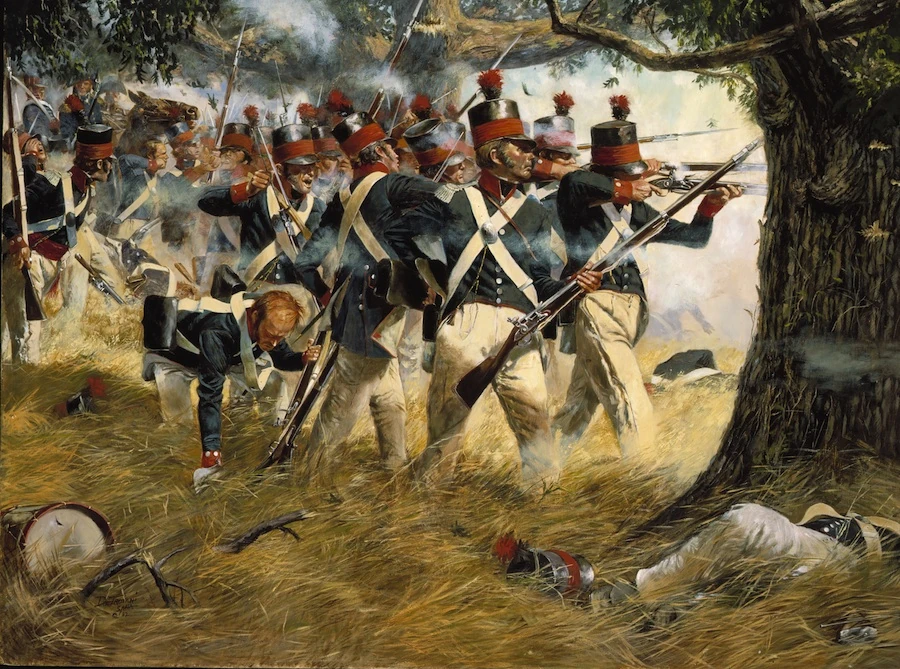
The 2nd Infantry Battalion repulses a British attack at the Battle of Plattsburgh
In 1812, a declaration of war passed, and the United States was once again at war with Great Britain. The 1st Marine Raider Regiment was immediately called to order for the planned invasion of Canada, and numbers swelled to around 1,500 men from a stagnant 800. The marine raiders were far better trained and equipped than the state militias and saw far more success in Canada. They did not take part in the ill-fated invasion of Sandwich, and thus evaded British capture at Detroit. The regiment contributed the 1st and 3rd Infantry Battalions, as well as companies of the 1st Artillery Battalion. The 2nd Infantry Battalion and the rest of the artillery remained in New York, to defend against a possible counteroffensive. The first action of the war in Canada the regiment participated in was the Battle of Queenston Heights in October 1812, kicking off the Niagara Campaign. The raiders crossed the Niagara River, making contact with the British forces and driving them back to the village. They came under fire from enemy artillery immediately and took the heights by the river, establishing a temporary defense there. Though a British attack initially pushed them back, the raiders held firm and inflicted heavy losses on the enemy, forcing them to retreat. When the British launched a major counterattack on the heights, the raiders were forced to retreat to avoid capture. They later fought at the Battle of Frenchman's Creek, the third attempt at an invasion of Canada. The raiders landed at the creek in two places. One group pushed to the strategically important Red House and spiked the guns there. The second group landed and pushed back the British, before holding their ground and repelling a Canadian counterattack. With the guns spiked, the raiders departed back to New York. The marine raiders played a key role in the successful amphibious assault at the Battle of Fort George in May 1813. They landed at the mouth of the Niagara and drove back the British forces, defeating several enemy counterattacks. As they pushed to the fort itself, the raiders captured it intact and without much of a fight. But the British forces in the fort had escaped capture and had rallied for a night attack on the American positions in June 1813. At the Battle of Stoney Creek, the raiders held off several British advances with small arms and artillery from the high ground. However, the American line collapsed and the raiders were forced to retreat to avoid capture yet again. After a short respite, the raiders again went into action in the Raid on Port Dover in May 1814. The raiders landed near the port and drove off a group of Canadian militia before moving forward and securing the village of Dover with no enemy opposition. In July, the raiders participated in another invasion of Upper Canada, this time at the Capture of Fort Erie. The raiders landed at night north of the fort and advanced towards it, while the fort's guns fired a few shots at them before the British surrendered the strategically important Fort Erie without a fight. They later saw a greater action the next day in the Battle of Chippawa, where the raiders took positions to check a British advance. Raider artillery and infantry inflicted heavy casualties on the advancing enemy forces, before outflanking the British and forcing the enemy to surrender. Pushing on to the Battle of Lundy's Lane later that month, the raiders attacked the British defenses. Though they suffered heavy casualties from enemy artillery, they managed to catch the British and Canadian forces in disarray and drove them back. On the right flank, the raiders stormed and took a British battery. The British forces made a counterattack in the center, which the the raiders resisted tenaciously before attacking the enemy, an action which failed. After defeating a third British counterattack, the raiders withdrew along with the rest of the American forces to Fort Erie, badly mauled from close quarters fighting. During the Siege of Fort Erie in August 1814, the raiders marched to defend the strategically important Snake Hill under British artillery fire. They defended the battery against a multitude of assaults by enemy forces, including inflicting severe losses on the last attack with artillery support from the fort. The raiders fell back to the fort and held off the enemy from the inside, killing large numbers of the enemy for few losses to themselves. In September, the raiders prepared to counterattack. They assaulted a British battery, but bad weather prevented the attack from continuing. Later in the month, they outflanked another battery and took the British by surprise, spiking the guns before retreating to the fort. In late September, the enemy lifted the siege, and the marine raiders evacuated the fort to return to New York.
The 2nd Battalion, 1st Marine Raiders, which had been stationed in New York, had not yet seen much action. At the Battle of Sacket's Harbor in July 1812, the raiders were alerted and called to the fort but did not engage in the naval engagement, which turned out to be a victory. They saw more action at the Second Battle of Sacket's Harbor in May 1813, when they split their forces to defend Forts Tompkins and Volunteer. Fort Tompkins was attacked by a British landing force, which the raiders defeated over the course of the battle. In July, a British force had looted a small New York town, and the raiders were tasked with cutting them off. In the Raid on Black Rock, the raiders ambushed the British forces on their way back to Canada and inflicted heavy casualties, though the enemy was still able to escape. In December 1813, the raiders were called into action at the Battle of Buffalo, when a British attack overwhelmed the American militia. The raiders fought tenaciously to defend the town, but they retreated when the American line broke. At the Battle of Fort Oswego in May 1814, the raiders were redeployed to the fort when a British landing force arrived to take it. The raiders fought to hold the walls of the fort and fell back into the fort itself, but were forced to withdraw due to enemy numbers. In September, the raiders in New York saw their greatest action yet. The British attempted a major invasion of the United States, which had so far failed at Baltimore. This would culminate in the Battle of Plattsburgh. The raiders first met the enemy at Chazy, where the raiders skirmished the enemy before falling back. As the British advanced, the raiders repulsed all further enemy attacks until the British retreated, following their loss of the naval battle. After Plattsburgh, the Treaty of Ghent had been signed and the War of 1812 was officially over. All battalions consolidated in New York once the war was over, before returning to their headquarters in Massachusetts. The regiment lost 213 killed, 629 wounded, and 106 men as prisoners. They claimed 531 enemy killed, 1,290 wounded, and captured 279 prisoners.
Mexican-American War (1846-1848)[]
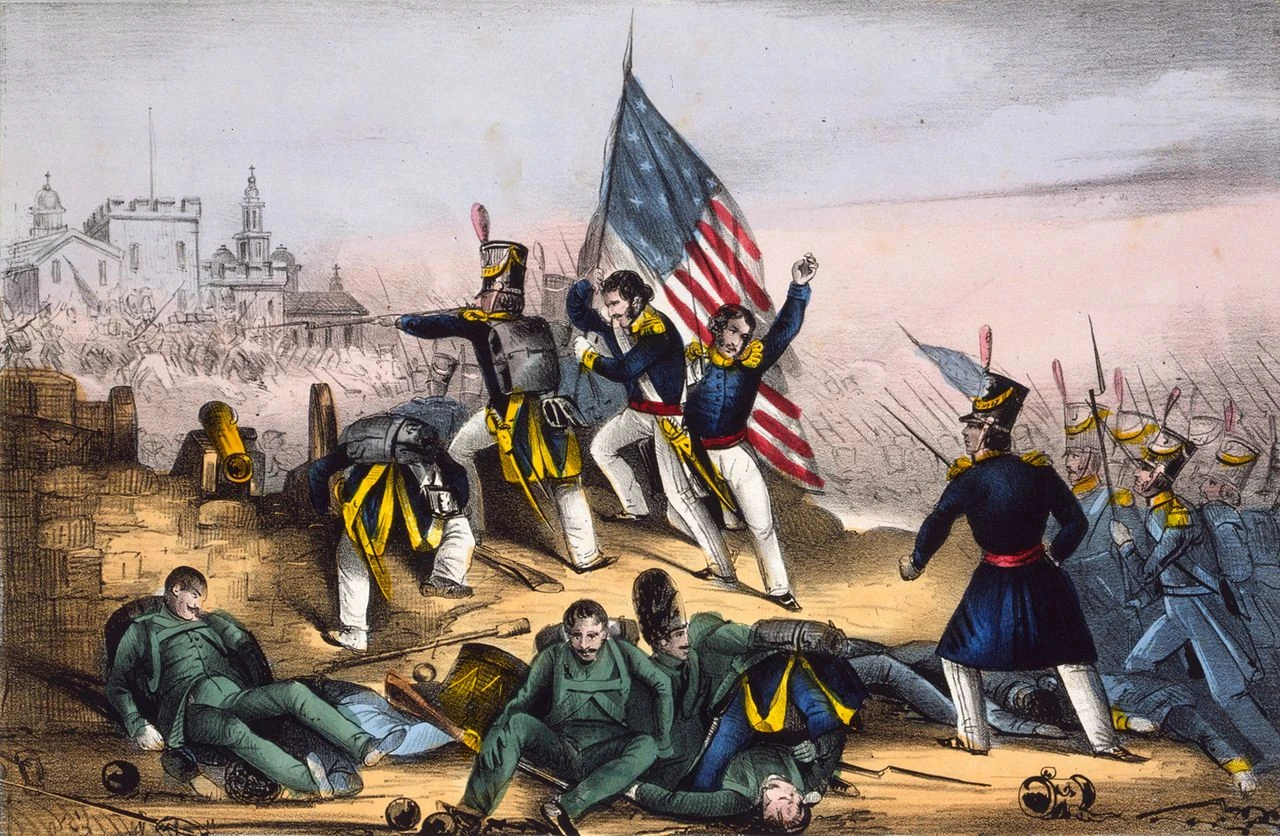
The entire 1st Marine Raider Regiment assaults Chapultepec Castle during the Battle of Mexico City (1847).
When Mexico declared war on the United States, the 1st Marine Raider Regiment was immediately called into action. All battalions of the regiment had been deployed to southern Texas before the war due to tensions rising on both sides of the Rio Grande. They saw their first action in the Texas Campaign at the Battle of Palo Alto in May 1846, in which the raider artillery inflicted heavy damage on Mexican batteries before the infantry repulsed two attacks by enemy cavalry. The raiders advanced to Brownsville, Texas, where they attacked the Mexican force entrenched along a riverbed at the Battle of Resaca de la Palma later in the month. The raiders assaulted and secured an enemy battery and drove the Mexican forces across the Rio Grande. The next objective for the marine raiders was Mexico City itself.
The Mexico City Campaign began for the raiders in September, when they crossed the border into Mexico and were ordered to take the city of Monterrey. In the Battle of Monterrey, the raiders marched through the plain in front of the city under fire from Mexican artillery. The 1st Battalion attacked the city from the east and took the tannery, while the 2nd and 3rd Battalions attacked from the west and took Fort Libertad on Independencia. Both raider forces pushed towards the center of the city through urban house-to-house combat and fully captured the city by the end of the month. In February 1847, the raiders took positions in the Puerto de la Angostura, where a much larger Mexican force attacked them in the Battle of Buena Vista. The raider battalions were organized from the right, center, and left positions. Though they wavered on the left and right flanks, the raiders held the field and repulsed the enemy over the course of the day. In March, the regiment marched to Tampico, where they departed to make a seaborne assault on Vera Cruz. The raiders landed at Collado Beach and moved inland unopposed. The raiders moved north, repulsing Mexican cavalry counterattacks, and enveloped the city in the Siege of Veracruz. Though they were under threat from Mexican artillery, the raiders' guns returned fire and the enemy surrendered the garrison in Veracruz at the end of the month. As the raiders advanced towards Mexico city, they discovered a heavily defended enemy position in El Telegrafo at the Battle of Cerro Gordo. In April 1847, the raiders attacked Atalaya Hill and took it, later attacking up the front of El Telegrafo itself and routing the Mexicans entirely. The raiders continued towards the capital, encountering a sizable Mexican force in August at the Battle of Contreras. The raiders cleared the enemy front before coming under enemy artillery fire, returning fire and destroying the batteries. They attacked and took San Geronimo before capturing the Mexican camp, driving off the enemy army. Fighting continued the next day at the Battle of Churubusco, where the raiders encountered the last Mexican resistance defending the capital city. The raiders attacked the heavily entrenched Mexican force, stumbling at first but later taking the tete-de-pont on the south bank of the river and eventually the well-defended Convent of San Mateo which was the centerpoint of the enemy force, accepting its surrender. Finally, the path to the capital became open and the Battle for Mexico City began in September 1847. The raiders were tasked with capturing a strategically important mill on the outskirts of the city. In the Battle of Molino del Rey, the raiders attacked the mill and the Casa Mata, but were forced back by a Mexican counterattack. They pushed forward and took the mill, but the Casa Mata exploded. The last major obstacle to Mexico city itself was the fortified Chapultepec Castle. The Battle of Chapultepec began in September, with the entire force of the regiment on the attack. After an barrage by the raiders’ 1st Artillery Battalion, the raiders assaulted with bayonets fixed. Moving quickly, they captured the castle and drove the enemy deeper into the city. Later, the raiders split their forces, as the 1st Battalion attacked and pushed through the Belen Gate, and the 2nd and 3rd Battalions moved down the causeway and took the San Cosme Gate. With Chapultepec Castle and the gates taken, the marine raiders marched into the undefended Mexico City and witnessed the Stars and Stripes being hoisted over the National Palace. The raiders remained in Mexico City until February 1848, mopping up enemy stragglers and restoring order. Shortly after, the Treaty of Guadalupe Hidalgo was ratified and the marine raiders were withdrawn from Mexico.
During the course of the war, the 1st Marine Raider Regiment suffered casualties of 412 killed and 978 wounded, with 130 taken prisoner. They inflicted upon the enemy 1,011 killed, 1,803 wounded, and took 674 prisoners.
American Civil War (1861-1865)[]
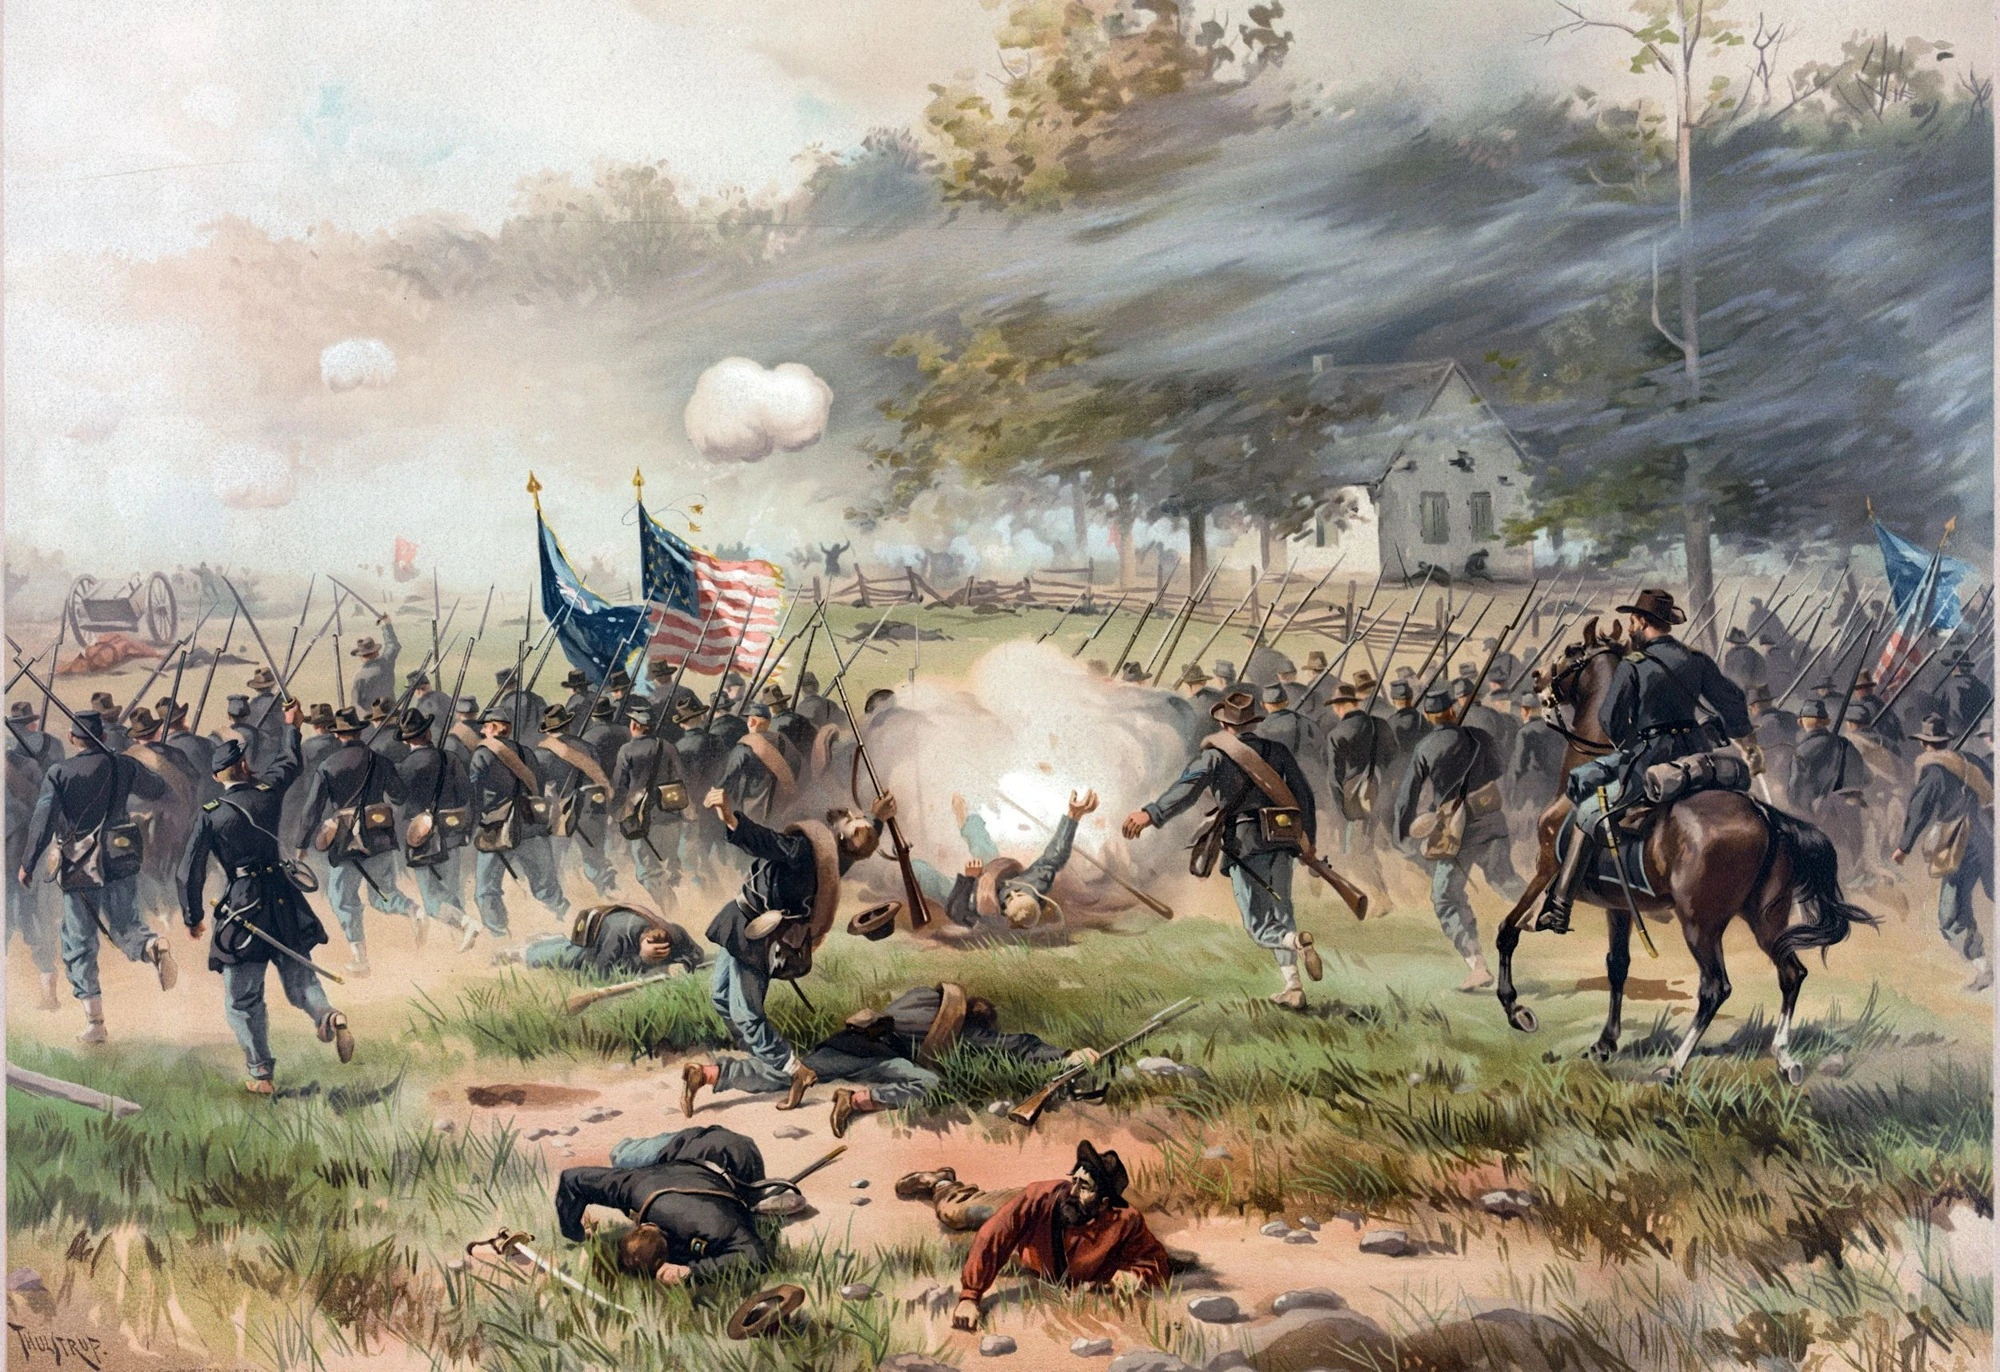

The 3rd Infantry Battalion attacks the Confederate forces at the Battle of Antietam (1862)
The 1st Marine Raider Regiment was called to order in April 1861, immediately after the bombing of Fort Sumter, as a part of the president's initial call for volunteers to fight in the Eastern Theater. The raiders began combat operations in the Western Virginia Campaign in May, beginning with the Battle of Philippi. The raiders marched south, assaulting the Confederate camp with an artillery barrage. When the raider infantry attacked, the enemy forces routed and the raiders had achieved a minor tactical victory. Operations in West Virginia, however, were short lived, as the raiders were needed in the east, where the Manassas Campaign was underway. The raiders were ordered to probe the Bull Run creek and find a crossing point. In July, they met a larger confederate force in the Battle of Blackburn's Ford. The raiders came under heavy fire and returned it, but were unable to break the enemy and retreated. The main attack of the campaign began three days later, in the First Battle of Bull Run. The raiders advanced on the left flank and forded the river before driving the Confederates from Matthews Hill. After an artillery barrage, the raiders attacked Henry House Hill but failed to dislodge the enemy. A Confederate charge pushed the raiders back under weight of numbers, but they rallied and held firm against the counterattack. They gave ground gradually and eventually formed a last stand near the intersection of the turnpike and Manassas-Sudley Road. They held their ground briefly before retreating back to Washington DC, restoring order in the city filled with panicked Union recruits. The raiders helped individual soldiers return to their companies. The marine raiders had failed in their larger objectives, but had impressed the Union command enough with their organization and fighting skill. The regiment recuperated and was ready for combat almost immediately, but would not see any action again until the next year.
In 1862, the regiment split its forces. The 2nd Infantry Battalion with artillery was sent to the Shenandoah Valley to fight in the Valley Campaign. They came in contact with the enemy in March 1862 at the First Battle of Kernstown, when a Confederate force attacked the raiders' batteries on Pritchard Hill, but the raider artillery used canister shot to effectively repulse them. The raiders then counterattacked the Confederates, driving them back. In May at the Battle of McDowell, the raiders attacked a large enemy position on Sitlington's Hill. Though they inflicted heavy casualties on the enemy, the raiders were outnumbered and forced to retreat. The battalion retreated to the Valley Pike to Winchester, where the raiders were attacked at the First Battle of Winchester. They repulsed the first Confederate attack, but retreated to Bower's Hill where the artillery was fighting a losing battle against the numerically superior enemy batteries. As the Confederate infantry attacked the hill, the raiders resisted tenaciously but were gradually driven back, leading to a retreat to Martinsburg to avoid capture. Marching further south, the raiders set up defenses at the Lewiston Coaling, where, at the Battle of Port Republic, their artillery soon pushed back the Confederates and did heavy damage to their batteries. As Confederate infantry advanced towards the Coaling, the raiders inflicted heavy casualties on them with small arms. The raiders were moved right, where they counterattacked the enemy and drove them back a significant distance. Nevertheless, enemy reinforcements forced a retreat, and the Confederates took the Coaling, making the defenses on the Lewiston Road untenable. The 2nd Battalion had failed in their objectives and the Confederates were left free to reinforce the Peninsula Campaign.
Meanwhile, the 1st and 3rd Infantry Battalions and their artillery saw heavy involvement in the Peninsula Campaign. The raiders sailed onto the peninsula by ship from Alexandria, marching to and laying siege to a Confederate force in April 1862, in the Siege of Yorktown. The raiders attacked and easily pushed back the Confederates, but were held up by heavy resistance from the Warwick Line, after which the raiders fell back and let their artillery do most of the work. Later in the month, they crossed the river near Dam Number One and routed the enemy, but were eventually pushed back themselves by Confederate numerical superiority. The battalions of the raiders on the peninsula consolidated and laid siege to the city, but by then the enemy forces had fled and the siege was broken off. The 3rd Infantry Battalion was ordered to board ships again and assault the Confederate positions on the York River. The 1st Infantry Battalion caught up with the enemy at the Battle of Williamsburg in May, which began as the raiders attacked the Confederates at Fort Magruder after initially being driven back by entrenched enemy forces, the raiders defended against a Confederate counterattack. The raider artillery had been pounding the Confederate left, which was entrenched in a defensive position around the College of William and Mary. The Confederates attacked, but the raiders repulsed them. The 1st Battalion had won the battle, but failed to cut off the enemy retreat and allowed them to escape. Meanwhile, the 3rd Infantry Battalion was making an amphibious landing on the York River. At the Battle of Eltham's Landing, they attacked several Confederate brigades hidden in the woods. The raiders initially retreated, but resumed the advance after the enemy dispersed. The raiders consolidated and moved north to deal with a Confederate force on the extent of the Union right flank in late May 1862 at the Battle of Hanover Court House. The raiders encountered an enemy force at Kinney's Farm which they proceeded to push in the direction of the courthouse itself. When the Confederates attacked, the raiders held off the enemy and counterattacked, routing them. The last part of the peninsula offensive was the Battle of Seven Pines, where the raiders defended against an initial Confederate attack near seven pines. Though they fell back, the raiders held their ground against the enemy. Another Confederate force attacked on the flank near the Fair Oaks train station, but the raiders held them off despite being heavily outnumbered. As Union reinforcements joined the battle, the Confederate attack began to falter and the raiders were victorious over renewed enemy offensive actions. After Hanover, the culmination of the campaign became known as the Seven Days Battles and the marine raiders, along with the newly arrived 2nd Battalion from the Shenandoah Valley, saw heavy action during the Confederate counteroffensive. In late June, after a resting period, the raiders went on the attack in the Battle of Oak Grove. The three raider battalions on the peninsula were arrayed at different positions on the federal line and advanced quickly, though they were held up by a time by Confederate resistance near White Oak Swamp. When the advance slowed, the enemy forces counterattacked, and the raiders were forced to retreat. The raiders returned to their defensive positions before being ordered to renew the assault, which they did with great success. However, the ground that had been taken from the enemy wasn't much, and this battle would end the last offensive action they would undertake on the peninsula. The Battle of Beaver Dam Creek began the next day, when the Confederate forces attacked the raiders, who were entrenched in defensive positions around Ellerson's Mill. The raiders, supported by machine guns, mortars, and artillery, inflicted heavy casualties on the Confederates and defeated all subsequent attacks. The raiders then fell back to more defensible positions along Boatswain's Creek, where they were attacked again at the Battle of Gaines's Mill. The raiders again stopped all Confederate pushes against the Union line, driving them back with heavy losses. The Confederates attacked again, and though the raiders put up fierce resistance, particularly at the McGehee house on the right flank, the Union line finally broke and the raiders retreated across the Chickahominy River. While the larger battle was being fought, a small number of raiders, primarily of the 3rd Battalion, saw other action at the Battle of Garnett's and Golding's Farm. The raiders had placed their artillery on Garnett's Hill when Confederate artillery opened fire. The raider batteries opened fire and defeated the enemy's guns, just before the Confederate infantry attacked the line at the Garnett Farm. The raiders repulsed the enemy and did the same at the Golding House the next day. The heavy fighting at both battles initiated a retreat further down the peninsula to the James river, when the Battle of Savage's Station began. The Union rearguard, which included the 1st Marine Raider Regiment, was attacked near Savage's Station, the fighting at which was prolonged and ended in a bloody stalemate. The next day at the Battle of Glendale, the raiders were attacked again, this time repelling the enemy from Frayser's Farm on the center as well as the right and left flank. The retreat to the James River continued, but the Confederate Army would attack the raiders one more time. The last stop on the path to the river was Malvern Hill, where the raiders entrenched and placed all of their artillery. The Battle of Malvern Hill began in July 1862, with an artillery duel in which the marine raider batteries silenced Confederate artillery. When the enemy infantry attacked, the raiders pinned them down and defeated a second charge by the Confederates. A third attack was forced back by the raiders, who inflicted heavy casualties on all subsequent enemy assaults on the hill. Despite having defeated the Confederates, the raiders were forced to evacuated to the James and left the peninsula via Harrison's Landing. The raiders were withdrawn to Washington DC, with the campaign ending in a defeat.
Following the defeats, the regiment was redeployed as part of the Northern Virginia Campaign. They fought the Battle of Cedar Mountain in August 1862, an attempt to advance into central Virginia. The raiders launched an artillery barrage before the infantry assaulted up the mountain with battalions arrayed from right to left on the line. The Confederates broke easily in the initial attack, but a counterattack caught the raiders off guard and they were forced to pull back. The raiders counterattacked and drove off the enemy force, but the Confederates were still advancing and the Union line collapsed, leading to a full retreat. Later in the month, the raiders were repositioned in the line on the Rappahannock River, where a they fought a series of skirmishes at Waterloo Bridge, Lee Springs, Freeman's Ford, and Sulphur Springs, collectively know as the First Battle of Rappahannock Station. Later, during the Manassas Station Operations, the raiders attempted to attack a Confederate advance near Manassas Junction, but were forced to retreat. The raiders then moved to the old battleground near Manassas, where the Second Battle of Bull Run would be fought. The raiders attacked the Confederates in the woods near Brawner's farm, where they fought an indecisive engagement. The raiders attacked the Confederate forces defending Stony Ridge in full strength the next day, assaulting on all flanks from the Manassas-Sudley Road. The assaults by the raiders were driven back and followed up by enemy counterattacks, which created a bloody stalemate that lasted all day. The next day, the raiders followed up on a dual movement against the Confederate left and right on the turnpike. Though artillery caused them damage, they succeeded in initially breaking the enemy line. However, the attack lost momentum and the Confederates counterattacked, in a way much similar to the first battle. Many of the raiders consolidated on Chinn Ridge and forced back several enemy assaults, intending to prevent the strategically important Henry House Hill from falling into enemy hands. Outnumbered and almost completely surrounded on Chinn Ridge, the raiders inflicted heavy casualties on the Confederates, but the enemy attack was too powerful and the raiders retreated from the hill. They fell back to Henry House Hill and defended it against further attacks, but they were soon ordered to withdraw to Centreville. This campaign was another strategic Union failure, and the Confederates would soon cross into northern territory.
The Maryland Campaign began in September 1862, when the Confederate Army invaded Union territory. The raiders participated in an attack against the enemy forces in the Battle of South Mountain, where the enemy was concentrated in three passes. In the southern pass, the 1st Battalion attacked the Confederates at the Battle of Crampton's Gap, near Burkittsville. The raiders attacked up the slopes of South Mountain, supported by artillery, and overwhelmed and routed the Confederates, driving them from the summit with heavy casualties. Meanwhile, the 2nd Battalion attacked the Confederates along the National Road at Turner's Gap. They pushed the enemy back up the mountain, but could not continue to assault as night had fell. The enemy forces still held the gap, but the raiders had forced them back and taken the high ground. At Fox's Gap, the 3rd Battalion pushed back the Confederates, but enemy reinforcements prevented any further advance. However, the Confederates began withdrawing from the mountain, and the regiment consolidates, having taken victory for the first time in months. Reforming with the rest of the Union Army, the raiders took positions at Sharpsburg, Maryland, where they would attack later in the Battle of Antietam. The raiders began by attacking the Confederates on the Hagerstown Turnpike, with the objective to take the Dunker Church. The 2nd and 3rd Battalions saw particularly heavy fighting here, charging through the Cornfield in hand-to-hand combat after the artillery launched a barrage. The 1st Battalion advanced on the West Woods, repelling a counterattack and continuing the assault towards the church. A large Confederate attack pushed the raiders back into the Cornfield, where they fought desperately at close quarters for the control of it. The raiders renewed the attack, this time through the East Woods, but this was driven back. By this time, the 3rd Battalion had taken Dunker Church and took the Confederate batteries, but soon they were forced to withdraw from a Confederate counterattack. In the middle of the day, the raiders attacked the center of the Confederate line at the sunken road, or "Bloody Lane". The raiders assaulted the trench several times, but fell back repeatedly until a small group of raiders from 1st Battalion broke in and enfiladed the Confederates. The enemy forces fell back from their line to Sharpsburg. The raiders pursued the retreating Confederates before falling back from enemy artillery fire and stopping a counterattack. The raiders were to resume the attack several days later in the Battle of Shepherdstown, where they attacked the Confederate rearguard at Boteler's Ford on the Potomac River. A small force of raiders assaulted the enemy position before being recalled, upon which the Confederates counterattacked. The raiders inflicted heavy losses with artillery and small arms, but this volume of fire was not enough to contain the Confederates and the raiders fell back. The marine raiders sat out the rest of the campaign, having successfully driven Confederate forces from Union territory.
The regiment ended its resting period in November 1862, when they took part in the Fredericksburg Campaign. They marched to Falmouth and stayed there until December, when they crossed the Rappahannock on pontoon bridges for an assault on the Confederate positions in the Battle of Fredericksburg. The 1st Infantry Battalion pushed into the town, eliminating Confederate sharpshooter positions. While the 1st was embroiled in urban combat, the 2nd and 3rd Infantry Battalions crossed on the center and left, respectively. The next day, the 3rd advanced on the Confederate right with the objective of taking prospect hill. The raiders broke through through a gap in the Confederate line and caught the enemy by surprise, but the enemy rallied and the raiders fell back. The Confederate forces counterattacked and the raiders were driven back, but they managed to stop the enemy with small arms and artillery fire from Stafford Heights across the river. On the northern end, the 1st Battalion moved through the city to attack the Confederates on Marye's Heights. The raiders attacked the well-prepared enemy defenses, and came under heavy fire from artillery. The raiders suffered heavy casualties while trying to attack the Confederates behind the stone wall on the heights, falling back every time. The 2nd attacked the heights after a lull in the fighting, and were also defeated with heavy casualties. The raiders fell back across the Rappahannock at their seperate crossing points and consolidated, spending the better part of the month recuperating from their losses. Fredericksburg would be one of the worst disasters in the regiment's history. The regiment took part in the last action of the campaign the next year, known as the Mud March in January 1863. The raiders were supposed to cross the river at Banks' Ford, but mud delayed the artillery movements and Confederate snipers made movement difficult. Eventually, the offensive was aborted and the crossing was never made.
The raiders would see their next action in the Chancellorsville Campaign after a three month resting period. In April 1863, the regiment crossed the Rappahannock again, with the intent of destroying the Confederate Army in a double envelopment. The 1st and 3rd Battalions would cross the river at different fords and drive back the enemy, while the 2nd would attack again near Fredericksburg. The 1st and 3rd first moved to Chancellorsville before moving against the Confederate forces. This advance began in May, beginning the Battle of Chancellorsville. The raiders advanced until they were thrown back by a Confederate attack, which the raiders repulsed with a counterattack. However, the raiders were ordered to break off their offensive and entrench around Chancellorsville in a defensive position. The initial Confederate flank attack caught the marine raiders by surprise, and though they managed to ward off the enemy, they ended up retreating. The next day, the Confederates attacked the Union position in full, and the raiders repulsed several enemy attacks from behind their strong defensive earthworks, counterattacking successfully every time the raiders lost ground. However, enemy artillery superiority and generally low ammunition prompted the raiders to retreat. The raiders fought several rearguard actions, taking on and repulsing larger Confederate forces, before they entrenched in defenses around US Ford on the Rappahannock. While the 1st and 3rd were engaged in fighting at Chancellorsville, the 2nd Battalion was mounting another attack, which they executed in the Second Battle of Fredericksburg. The raiders crossed the river on pontoon bridges and attacked Marye's Heights, but were repulsed the first couple of times. Eventually, the raiders overcame the stone wall defenses and pushed the Confederates back, forcing them from Lee's Hill. The raiders continued their advance, meeting the enemy in the Battle of Salem Church. The raiders attacked the Confederate force, but were stopped by a counterattack, which caused a retreat. The raiders held their ground near Marye's Heights, but were forced to give up the ground. They stabilized their line west of the heights and defeated several Confederate attacks with artillery support from Stafford Heights. The raiders, however, were not able to advance further and withdrew across the river when night fell. The 1st and 3rd at US Ford followed suit and fell back across the river, having been defeated yet again.
The regiment had seen heavy action and some serious defeats, and required time to refill their ranks and reequip their men. They took a rest for the first part of the Gettysburg Campaign, or the second invasion of the north by the Confederate Army, which was mostly being fought between cavalry anyways. The marine raiders arrived to the Union positions south of Gettysburg, Pennsylvania in late June, fully recuperated and ready for a fight. In July 1863, the Battle of Gettysburg began. The raiders were rushed to the front as infantry reinforcements to the Union cavalry, which had almost been overrun by a large enemy force. The raiders fought hard against the numerically superior Confederates in the Chambersburg Pike area, repulsing with heavy losses an enemy advance through McPherson's Woods. Renewed Confederate assaults pushed the raiders back, however, and retreated through the town of Gettysburg. The regiment consolidated on Cemetery Hill, where it camped for the night. On the second day of the battle, the 1st and 2nd Battalions were sent to defend the Union left flank. The 2nd held the Wheatfield and the Peach Orchard, while the 1st defended the rock formation known as Devil's Den and the Little Round Top hill. The raiders, heavily outnumbered, repelled enemy assaults on the Wheatfield and the Peach Orchard, until both were overrun and the raiders retreated to Cemetery Ridge after suffering substantial casualties. The raiders fought hard at Devil's Den before retreating to Little Round Top, where they held off the Confederates while inflicting heavy casualties despite being outnumbered. Meanwhile, on the right flank, the 3rd Battalion repulsed the Confederates attacking their positions on Culp's Hill. However, an enemy attack broke through their defense and the raiders retreated to East Cemetery Hill, where they continued to drive back the Confederates well into the third day of the battle. The raiders consolidated soon after, when they would be subjected to a massive Confederate attack on the Union center. The enemy artillery started a great barrage, but this barely affected the raiders, who were entrenched in another defensive position. When the Confederate infantry began their assault, the regiment's 1st Artillery Battalion responded from their hilltop positions and in the center, firing both standard and canister shot. The artillery, coupled with raider infantry small arms, killed huge numbers of Confederates as they advanced on the raiders' position behind a stone wall. As ammunition began to run low, the marine raiders fought against a larger enemy force with bayonets and rifle butts in hand-to-hand combat. The battle ended with the Confederate charge being soundly defeated and the 1st Marine Raider Regiment capturing hundreds of prisoners. The victory of the most decisive battle in the war bolstered the men's spirits considerably, as they had been defeated in battle almost consistently for the better part of the war. Over the next few days, the Confederate Army began its retreat from Gettysburg. The raiders pursued, pushing them out of Pennsylvania and much of Maryland. The raiders caught up with the enemy rearguard in the Battle of Williamsport later in the month. They probed the Confederate defenses in on the Potomac River and skirmished with the enemy, but did not try to break their lines. Later in the month, the 2nd Battalion moved north to quell the New York City draft riots. The raiders fought a few skirmishes against the mobs, restoring order in the city before returning to Maryland.
After Gettysburg, the regiment participated in the Bristoe Campaign, pushing into Virginia once again. In the First Battle of Auburn in October 1863, the raiders arrived after the main engagement but defeated a cavalry attack with canister shot. The next day, at the Second Battle of Auburn, the raiders advanced on the Confederate positions supported by artillery firing from the nearby Coffee Hill. The raider infantry skirmished with the enemy until the Confederates counterattacked. From there, the fighting stalled and only the raider artillery continued to fire on the enemy. The Confederates pressed the attack at the Battle of Bristoe Station, but the raiders forced back the enemy and successfully counterattacked. The next operation for the marine raiders was in November, when they were tasked with capturing a bridgehead in the Second Battle of Rappahannock Station. The raiders split to attack the enemy at two points: one at Kelly's Ford and another at Rappahannock Station. They overcame the Confederates at the ford and crossed it. Meanwhile at the station, the raiders launched an artillery barrage and took the Confederate line at all points, securing the bridgehead and the pontoon bridge, as well as capturing many enemy prisoners. The battle at the Rappahannock was decisive and made the relatively small campaign a victory.
The Mine Run Campaign was less so. Later in November, the raiders took part in another offensive against the Confederates, beginning with a march on Clark's Mountain. The advance, however, was slow, and it was a while before the Battle of Mine Run began. The raiders bombarded the enemy defenses with artillery and moved forward the infantry, but the attack failed to materialize and the raiders retired from the campaign, concluding their military operations for the rest of the year.
The regiment split their forces to participate in two campaigns. The 1st and 3rd Battalions with supporting artillery were assigned to take part in the Overland Campaign in May 1864. The marine raiders crossed the Rapidan River towards the Wilderness of Spotsylvania. They advanced through the woods until they encountered a Confederate force, beginning the Battle of the Wilderness. The 1st Battalion attacked the Confederate line at multiple points on the Orange Turnpike and fought fiercely for the better part of a day, but failed to make any real progress. The 3rd Battalion attacked in a similar fashion farther south on the Orange Plank Road, and fought fiercely but for no real gain. The next day, fighting continued as usual, until a Confederate attack on the Union flank pushed the 1st back. The raiders rallied and counterattacked, however, and took back most of the ground lost. Meanwhile, the 3rd attacked and pushed back the Confederates on the plank road until an enemy counterattack threw them back. The day after, the raiders maneuvered with the rest of the army towards Spotsylvania, so as not to suffer unnecessary casualties attacking the well-entrenched Confederate defenders. They encountered the Confederates again at the Battle of Spotsylvania Court House. The 1st Battalion attacked the enemy line on Laurel Hill, but could not take it despite repeated attempts. That night, the raiders built fortifications, while the 3rd Battalion advanced on the left via the Fredericksburg road, skirmishing with Confederate cavalry. The next day, the raiders withdrew north of the Po River to attack the whole Confederate line, leaving only a small rearguard force behind. The raiders' rearguard was attacked by a larger Confederate force, who they held off for a while before escaping across the Po, destroying the bridge after they were safely across. Meanwhile, a second attempt on Laurel Hill by the raiders was defeated. The raiders rested for the night and spent the next day regrouping and preparing for the grand assault. They were ordered to attack a salient in the Confederate line, known as the “Mule Shoe”. The 1st attacked head on, while the 3rd attacked east of the Mule Shoe. The 1st Battalion smashed through the enemy defenses and fought in hand to hand combat, driving the rebels back at the points of the raiders’ bayonets. They fought the Confederates for hours at the place in the line called the “Bloody Angle”, but no advantage was gained over the enemy. The 3rd Battalion fought close by on the Confederate right flank, trying to push back the enemy. After a period of prolonged, bloody fighting, the enemy fell back to another defensive line. The raiders spent the next few days reorganizing and regrouping. They skirmished with the Confederates and tried to secure some high ground, but were unable to conduct any major offensive action for the time being. A final attack a day later on the Fredericksburg road was unsuccessful. The raiders' final task was to advance with the intention of trapping a Confederate force between Richmond and and Fredericksburg. The raiders were ambushed by the Confederates near the Harris farm, beginning the Harris Farm Engagement. The raiders fought and pushed the enemy back, eventually forcing them to retreat, ending the battle. The Confederates broke off, and the raiders pursued, with the objective of taking the strategically important North Anna River. In the Battle of North Anna, the raiders marched along the Telegraph Road to make two separate crossings, the 1st at Jericho Mills and the 3rd at Chesterfield Bridge. The raiders at Chesterfield bridge advanced until they encountered a small enemy force at Henagan's Redoubt, which they stormed and drove the enemy back. They began to take artillery fire, and were unable to cross the bridge. The raiders entrenched on the north bank of the river. At the undefended crossing at Jericho Mills, the raiders crossed on pontoon bridges and regrouped on the other side. The Confederates counterattacked, which initially surprised the raiders. They rallied, however, and pushed the enemy back with heavy casualties with the support of their nearby artillery. The 1st Battalion set up defenses after having defeated the enemy attack. The 3rd Battalion crossed Chesterfield Bridge the next day, pushing forward before engaging a Confederate force. They were unable to break the enemy, however, and the raiders down the line constructed earthworks and made no offensive maneuvers for the next few days, save for limited skirmishing. The 1st Battalion crossed back over the North Anna silently, while the 3rd remained to guard the fords. The 1st crossed the Pamunkey River and regrouped with the 3rd, when they would attack the Confederates in the Battle of Totopotomoy Creek. This attack, however, made little progress, and the raiders entrenched at the Bethesda Church along Old Church Road. However, a Confederate attack puushed them back, and the raiders moved their defenses to the other side of Beaver Dam Creek. The Confederates attacked, and the raiders inflicted heavy casualties on them while capturing scores of prisoners. After the battle, the raiders continued their advance with the intention of capturing the crossroads at Old Cold Harbor. The raiders participated in June at the Battle of Cold Harbor, where, at the southern end of the battlefield, they attacked the Confederates on the Mechanicsville Road. These attacks were a failure, but the raiders had some success repulsing a Confederate attack farther north. The next day, the raiders shifted their forces to prepare for another attack on the Confederate left flank. The next day, the attack began, with the assaults failing up and down the line. The raiders suffered heavy casualties to enemy fire and, even though they broke into the enemy fortifications, were still forced back by artillery. The raiders spent the rest of the week regrouping and recuperating from their disastrous losses and launching mortars into the Confederate lines. The Overland Campaign had ended in a Union victory, but the raiders' command was seriously dissatisfied with the Union management.
While the 1st and 3rd Battalions were engaged in the Overland Campaign, the 2nd Battalion returned to the Shenandoah Valley in the Lynchburg Campaign, part of the Valley Campaigns of 1864. Their objective was simple: to secure the valley and prevent its use to the Confederacy. They approached the valley in May 1864, establishing defensive positions near the North Fork of the Shenandoah River. The raiders were attacked by the Confederates in the Battle of New Market. The raiders fought to hold Manor's Hill against a Confederate infantry attack, but were eventually forced off and retreated to Bushong's Hill where they stopped the Confederate advance with artillery fire. After a counterattack by the raiders was defeated, they retreated still to Rude's Hill, where they organized a rearguard action to hold off the Confederates before withdrawing across the river. After the retreat, the raiders rested for the rest of the month and made another offensive in June, at the Battle of Piedmont. The raiders marched down the Staunton Road towards Mount Meridian. They turned back a Confederate cavalry attack and pushed the enemy infantry back towards the village of Piedmont. The raiders continued, but were repulsed by the strongly entrenched Confederate forces. The raiders' artillery dealt with the enemy's guns, and the raiders attacked again. This also failed, and the Confederates counterattacked. The raiders stopped this attack, however, and pushed the enemy to the bluffs of the Middle River, forcing them to surrender. The raiders advanced to their objective of Lynchburg, Virginia, defeating a Confederate cavalry force near Lexington. The raiders found a small enemy force entrenched around the Quaker Meeting House, who they drove back, before preparing for a main assault in the Battle of Lynchburg. The raiders got into position to attack the city, but hesitated and were counterattacked by the Confederates, who they defeated. However, the flanking attack they had sent to the right flank had failed, and the raiders retreated from the city with the Union forces.
The 2nd Battalion was redeployed to Maryland to deal with a possible Confederate threat to Washington DC. In July, the raiders established defenses near Monocacy Junction, which were attacked by the Confederates in the Battle of Monocacy. The Confederates sent out a cavalry force for a flanking attack, but the raiders forced them back. The raiders were then attacked from several sides by Confederate infantry, who forced the raiders back towards Baltimore. The battle had been a defeat, but the raiders had successfully delayed the enemy long enough to reinforce Washington DC. They arrived in time to take positions at Fort Stevens, which would be the site of the Battle of Fort Stevens. When the enemy attacked, the raiders skirmished with them until a Confederate cavalry attack broke through them. The raiders counterattacked, however, and forced the enemy back. The Confederates broke off the offensive towards Washington the next day. The raiders followed in pursuit, catching up with the Confederates in the Battle of Cool Spring. They crossed the Shenandoah and drove off the enemy force near the ford. The raiders were faced with a Confederate division, which pushed them back almost to the river, but the raiders stopped them with heavy rifle fire from behind a stone wall. Newvertheless, the battle was a defeat. The raiders disengaged, and were attacked again at the Second Battle of Kernstown. The raiders defended Pritchard's Hill before moving out to attack the Confederates. This attack failed, and the raiders were forced to retreat, having been counterattacked by a much larger enemy force.
The 2nd Battalion had one final chance to take the Shenandoah Valley, this time after more coordinated efforts and a shakeup in the Union leadership. The first battle in the new campaign was the Battle of Summit Point in August 1864, in which the raiders defended Charles Town and Summit Point from a Confederate attack. The raiders employed rearguard delaying actions effectively until they had safely withdrawn to Halltown. From there, the raiders continued, when they were ambushed by the enemy in the Battle of Berryville in September. The raiders fought hard until nightfall, which ended the battle inconclusively. They prepared for another attack later in the month at the Third Battle of Winchester, in which the raiders conducted a frontal assault. On the left flank, they were held up by artillery fire from strong Confederate earthworks, and on the right, the attack halted after clearing the woods. A renewed advance pushed the Confederates back, however, and the raiders were able to overwhelm the entire enemy line. A few days later, the raiders advanced to make an attack on the enemy left flank. In the Battle of Fisher's Hill, the raiders attacked and broke the Confederate line, prompting an enemy retreat. The raiders would meet the enemy one more time in the Shenandoah, at the Battle of Cedar Creek in October. The Confederates launched a major attack on the Union encampments, including the raiders' camp. The attack surprised the raiders, but they were able to regain unit composition and hold off the enemy after they had successfully retreated to Middletown on the Valley Pike. They regrouped with the Union troops and held the line south of Middletown, defeating attack after attack. The raiders counterattacked in conjunction with Union cavalry and routed the Confederates, inflicting many casualties and taking even more prisoners. With this decisive victory, the Shenandoah Valley was secure and the raiders of the 2nd Infantry Battalion were free to reinforce their comrades at Petersburg.
After the Overland Campaign, the 1st and 3rd Battalions were engaged in fighting in the Richmond-Petersburg Campaign. The raiders were ordered to attack in the Second Battle of Petersburg, the first of which had been a failure. In June, they assaulted the Confederate line, but the attack quickly lost momentum. The next day, the raiders attacked and stormed Redans 13, 14, and 15, until a Confederate attack pushed them back. The day after, the raiders stealthily assaulted the Confederate line and pushed through it, but were subject to fire from another enemy defensive line and were forced to retreat. The raiders attempted again to attack the Dimmock Line but failed at all points. All final assaults on Petersburg were failures. Faced with no other option, the marine raiders dug in around the city, beginning the Siege of Petersburg. The next objective, nearly a week later, was to capture the Weldon Railroad and sever a Confederate supply line. In the Battle of Jerusalem Plank Road, the raiders drove off Confederate cavalry before setting up defenses. A Confederate flanking counterattack threatened the line, but the raiders held them off after a retreat, stabilizing the line. The efforts to destroy the railroad failed, and no further attempts were made for a while. In July, the 1st Battalion was sent on an expedition to threaten the Confederate capitol of Richmond, which culminated in the First Battle of Deep Bottom. The raiders crossed Deep Bottom on a pontoon bridge before advancing on enemy positions on the New Market Road. They took out Confederate rifle pits and artillery before setting up positions on the east bank of Bailey's Creek. The next day, the raiders attempted to take Gravel Hill, but this failed. They also stopped a Confederate counterattack with heavy losses. With the 1st having substantially distracted the enemy, the 3rd Battalion was clear for its attack in the Battle of the Crater, a few days afterwards. A mine had been planted under the Confederate lines, and the raiders would attack after it had been detonated. But the assault was delayed, and after a first Union attack failed, the 3rd Battalion was sent in. The raiders were supposed to flank the crater from both sides, but due to the heavy volume of enemy fire they were forced to take cover in it. When it became clear that the crater was a death trap, the raiders flanked to the right and succeeded in driving the enemy back in melee combat. The raiders were slowly pushed back, however, and returned to the Union lines in defeat. In August, the 1st prepared for another offensive. They crossed the James River to threaten Richmond a second time in the Second Battle of Deep Bottom. The raiders again pushed up the New Market Road and the Darbytown Road to attack Fussel's Mill. The raiders attacked the Confederate positions and captured some of the entrenchments, but could not take the mill or most of their other objectives. A renewed attack a few days later had some success, but the raiders were driven back by a Confederate counterattack. They crossed back over the James the next day. While the 1st Battalion was fighting near Richmond, the 3rd Battalion made another attack on the Weldon Railroad south of Petersburg in the Battle of Globe Tavern. The raiders reached the railroad and began destroying the tracks until they were pushed back by a Confederate attack. They counterattacked, however, and drove the enemy forces back over all the ground they had lost. The raiders dealt with both a flank attack and a frontal assault the next day, both of which they repulsed. The raiders pulled back to another defensive line, from which they stopped all further attacks with heavy casualties. The 1st Battalion farther south made another attempt at the railroad in the Second Battle of Ream's Station. The raiders set to work destroying the track and building earthworks near the station. The raiders drove back several Confederate attacks with substantial losses for the better part of the day, but a final enemy attack pushed back the raiders. They fought a final delaying counterattack, which delayed the Confederates long enough to make a retreat. The 1st was to make another attack farther west in late September, at the Battle of Chaffin's Farm. The raiders attacked New Market Heights, charging up the slopes and routing the enemy forces at the top. The raiders tried to take Fort Gilmer and Fort Gregg, but these assaults were unsuccessful despite repeated efforts. Meanwhile, to the west, the raiders attacked and took Fort Harrison and stopped several Confederate counterattacks. These efforts near the James prompted Confederate redirection of resources to the area, leaving 3rd Battalion ready for their attack at the Battle of Peebles's Farm. The raiders began their assault on the fortifications guarding the Boydton Plank Road, breaking through the Squirrel Level Line and taking Fort Archer. They stopped a Confederate counterattack and stabilized the line before the battle ended. The Confederates launched a counteroffensive in October at the Battle of Darbytown and New Market Roads, in which the raiders defended New Market Road. Union cavalry had been recently forced out of their positions at the Darbytown Road, and the raiders met the Confederate attack with small arms and artillery fire, driving them back. The raiders counterattacked almost a week later at the Battle of Darbytown Road, where the raiders probed and skirmished with the new Richmond defensive line. They assaulted a series of fortifications later in the day, which failed and the raiders fell back. Later in the month, the 1st and 3rd Battalions coordinated two assaults. The 1st attacked at the Battle of Fair Oaks & Darbytown Road, where they attacked the Richmond line again and failed to take any ground, before being driven back by a Confederate counterattack. The 3rd moved to Dinwiddie County, where they moved to attack in the Battle of Boydton Plank Road. The raiders crossed Hatcher's Run and drove off some Confederate cavalry before coming to a halt and moving backwards. The raiders found themselves surrounded on three sides by Confederate infantry and cavalry, but they seized the initiative by committing all their forces to a flanking assault and routed the Confederate division. The raiders, however, were in an unstable position and withdrew to their original position. The raiders consolidated in Dinwiddie county with the 2nd Infantry Battalion, newly arrived from its successful combat operations in the Shenandoah Valley. They settled into their trenches for the winter and did not take part in any operations for the rest of 1864. In February 1865, the raiders were ordered to provide support for cavalry in the Battle of Hatcher's Run, where the raiders crossed Rowanty Creek at Monk's Neck Bridge and set up a blocking position on the Vaughn Road. Meanwhile, another raider force moved from the Halifax Road down the Vaughn Road to Hatcher's Run. This force was attacked by the rebels, but the raiders defeated them. The raiders on the Vaughn Road consolidated with those at Hatcher's Run, where they were attacked by a large force of Confederates. The raiders repulsed most of the attacks, but one assault pushed them back to Dabney's Mill. The raiders rallied, however, and drove back the enemy. They attacked the next day, and retook all ground lost to the enemy advance. The raiders returned to the Petersburg lines, with a small force of the 3rd Battalion holding the northern sector. This sector was subject to a major Confederate attack in March 1865, in the Battle of Fort Stedman. The raiders were taken by surprise, and through they fought hard to save the fortifications, they were driven back. Later in the day, the raiders were reinforced by the other battalions and they reformed their lines. The raiders stopped the enemy advance and immediately charged the Confederate lines. The counterattack overwhelmed the Confederates along the whole line, inflicting severe casualties. This was the last attempt by the Confederates to break out, and it ended the Richmond-Petersburg Campaign.
The 1st Battalion, on the southwestern part of the Union line, fought the Battle of Lewis's Farm in March, beginning the Appomattox Campaign. The raiders advanced on the Quaker road and encountered a Confederate force, who they began to drive back to Lewis's Farm. The Confederates retreated to their entrenchments, however, and the raiders were unable to make any further progress against them. A renewed charge by the raiders drove the enemy out of their fortifications in the woods to White Oak Road. Two days later, the raiders advanced to the Confederate positions and were fired upon in the Battle of White Oak Road. A Confederate attack pushed them back across Gravelly Run and the raiders were forced back. However, with artillery support, the raiders were able to stabilize their lines. The raiders counterattacked and drove the Confederates back, taking White Oak Road. A few days later, the 2nd Battalion reinforced the 1st for their offensive, which began in April 1865 with the Battle of Five Forks. The raiders attacked the enemy defensive line at Five Forks on the left and center, where they overwhelmed the Confederate earthworks and threw them back. The Confederates reformed a new line at the west end of Syndor's Field, but the raiders drove them out again. A renewed attack by the raiders routed the enemy, and they took hundreds of prisoners. They broke the Confederate left flank with a repeated push and soon routed the whole line along the intersection, and Five Forks was in Union hands. The raiders blocked off Ford's Church Road with a bayonet charge, cutting off the enemy route of escape. The raiders mopped up pockets of Confederate resistance and further secured the area, The 2nd Infantry Battalion, stationed at the middle of the line, was clear for their attack on the city. The Third Battle of Petersburg, which began a day after the fighting at Five Forks, started with a massive barrage on the Confederate lines courtesy of the 1st Artillery Battalion. The 2nd Battalion smashed through the Confederate pickets at the Boydton Plank Road Line and charged up the enemy fortifications, where they pushed the enemy back after half an hour of heavy fighting. The raiders of the 2nd pushed forward, with support from a force from the 3rd Battalion. The raiders captured Fort Davis and lost it to a counterattack, but soon took it back. A Confederate counterattack slightly checked the raiders' advance, but they pushed on relatively unhindered. The raiders stormed Fort Gregg, although with some difficulty, and took Fort Whitworth before reaching the Confederate headquarters at Edge Hill. The main force of the 3rd Battalion was at the north end of the line, and were given the order to make their own attack on the Confederates in and around Fort Mahone. The raiders pushed through the defensive line and drove the enemy back, taking Fort Mahone and the surrounding trenches. They were held up by enemy counterattacks and bitter hand to hand fighting ensued, though the raiders quickly got the upper hand in these engagements. The 1st Battalion, farther west, was making their own attack in the Battle of Sutherland's Station. The raiders pursued the retreating Confederates up the Claiborne Road, and attacked the more numerous Confederate forces defending the South Side Railroad. They broke the enemy and routed the entire force, providing a valuable distraction that greatly helped their comrades in the main attack at Petersburg. The entire Confederate Army retreated from the area, and the 1st Battalion was able to take Richmond, with the 2nd and 3rd Battalions taking Petersburg, both of which were undefended. Following the lengthy Confederate retreat, the raiders pursued. The 2nd Battalion marched to and occupied Burkeville Junction before moving to attack the Confederates in the Battle of Rice's Station. The raiders skirmished with the dug-in Confederates, but did not commit to a full assault. The enemy abandoned their positions soon after. The raiders' other forces caught up with the Confederates in the Battle of Sailor's Creek, in which the raiders fought two engagements in close proximity. The 1st Battalion saw action in the Battle of Lockett's Farm, fighting a running battle with the Confederates until they made a stand at Deatonville. The raiders charged the Confederate batteries on a nearby hill, capturing them and occupying Deatonville, in which they captured a large amount of Confederate supplies. The raiders drove the enemy forces from the field, taking many prisoners. Meanwhile, the 3rd Battalion was nearby fighting the Battle of Hillsman's House. The raiders executed a hammer-and-anvil tactic, pushing the Confederates into the Union cavalry on the other side of their position. The raiders crossed Sailor's Creek and pushed towards the Confederate positions, driving back a counterattack with artillery support from the Hillsman Farm. The raiders succeeded in entrapping the Confederates, forcing a mass surrender. The raiders sharply pursued the Confederates to High Bridge, which they were ordered to capture intact. A Union force attempting to take this bridge had already been captured, and the raiders were sent in towards the end of the Battle of High Bridge. The raiders drove off the Confederates attempting to burn the bridge, saving it from collapse. Another force of the raiders pushed to and occupied Farmville, driving the Confederates farther back. They advanced to defeat another enemy force soon after, in the Battle of Cumberland Church. The Confederates occupied the high ground around the church, and the raiders soon became engaged with them. The raiders attempted to attack the enemy, but they were too numerous and the assault was repulsed. A second attack made it to the Confederate line, but the raiders were forced to fall back as they were unsupported. With the Confederate Army seriously downsized, the marine raiders converged on Appomattox. The raiders would see their last fight of the war at the Battle of Appomattox Court House in April 1865. The raiders moved to cut off the Confederate escape towards Lynchburg, advancing at several points to the Confederate forces. They were about to commence an attack when the Confederate Army surrendered, having seemingly no other option. The command of the regiment witnessed the surrender in the courthouse itself, and the raiders paroled large numbers of enemy soldiers. The raiders were victorious, but battered and exhausted.
After the close of the war, the 1st Marine Raider Regiment was tasked with the occupation of southern territory during the Reconstruction Era. They occupied the 1st Military District (Virginia) from 1867 until 1870, which was relatively uneventful.
Throughout the war, the regiment suffered casualties of 340 killed, 509 wounded, and 23 missing in action. They inflicted upon the enemy 1,295 killed, 2,765 wounded, and took 1,248 prisoners.
United States Expedition to Korea (1871)[]
Ten days after an American ship was fired upon by Korean batteries, an expedition was launched against the small Asian country. Among the 1st Marine Raider Regiment, a small task force of the most loyal and proven veterans of the Civil War was formed for the expedition. The raiders landed on Korean territory in June 1871, with initial contact with the Koreans proving uneventful. The US fleet was fired upon by Korean forts on Ganghwa island, and no apology was given by the Koreans. 10 days later, the task force took part in the Battle of Ganghwa, an assault on the island's forts. The raiders initially landed at Point Du Conde after an artillery barrage. They stormed and took Fort Du Conde without serious resistance from the Koreans, before continuing to advance. They encountered a small enemy force, which the raiders skirmished with. The raiders pushed the enemy back and took Fort Monocacy, upon which they camped for the night. The next day, the raiders planned an attack on Fort McKee, the most well defended of the enemy forts. They assaulted the fort after an initial bombardment and engaged the Koreans in hand to hand fighting, which did not last very long as the remaining enemy surrendered after a short fight. The raiders set to work destroying the Selee River Forts, of which there were six. After dismantling five of the forts, the raiders departed. Though the raiders had won a tactical victory, little else was gained from the expedition, and they returned to the United States having lost 1 killed and 3 wounded, and inflicted casualties of 89 killed and 10 captured (7 of whom were wounded) on the Koreans.
Spanish-American War (1898)[]
After the declaration of war on Spain, the 1st Marine Raider Regiment was deployed to the Caribbean Theater to take part in the ongoing Cuba Campaign. The raiders arrived in Cuba in June 1898, setting up a base of operations on the island. Reconnaissance found a Spanish outpost nearby, and the marine raiders moved out to attack it in the Battle of Las Guasimas. The raiders split into two columns, moving forward to the assault. The raiders on the right road attacked the Spanish after a small artillery barrage and, though under heavy fire, climbed the ridges on the right side of the Camino Real road and routed the Spanish. On the left trail, the raiders attacked the enemy, and after a short firefight forced them back to their secondary trenches. They pushed the Spanish back to reserve positions on a "finger-like hill", before linking up with their comrades and forcing a Spanish withdrawal. Having defeated the enemy rearguard action, the raiders occupied the nearby town of Sevilla for a brief period. The raiders continued their advance, having limited contact with the Spanish forces until they were ordered to attack in July at the Battle of San Juan Hill. A force of the raiders, mostly of the 1st and 2nd Infantry Battalions, commenced their attack on San Juan Hill, one of the hills making up San Juan Heights. The raiders assaulted, driving back the Spanish skirmishers and continuing up the slopes of the hill to the enemy trenches. With critical machine gun and artillery support, the raiders advanced to the top and fired into the trenches. They took the Spanish blockhouse and drove the enemy from the hill. Meanwhile, another force of raiders, primarily of the 3rd Infantry Battalion and the remnants of the 1st and 2nd, made an attack on Kettle Hill, the other Spanish position on the heights. They advanced up the hill, aided by machine gun support, and made it into the Spanish trenches, where the raiders fought hand to hand with the enemy with their bayonets. They pushed the Spanish off of the crest of Kettle Hill, but were subject to increased enemy fire from the heights. The raiders fired back, decimating the Spanish and taking their entrenchments at the very top of the heights. The Spanish counterattacked both hills, but the raiders had been preparing their defensive positions and were ready. They stopped the attack on San Juan Hill fairly easily, but the Spanish forces preparing to attack Kettle Hill were much more numerous. Nevertheless, the raiders inflicted heavy casualties with machine gun fire and forced the enemy to retreat. From their positions on the hills, the raiders systematically dealt with snipers and artillery fire once the battle was over. From there, the raiders proceeded to their main objective of the campaign, the capital city of Santiago. The raiders participated in the Siege of Santiago for most of early July. The raiders' artillery and machine guns on San Juan Heights constantly fired into the city, while the infantry choked off the Spanish supply lines. After the two-week long siege, the Spanish forces surrendered and the Cuba Campaign ended in victory.
After their main actions in Cuba, the raiders were ordered to join the ongoing Puerto Rican Campaign. They authorized a small volunteer task force from the veterans of Cuba, including men from the 2nd Marine Raider Regiment. This was the first time since 1781 that the two regiments had fought together. The raiders landed on the beach at the Bay of Guanica, driving away the local Puerto Rican militia and setting up a dock for the main force. The raiders advanced towards Yauco, with the objective of taking the local rail terminus. They encountered an enemy force in the Hacienda Desideria at the Battle of Yauco in July. The raiders attacked the Spanish-Puerto Rican force at the hacienda, overrunning them. Before the enemy fully retreated, however, they counterattacked the raiders on their right flank. The raiders drove back this assault and continued on towards the city of Ponce. When the raiders arrived, they accepted the surrender of the Spanish garrison in the city without a fight. After their success at Ponce, the raiders moved east and took the port town of Arroyo. Moving to capture their next objective of Guayama, the raiders encountered a Spanish force entrenched on two hills overlooking the road between the towns. The raiders attacked them in the Battle of Guayama, advancing on the hills and driving the Spanish back towards the town, which the raiders took once it had been abandoned by the enemy. Later, the raiders crossed the Rio Guamani to support an attack which was taking place there at the Battle of the Guamani River Bridge. The raiders assaulted the Spanish on Guamani Heights and routed them after small fighting. The raiders next moved to destroy an enemy force, which had stopped marching and was resting at the Banos de Coamo. The raiders attacked the town, beginning the Battle of Coamo with an opening artillery barrage. The raiders split their forces to trap the enemy in a pincer move, flanking around the rear and trapping the Spanish and Puerto Ricans in a crossfire. The enemy launched an attack, which the raiders defeated easily and took many prisoners. The enemy troops retreated, and the raiders pursued, catching them at Aibonito Pass. The raiders launched an attack in the Battle of Asomante, but this was unsuccessful due to enemy artillery. After the raiders launched a counterbarrage, they advanced. But this advance was subject to increased enemy fire, and the raiders were forced to retreat and cease the attack. Despite this apparent final defeat, the war ended in victory for the raiders.
After the war, the marine raiders occupied Cuba as a part of the United States Military Government in Cuba from January 1899 to May 1902. This was relatively uneventful.
Throughout the war, the 1st Marine Raider Regiment lost 24 killed, 66 wounded, and 5 prisoners. They inflicted 71 enemy killed, 103 wounded, and took 63 prisoners.
Boxer Rebellion (1899-1901)[]
In May 1900, foreign officials inside the legation quarter of the city of Peking, China, threatened by the violent nationalist Boxers, sent a message for urgent help. The 1st Marine Raider Regiment immediately scrambled together an expedition force, primarily of the 1st Infantry Battalion, to reinforce Peking from Cuba. The raiders landed in China in May and moved from Tientsin to Peking. Once in the city, the small number of marine raiders began to set up defenses. However, it soon became clear that this amount of men was not enough and that even more reinforcements would be necessary. Another larger force of raiders was gathered together from more volunteers in Cuba and assigned to the Eight-Nation Alliance's Seymour Expedition. Moving by train, this raider force departed for Peking in June, crossing the bridge at Yancun over the Han River. However the rails were in poor condition, and the raiders had to repair them and defend against several Boxer attacks. The raiders repulsed these assaults with great success, and continued on their way. To the raiders' surprise, they were ambushed not only by the Boxers, but by Chinese Imperial forces in the Battle of Langfang. The raiders held off the enemy's repeated human wave attacks with rifle and machine gun fire, inflicting many casualties. However, it soon became clear that the raiders' position was too exposed and the railroad advance was far too dangerous, so they retreated back to Tientsin. However, they discovered that the Chinese had destroyed the bridge over the Hai River. The raiders then deployed boats and followed the river back to Tientsin, fighting off Boxers the whole way. When the raiders were nearly out of ammunition, they by chance happened upon a large Chinese arsenal, from which they and the other allied troops reinforced their position. Well-supplied with weapons and ammunition, the raiders repulsed the renewed attacks of the Chinese forces on the arsenal. When they learned of the allied troops' predicament, the marine raiders assembled another force to rescue them. This raider force broke through the enemy and helped the others in their retreat back to Tientsin. The expedition had been a terrible failure, but with an even larger friendly force in Tientsin, renewed attempts were not ruled out.
Meanwhile, the very small force of raiders in Peking was trapped and fighting for their lives in the Siege of the International Legations. Though they were small in number, the raiders spread their force to cover multiple areas. They defended the Fu, a large palace and park housing Chinese Christian refugees, several of the foreign legations, and the Tartar Wall behind the legation quarter. The raiders held off the attacking Boxers at the Fu, along with Japanese, Italian, and British troops, even when the enemy built walls closer and closer to their position. Other fierce fighting took place at the French Legation, where the raiders and their allies stopped assault after assault in the convoluted urban area. On the Tartar Wall, the raiders, with their German allies, defended a crucial positions. Attacked relentlessly on both sides by the Boxers, the raiders forced the enemy back multiple times. The raiders held their ground for the rest of June, but a great threat was discovered in July. The Chinese had built fortifications dangerously near the heavily outnumbered raiders' positions on the Tartar Wall. The raiders counterattacked at night, and drove the enemy away from these fortifications. In July, things reached their worst for the raiders in Peking. At the Fu, the raiders and their allies were pushed back to their last line of defense, and the raiders were forced to abandon the French legation because of explosives that the Chinese had detonated below it.
The raiders, both veterans of the first expedition and newly arrived reinforcements to the relief effort were given another objective, this time to rescue another besieged city. The allies attacked at the Battle of Tientsin, where they split their force to attack towards the South Gate and the East Gate of the city. The raiders were exposed to Chinese fire for the better part of their advance, and attacks at the South Gate were temporarily called off because of the difficulty in securing the gate. However, renewed efforts by the raiders succeeded in pushing through both gates and driving the Chinese out of the city. After they had secured Tientsin, the raiders took part in the Alliance's next operation: the Gaselee Expedition. In August 1900, the raiders advanced towards Peking on foot, as the Chinese had destroyed the railway. They encountered an Imperial Chinese force entrenched around the Han River, and attacked them in the Battle of Beicang. The raiders launched an attack coordinated with the Japanese on the western flank, preempted by an artillery barrage. They assaulted the Chinese trenches through the millet and corn fields, forcing the enemy into a retreat. The raiders on the east bank of the river had difficulty moving due to the flooded terrain, but nevertheless pushed back the Chinese. The raiders continued their march forward until they encountered more enemy resistance, this time from a large Chinese force behind a railroad embankment near Yangcun. The raiders deployed in a battle line parallel to the river and attacked the enemy fortifications in the Battle of Yangcun. The raiders charged across the open fields to get to the Chinese positions before driving the enemy away from them. They defeated the enemy's rearguard actions, and defeated all further Chinese resistance. They advanced to Tongzhou, where they rested and recuperated from their losses for a brief period. Two days later, the raiders made their final assault to relieve the city in the Battle of Peking. The raiders again split their forces to attack the Tung Chih, Chi Hua, Tung Pein, and Sha Wo Gates. The raiders blasted the gates open with artillery and attacked through, while also scaling and taking the walls. They pushed the Chinese back into the city, entering the legation quarter via a drainage canal known as the Water Gate. Once the raiders made it to the legations, they regrouped with their besieged comrades who had been holding off the Boxers since June, and were low on ammunition and nearly starving. After providing the raiders in the city with some much needed relief, they were ordered to clear the remaining enemy forces from the Imperial City. The raiders' artillery blasted through the city's gate and walls, and occupied the Imperial City. Meanwhile, another force of raiders was engaged in fighting against Chinese Muslim forces at the Zhengyang Gate. After all pockets of resistance were eliminated, the raiders settled in for an occupation of the city. They marched victoriously through the Forbidden City in late August. The marine raiders occupied Peking until September 1901, ten days after the Boxer Protocol was signed, after which they left China for good.
The 1st Marine Raider Regiment had suffered casualties of 58 killed and 109 wounded, with 13 men taken prisoner. They inflicted on the enemy forces (both Boxers and Imperial Troops) 238 killed, 129 wounded, and took 47 prisoners.
United States Occupation of Nicaragua (1912-1933)[]
Due to political instability within the Nicaraguan government, a small force of the 1st Marine Raider Regiment was authorized to land in the Central American country to protect US interests and citizens. The small Nicaragua force landed in Bluefields in May 1910 to provide all-around security. When the conflict between the Nicaraguan political parties had greatly escalated, the Nicaragua force was reinforced and moved to Granada, Nicaragua, a stronghold of the rebellious Nicaraguan forces. While travelling by train, the raiders were ambushed by the rebels in September 1912 at the Battle of Masaya. While the train had been stopped, enemy forces on both sides of the track began shooting at the raiders. The raiders returned fire from inside the train and along the roadbed, driving off the rebel forces after a brief firefight. Upon arriving in Granada, the raiders surrounded the city and forced the surrender of a large rebel force. Continuing onward, the raiders moved to assault the next rebel stronghold in the Battle of Coyotepe Hill. With more of the marine raiders having arrived in Nicaragua, they had enough men to attack Coyotepe. In October 1912, the raiders launched an artillery barrage on the rebel trenches and made a pincer move with a three-way assault on the hill. They charged to the summit and forced the enemy off before directing artillery to fire on the nearby hill of La Barranca, which the raiders captured soon after. After the victory at Coyotepe, the raiders took the city of Leon, Nicaragua, and convinced the last of the rebels to surrender. With the Nicaraguan elections proceeding undeterred, the marine raiders left the country.
The marine raiders returned to Nicaragua in 1927 in the wake of the Nicaraguan Civil War between the Conservative government and the Liberal rebels. They landed at Corinto on the west coast of Nicaragua and occupied La Loma Fort in Managua. With the attack on Ocotal and the beginning of the Sandino Rebellion, the raiders prepared for combat operations. Within a short period of time they were ready for an armed expedition, which began in late July. A small force of raiders moved from their starting position to one of their objectives, a small town in the Nueva Segovia Department named San Fernando. In what became the Battle of San Fernando, the raiders moved through the seemingly-unoccupied village unopposed. While crossing the town's grassy plaza, the raiders began to take fire from a group of Sandinistas who had been waiting in an ambush. The raiders then counterattacked and pushed back the rebels, forcing them to retreat. After the confrontation at San Fernando, the raiders continued their expedition into northern Nicaragua. When aircraft spotters found a force of Sandinistas waiting to ambush the raiders, the raider infantry moved up with the airplanes providing support. A mile southeast of Santa Clara, the raiders came in contact with the enemy. The Battle of Santa Clara was fought for a while, before the Sandinistas were driven back. After the fighting at Santa Clara, the enemy forces retreated to the jungles around El Chipote mountain, and waged a guerrilla war. In November 1927, it was discovered that the fortress of El Chipote was a major base for the Sandinistas, and a plan was made to destroy it. By December, the raiders had split their forces into two columns. One was in Jinotega, and the other was moving from Telpaneca. The first column was to meet with the other column at Quilali, but it encountered an attack from a large force of Sandinistas firing at the raiders from behind rocks, bushes, and trees. The firefight lasted a while, but the enemy was driven off and the raiders marched into Quilali unopposed. The other column fought a skirmish with another rebel group twenty-two miles away from Telpanca. After the rebels were defeated, the second column continued on its route, coming in contact with a substantial rebel force six miles northwest of Quilali in January 1928 at the Battle of Las Cruces. The raiders had been moving along a trail when they came under fire from Sandinista forces entrenched on Las Cruces Hill. The enemy fired at them with rifles and machine guns from fortified parapets made out of pine trees. The raiders returned fire and attacked, until a rebel counterattack pushed them back. The raiders retreated to their own defensive positions and repulsed the enemy attack with small arms and artillery fire. The raiders, with the arrival of friendly air support, counterattacked and took the hill, pursuing the routed rebel forces. After camping for the night on Las Cruces Hill, the raiders rendezvoused with the other column in Quilali. The Sandinistas, however, reinforced themselves and laid siege to the city. With the siege holding up operations, the expedition to El Chipote was cancelled. However a new assignment came in February. An American convoy had been ambushed while moving along the Yali-Condega Trail by a large force of Sandinistas, and the raiders were ordered to assist the greatly outnumbered American and Nicaraguan forces. In the Battle of El Bramadero, the raiders arrived a day after most of the fighting had taken place and fought off the remaining rebels. For the rest of the occupation, the marine raiders undertook duties such as supervising the Nicaraguan elections in November, and training the Nicaraguan National Guard. In February 1932, the raider forces in the country were seriously downsized, and the withdrawal was completed in 1933.
The 1st Marine Raider Regiment lost 15 killed and 40 wounded during both interventions. They killed 460 Sandinistas and wounded another 89, taking 16 prisoners.
World War I (1914-1918)[]
The 1st Marine Raider Regiment was greatly expanded after the declaration of war on the German Empire. They left New York on a ship bound for France in April 1917, where the war had been raging for three years. The raiders deployed behind the Allied lines and extensively trained their recruits in the new kind of war, enlisting the help of experienced British officers. For most of 1917, the raiders were held behind the allied lines, not seeing combat for the rest of the year.
In early 1918, the marine raiders were moved to the Cantigny sector of the French lines. The Germans began shelling them in May, to test the raiders' morale. The raiders, however, did not flinch at this gesture and returned fire with all available batteries of the 1st Artillery in a massive counterbarrage. Later in the month, the raiders were given their first real assignment, to take the town. They launched an hour-long artillery barrage, and went over the top immediately after, beginning the Battle of Cantigny. A rolling barrage kept the raiders covered as they moved up to the town, after which they attacked through the woods to the high ground. They took out enemy machine gun nests and drove the Germans out of the village with the aid of coordinated French support. Shortly after, the Germans launched a counterattack against the raiders' right flank, but they repulsed this assault without great difficulty. After an enemy artillery barrage, a stronger enemy attack hit the raiders, but they drove back this and all further attacks on their position at the town. The German offensive continued, and, as the 2nd Marine Raider Regiment held off the enemy on the banks of the Marne river, they made a push towards Belleau Wood directly threatened Paris. In response, the raiders marched along the Paris-Metz highway and held positions between the highway and the Marne. In June, the Germans pushed through the French troops on the left, and the raiders' reserve force was rushed in to plug the gap, beginning the Battle of Belleau Wood. Holding a line from Triangle Farm to Lucy-le-Bocage, the raiders dug shallow trenches and waited for the enemy assault. Some days later, the German forces attacked through a large grain field towards the raiders' positions. The raiders fought off the enemy assaults with small arms and fire support over two days, inflicting heavy casualties on the Germans and pushing them back into the woods. The enemy forces then dug a vast defensive line farther back, which the marine raiders were ordered to capture in the next phase of the battle. The 1st Battalion attacked Hill 142 on the left, while the 2nd and 3rd Battalions were to take the ridge overlooking Torcy and Belleau Wood. The raiders attacked across a wheat field while under fire, before breaking through the German line on the hill. The Germans launched a counterattack to retake the ground, and the outnumbered raider companies on the line were in danger of collapse. However, reinforcements arrived and defeated the German attack, and the raiders held Hill 142 by the afternoon. On the right, things were similarly rough for the others. The raiders faced heavy German fire, but were able to close the distance and engage the enemy in hand to hand combat. Though the fighting was costly, the raiders had established some of the first strongpoints in Belleau Wood. The raiders successfully defended against a German counterattack, but a similar attack by the raiders was also unsuccessful. To break the stalemate, the regimental artillery fired into the woods, wreaking havoc on the German defenses. The raiders made another push into the wood, but this was met by enemy machine guns and large quantities of mustard gas. A renewed attack smashed through the German lines and drove them even farther back, however. A total of six assaults by the raiders through the end of June defeated several German divisions and eliminated enemy presence in the woods entirely. After a short resting period, the raiders were quickly rushed to the banks of the Marne river east of the mountain of Riems, where a massive German attack was about to take place. During the Second Battle of the Marne in mid-July, the raiders faced the full force of an attack by seventeen German divisions across the river. In the Battle of the Mountain of Reims, the raiders, in defensive positions, came under heavy fire from poison gas and artillery. German stormtroopers began to cross in rafts and boats and attempted to build skeleton-bridges over the river. The raiders, heavily outnumbered, continued to hold their ground against the enemy assault, but by evening, the Germans had taken a bridgehead on either side of the town of Dormans before they were finally stopped by the raiders, with air and artillery support. Having blunted the German attack, the allies prepared for a massive counteroffensive. In the Battle of Soissons, the raiders attacked along a large front to eliminate the German salient aimed at Paris. They struck with a concentrated force at the most exposed parts of the line, breaking through and forcing the enemy to retreat. Just five days after the fighting at the Marne, the raiders' counterattacks had neutralized all gains made by the Germans during the Spring Offensive. By the end of July, the Germans had retreated to a line running along the Aisne and Vesle Rivers, shortening the front considerably.
After the near continuous combat during the German offensive, the raiders rested while an Allied attack was developing. The Hundred Days' Offensive, which had begun in August, was in the process of pushing the Germans out of France. The 1st Marine Raider Regiment was ordered to partake in an American attack on the St. Mihiel salient in September 1918, at the Battle of Saint-Mihiel. Facing the raiders were a series of formidable trench networks with barbed wire and machine gun posts. However, the raiders were aided by tank and air support, as well as the fact that the Germans had already begun withdrawing from the salient. The raiders went over the top in mid-September with a three-pronged attack. The 1st Infantry Battalion led the main assault on the south face of the salient, attacking along a wide front which extended from Pont-à-Mousson on the Moselle in the east towards Marvoisin to the west. The 2nd Infantry Battalion attacked the west face along the heights of the Meuse, from Mouilly north to Haudimont. The 3rd Infantry Battalion made a holding attack on the apex of the salient, forming an anvil to trap the German forces between the allied attacks. The weak state of the enemy forces because of their ongoing with drawl coupled with the strength of the allies made the attack hugely successful. By the end of the first day of the battle, a speedup was ordered, and by the second day, all the objectives in the salient had been captured, and the regiment was able to consolidate and push the Germans out even further. However, an even greater push to finish off the enemy forces in the Argonne Forest was being launched later that month, and the raiders were withdrawn to take part in the American-led attack. The Meuse-Argonne Offensive began in late September, with the objective of capturing the railway hub at Sedan and breaking the German rail network. A massive artillery barrage was launched in preparation, and the raiders left their trenches and went on the attack with large amounts of tanks and close air support. The initial attack was not wholly successful. The raiders had met most of their objectives, but had not taken Montfaucon, Montfaucon d'Argonne, and Epinonville. The next day, gains were little, but the raiders finally took Montfaucon as well as the village of Baulny, Hill 218, and Charpentry. A massive German counterattack temporarily pushed back the raiders, but they were able to rally and repulse the enemy, retaining most of the ground they had taken that day. The raiders were also able to push deep into the German lines in the Battle of Somme-Py and northwest of Reims in the Battle of Saint-Thierry. The second phase of the offensive began in October, where the 2nd and 3rd Battalion took part in another attack northeast of Reims at the Battle of Blanc Mont Ridge. After a preliminary artillery barrage, the raiders attacked up the hill and secured the crest, but the Germans still held the west end of the ridge. By the end of the day, the Germans had been pushed off the ridge entirely, and the raiders were advancing their artillery with the objective of taking the Blanc Mont-Medeah line. Though powerful small arms and artillery fire hit the raiders on all sides, they were able to smash through the enemy at Orfeuil and link up with the French forces at the Medeah Farm. The raiders made another, albeit limited attack the next day, taking a ridge southeast of St. Etienne and forcing back a German counterattack. After a rolling barrage the next day, the raiders reached the St. Etienne-Orfeuil road and set up a new line. Another attack to take the German line, beginning some days later, didn't see much success but managed to take some ground in front of the town of St. Etienne as well as Hill 160 on the right flank. When the Germans retreated, the raiders marched into the unoccupied village. They failed in an assault north of the town, but managed to take the St. Etienne cemetery and drove the Germans to the northeast-southwest St. Etienne-Semide road. When a massive German counterattack threatened the line, some raider companies who were short on resources fell back, but they managed to hold off an attack on Hill 160 using captured enemy supplies. The days after were spent resting and reorganizing, before the raiders resumed the fighting. The raiders assaulted towards Machault and Cauroy later in the month, as well as in the direction of Dricourt and Attigny, pursuing a German retreat and fighting enemy rearguard actions between St. Etienne and Machault. They pushed on and took Hill 167 northwest of Vaux Champagne, overlooking the valley of the Aisne from Attigny to Givry. With the enemy positions on the Aisne being too fortified, the raiders halted and stabilized their line. After taking the Forest Farm by the end of the month, the advances in the sector halted. Meanwhile, the 1st Battalion was engaged elsewhere in the offensive. With a gap in the main lines, the raiders were forced to make an assault to close the hole and rescue the Lost Battalion. After a series of successive assaults, the raiders eventually broke through the Kriemhilde Stellung of the Hindenburg Line in the Battle of Montfaucon. By the end of the month, the regiment consolidated and pushed the Germans out of the Argonne Forest entirely. The third phase of the offensive began in November 1918, and the raiders reorganized accordingly. The 3rd Battalion pushed towards the Carignan-Sedan-Mezieres Railroad, while the 1st Battalion attacked eastwards in the direction of Metz. The 2nd Battalion broke through the German defenses at Buzancy and crossed the Aisne River, pushing the Germans back and taking Le Chesne in the Battle of Chesne. The rest of the raiders pushed on, taking Sendan and the railroad hub objective in the Advance to the Meuse. For the rest of the early part of the month, the raiders continued to secure the hills surrounding Sedan and the Meuse until the fighting ceased after the Armistice had been signed.
After the war, the marine raiders marched out of France and into Germany as a part of the Allied occupation of the Rhineland. The raiders were stationed at the north end of the Koblenz bridgehead as well as the Ehrenbreitstein Fortress, and remained there in force until July 1919, when their presence was seriously downsized. However, the raiders remained in Germany as a part of the American Forces in Germany. They withdrew entirely from Europe in January 1923.
The 1st Marine Raider Regiment had sustained casualties of 253 killed, 610 wounded, and 112 missing. They inflicted on the enemy 2,874 killed, 3,587 wounded, and captured 1,212 prisoners.
Russian Civil War (1917-1923)[]
Immediately after the surrender of Germany, a small force of the 1st Marine Raider Regiment, veterans of combat in France, were rerouted to Russia to participate in the North Russia Intervention with the rest of the allied forces. The raiders landed at Arkhangelsk and moved to the Dvina River, where they took positions in front of the village of Tulgas. In November 1918, in the Battle of Tulgas, a large Bolshevik force attacked and the raiders skirmished with the enemy, retreating back to the village. For three days, the raiders held off the Bolsheviks from the bridge and the village itself, driving them back with heavy losses every time. Later in the battle, the raiders counterattacked the Bolshevik camp and drove off the Communists, forcing them to retreat from the area entirely. The marine raiders then moved to the Vaga River Front, where they went into combat again in the Battle of Shenkursk in January 1919. The raiders had split their forces to defend the village of Vyoskaya Gora while the rest remained in Shenkursk. A very small force of American troops had already been attacked in Nizhnyaya Gora, and were retreating to the raiders' forward position. When the Soviets finally attacked, the raiders held them off for days, despite being heavily outnumbered. When the order came to withdraw, the raiders retreated to Sholosha, then Spasskoe, then finally Shenkursk itself. They were forced to cede the area, however, to avoid being destroyed and set up defenses in the village of Vystavka. The Battle of Vystavka began when a large Bolshevik force attacked the village, which the raiders held off until March 1919, inflicting heavy casualties on the Communists. Being overpowered by numbers, the marine raiders withdrew to Kitsa. Though the battle was a tactical defeat, the Soviet offensive was checked and the Bolsheviks abandoned the Vaga Front entirely. Once the offensive was halted, the raiders moved to take the village of Bolshie Ozerki, a point which lay in the middle of the road between the Allied base at Obozerskaya and the port at Murmansk. They attacked the village in March 1919 at the Battle of Bolshie Ozerki, but were driven back due to heavy snow and the large Bolshevik force defending it. With the raiders halting their attacks, the enemy made an attack on a White Russian battery, but the raiders repulsed them every time. The raiders made another assault on the Soviet-controlled village, but this was again unsuccessful. Raider artillery fire responded to Soviet pressure on both flanks, until the infantry made a successful counterattack against the enemy forces. After withdrawing from the area at night, the attacks from both sides subsided. The next day, the Bolsheviks withdrew from the village, but the allied forces were given the order to withdraw from North Russia entirely.
The small raider force which participated in the expedition marched back to Arkhangelsk and left for the United States in mid April 1919. The fighting in Russia had cost the raiders 34 killed, 78 wounded, and 12 missing. They had inflicted casualties on the Communists of 727 killed, 931 wounded, and took 49 prisoners.
World War II (1939-1945)[]
After the defeat of France and most of the European allies in 1940, the size of the United States military, including the marine raiders, was vastly increased. The raiders ran continuous exercises and drills, should war be declared. In December 1941, war was declared on the Axis powers. The 1st Marine Raider Regiment was to follow a Europe first policy and focus on the defeat of Nazi Germany and Fascist Italy.
The regiment was first called to order for Operation Torch, the invasion of Vichy French North Africa, a part of the ongoing North African Campaign. The raiders were to be a part of the allied Western Task Force, primarily aimed at taking Casablanca. In November 1942, the raiders went ashore in Morocco at three points. The 1st Infantry Battalion landed at Safi in Operation Blackstone, the 2nd Infantry Battalion at Fedala in Operation Brushwood, and the 3rd Infantry Battalion at Mehdiya-Port Lyautey in Operation Goalpost. At Safi, the raiders conducted the beach landing mostly successfully. However, they were soon pinned down by French snipers and had to overcome some enemy resistance in securing the beachhead. A day after the landing, Safi surrendered, and the enemy forces were pinned down by the day after. At Fedala, the raiders came under French fire while on the beaches, but secured their objectives by the end of the day. The combat was more fierce in the third sector, with the raiders there fighting in the Battle of Port Lyautey. The landings had been delayed due to confusion and the beaches were heavily defended by the French forces armed with small arms and artillery pieces. On the first day, the raiders secured the beachhead and took the beach town of Mehdia on the second day. However, the raiders could not secure the Kasbah fortress, which was being defended by the French in force. The next day, they took the fortress and captured the local airfield, bringing an end to the battle. When all objectives had been taken, the raiders regrouped and pushed towards the port of Casablanca. They surrounded the city in preparation for an assault, but the city surrendered before the attack could take place. With Casablanca taken, the next objective was Tunisia. During the Run for Tunis, which began the Tunisia Campaign, the raiders became part of a major allied attack after a British thrust had failed to take the city. In December, the attack began despite bad weather and a large opposing enemy force. The attack did not succeed, and the offensive was called off three days later. In another separate push, the raiders crossed the Atlas mountains and set up a forward base near Faid. By late February 1943, the raiders continued their advance until they were surprised by a massive German attack in the Battle of Kassarine Pass. The raiders defended the pass from the enemy assault, offering stiff resistance from small arms and artillery fire on the floor of the pass and Djebel Semmama, the hill on the eastern flank. The German Afrika Korps and the Italian forces made another reinforced push and the forward positions occupied by the raiders were overrun, and the heavily outnumbered raiders were beginning to give way. A retreat was ordered, and the raiders fought a fighting withdrawal up the western exit from the pass to Djebel el Hamra, where the rest of the regiment was stationed. At Djebel el Hamra, the raiders defended the town in order to prevent the Germans from taking Haidra and Tebessa. They stopped the German and Italian forces, despite being under attack from enemy aircraft. Under constant pressure from the German and Italian assaults, the raiders held the line and launched a decisive counterattack that broke the Axis force. Despite the raiders holding most of their objectives, the battle ended in defeat for the allies, prompting a shakeup in the US command. In March 1943, the raiders resumed the offensive, taking the town of Gafsa and setting up a base there. Continuing onward, the raiders reached the El Guettar valley when they were attacked by German armored forces in the Battle of El Guettar. The raiders, entrenched on a nearby hill, were attacked by German tanks and motorized infantry. The raiders slowed the enemy assault, giving ground gradually until the Germans ran into a minefield and slowed their advance. The raider artillery and anti-tank guns opened fire, and the Germans retreated, having lost a large number of vehicles. The enemy made a second push into the valley, but the raiders were ready. Their artillery broke up the attack and inflicted heavy casualties on the Germans, who retreated to the surrounding hills. With the threat of another Axis attack lessened, the raiders resumed setting up their lines on the Eastern Dorsal range of the Atlas Mountains. By the end of the month, the raiders were ready to go on the attack south of El Guettar, with the objective of starting a breakout. The first objectives were Hill 369 and Hill 772, both held by Italian forces. The raiders began their attack on Hill 369, but ran into stiff resistance from Italian anti-tank fire as well as enemy minefields. Another attack by the raiders gained much ground, but was forced back by a surprise enemy counterattack. Another similar attempt also failed. Despite the hill not yet being taken, the 3rd Marine Raider Regiment, which had been assisting the 1st, was broken off to attack Hill 772. By early April, the raiders had taken Hill 369, but not Hill 772. German reinforcements were called in by the Italians, and the attacks stopped and the lines stabilized. With the combined US-British advance, the raiders moved to take out the last Axis resistance in North Africa in Operation Vulcan. The raiders pushed on despite enemy resistance and liberated Bizerte in May. The raiders observed the Afrika Korps surrender, during which massive numbers of German and Italian troops were taken prisoner. With the continent of Africa secure, the next Axis stronghold, and the next objective for the raiders, was the Italian island of Sicily.
In July 1943, the raiders departed North Africa to make a seaborne assault in the Allied invasion of Sicily in Operation Husky. The raiders departed from their landing crafts shortly after midnight and pushed inland east of the Gela River in the dime sector in the Battle of Gela. The raiders split at battalion level to take various objectives from the Italian defenders. The 3rd Battalion attacked the town of Gela with the intent of capturing the pier. Though they succeeded in securing Gela, the pier had been blown up by the Italians. The 2nd Battalion was to capture the high ground west of Ponte Olivo while the 1st Battalion tried to take the Piano Lupo highland east of Ponte Olivo. The 1st came under heavy fire from enemy machine gun nests in their sector, while all raider battalions experienced harassment from mortar and coastal gun fire. The raiders suffered from lack of support and confusion in getting supplies ashore. An Italian infantry and tank counterattack was organized and approached Gela from three different directions, one from Butera, one along the road from Ponte Olivo, and another from Niscemi. The 3rd Battalion, supported by US Naval gunfire, drove back the counterattack along the Ponte Olivo road, inflicting heavy casualties on the Italians. The column from Butera was also repulsed by the 2nd Battalion, with support from the 3rd. The column from Niscemi arrived and fortified Piano Lupo, attempting to defend it from the raiders. The 1st Battalion attacked the Italian forces, and with support from the naval guns, drove the enemy off the highlands. With the Italian counterattack being repulsed, the Germans launched an attack of their own. A large German force approached Piano Lupo from Niscemi, and the 1st Battalion was driven back. Another force of German panzergrenadiers attacked the other raider battalions, and though the enemy overran the lead elements, the raiders rallied and halted the offensive. The 1st Battalion as well, with naval gun support, stopped the Germans and forced them to withdraw. When the Germans launched a massive air assault, the raiders fell back towards the beaches. The Italians then attacked the 3rd Battalion at the town on the west side of the Gela River, while the Germans attacked the 1st and 2nd Battalions on the beachhead on the east side. The 2nd was pushed aside, but the raiders of 1st Battalion managed to hold the Germans until the naval guns were in a position to support. The raiders held the enemy at the beach, during which time the ships offshore offloaded tanks and provided support. The raiders stopped the German and Italian attacks, destroying many of the enemy tanks. The raiders pushed onwards, taking the Ponte Olivo airfield and securing crucial air support. Pushing inland, the raiders next objective was to break the Etna Line. The raiders moved east on Route 120 to Troina, which they attacked in the Battle of Troina in July. A small attack by the raiders on Troina failed, so the raiders prepared for a longer battle. They pounded the German and Italian defenders constantly with artillery and air support. While the 1st and 3rd Battalions engaged the enemy forces from the front, the 2nd Battalion was ordered to flank around and capture Monte Basilio two miles north of the town, cutting the Axis line of retreat. Despite being under enemy artillery fire, the raiders took Monte Basilio and repelled a German counterattack with machine gun fire. By August, the men of 2nd Battalion had been completely surrounded and cut off from the rest of the regiment. Despite supplies being low the raiders continued to hold, and due to the pressure on the line, the enemy forces evacuated Troina. Continuing their advance, the raiders took Cesaro, a valuable objective on the New Hube Line, and linked up with friendly forces at Randazzo. After taking Messina, the raiders remained in Sicily until they departed for England, which they reached in November 1943, leaving the 3rd Marine Raider Regiment to deal with mainland Italy.
During the time in England, the marine raiders reequipped and retrained their forces before the offensive preparations commenced. They also took part in numerous exercises meant to replicate the expected conditions. The objective was Normandy, France, in an offensive campaign that would take back Western Europe from Nazi control. In early June 1944, the raiders departed England to land on the Normandy coast in an amphibious assault as part of Operation Overlord. Their landing position was the westernmost of all the allied landing zones, Omaha Beach. The raiders split their forces to take individual sectors of the beach. The 1st Battalion took Dog Green, Dog White and Dog Red, the 2nd Battalion took Easy Green and Easy Red, while the 3rd Battalion took Fox Green and Fox Red. After an initial bombardment from air support and naval guns, the raider infantry disembarked from their landing crafts and waded ashore. Immediately, they were hit heavily by machine gun fire and suffered heavy casualties attempting to reach the cover of shingle bank. Additionally, many of the raiders had landed outside of their assigned sectors and struggled to reach them. At this point, confusion was prevalent, and the raiders who had survived the first wave were mostly unable to provide adequate support for the secondary assault wave, who also suffered heavily. The 1st Battalion saw some success later in the fighting as the smoke from the grass fires caused by the naval bombardment gave them some well-needed concealment. Soon all of the battalion had reached the seawall between the German strongpoints of Vierville and Les Moulins in the Dog White sector. However, east of Les Moulins, in the Easy Green sector, the 2nd Battalion struggled with the coastline defenses and an effective attack was out of the question. In the Easy Red sector, some men of the 2nd saw some success as they could advance to the shingle between two German strongpoints. In Fox Green and Fox Red, the raiders of 3rd Battalion suffered from confusion and all but lost unit cohesiveness. Later in the attack, most of the surviving raiders had reached the relative safety of the shingle, but had no way break out. The only way to secure the objectives at this point was to take the bluffs. On Dog Green, the raiders forced gaps in the barbed wire and charged up to the top of the bluff and pushed inland. Soon after, the 2nd fought their way up to the bluff next to Les Moulins. The 3rd also made it up the slope on Fox Green. While continuing to penetrate inland, the raiders encountered small pockets of resistance that continued to hold up the advance. Meanwhile on the beach, vehicles and supplies began to land even though though the beachhead was still not completely secure. Later in the battle, the raiders had secured the Vierville draw, but the St. Laurent and Colleville draws had still not been opened. By the end of the day, the raiders had assisted in taking thirteen gaps. The raiders soundly defeated a German counterattack in the Colleville area and continued fighting small, localized actions for the rest of the battle. The beachhead became a supply station, though it was still being hit by artillery shells consistently. The foothold gained on D-Day still needed to be expanded. The next day, the 1st Battalion moved on and captured Port-en-Bessin, while the 2nd and 3rd Battalions took Formigny, which the Germans only gave up after hard fighting. Four days after D-Day, the raiders of 1st Battalion had successfully linked up with British forces, linking Omaha with Gold Beach. The 2nd and 3rd Battalions cleared the last of the German defenders from the bluffs and relieved US forces holding Point du Hoc. As part of the initial movements inland, the raiders went into action again to counterattack a German force threatening an American position at the town of Carentan in the Battle of Bloody Gulch. As the position was about to be overrun, the raiders, with tank support, counterattacked the Germans in a flanking maneuver, forcing them back with heavy casualties. For the rest of June, the raiders reorganized after the relative chaos of the landing and the weeks after. The next objective for the raiders, assigned in early July, was the strategic crossroads at St. Lo. The 1st Artillery Battalion had been pounding the city almost constantly since the artillery guns went ashore after the landing. The Battle of Saint-Lo began later in the month, and the regiment moved on the Bayeux road near Martainville. The 1st attacked the northeast sector near the Madeleine. At this point, the raiders were ordered to relieve a cut off American force trapped and under fire by German artillery on Martainville Hill. Once the raiders reached their objective, a massive German counterattack hit their position and the raiders were stopped from advancing any further. After calling in artillery and air support, the raiders advanced to an abandoned mine depot, while another raider force was moving through La Luzerne to the bottom of the Dollee Valley. When the raiders successfully established positions along the crossroads at Madeleine, the Germans began a retreat west towards Rampan. Shortly after the enemy retreat, the raiders marched via the road to Isigny into the Bascule district of the city, near the Saint-Croix church. The next assignment for the raiders from St. Lo was an offensive to isolate the Brittany peninsula. Operation Cobra was launched in late July, and the raiders attacked westward after an air barrage. They advanced through craters on the unoccupied German outpost line, expecting little resistance. However, a German force of infantry, tanks, and artillery put up a fight and the raiders were forced to engage. The first day's results were not entirely successful due to heavy resistance from the enemy forces, but by the next day, the raiders managed to take a road junction north of Le Mesnil-Herman, an important objective in the operation. Progress was slow even when the Germans weren't actively resisting. Floods and swamps as well as minefields often delayed the advance. They took Coutances despite resistance from the determined enemy defenders, and afterwards throwing back several desperate counterattacks, inflicting heavy losses on the German tanks and infantry. When large amounts of German reinforcements arrived on the battlefield, the raiders fought and defeated them in individual battles near Saint-Denis-le-Gast and Cambry. During the final days of the operation, the raiders took the last objective: the seaside town of Avranches. All further German attacks were repulsed with heavy losses, and the raiders were able to move outside of the bocage for the first time. The 3rd Battalion was advancing west towards Brittany, while the 1st and 2nd were participating in the drive east, and were almost at Le Mans, an important German logistical center. By the beginning of August 1944, the raiders had all but annihilated the German forces in Normandy, and the Germans launched Operation Luttich, a massive counterattack between Mortain and Avranches. The raiders were temporarily surprised by the attack east of Mortain, and although Mortain was briefly taken, the raiders still held onto Hill 314, and stopped the German advance in its tracks. Another offensive pushed southwest toward Avranches and penetrated the raiders lines, but they were able to rally and hold the enemy off just south of the town. With clear skies, the raiders received much needed air support, which destroyed large numbers of German tanks and forced a large-scale retreat. The infantry counterattacked to the south near Vire and pushed back a large number of German regular and SS units. The raiders defeated the Germans in subsequent attacks near Mortain and took Le Mans shortly after. With the German offensive fully halted, the raiders pushed eastwards towards Argentan and Chambois, with the objective of encircling the German forces at Falaise. The raiders advanced to close the Falaise Pocket in mid August, capturing Alencon and forcing back a counterattack. Eventually, the raiders occupied positions overlooking Argentan. After advancing to encircle the Germans at Chambois, the raiders linked up with Polish and Canadian forces. The raiders made their final push, attempting to destroy the trapped enemy forces in the Battle of Chambois. The raiders attacked the city, killing and capturing large numbers of German soldiers. However, a German counterattack pushed the raiders back, and they were forced to rely on air support to hammer the Germans in the city. The next day, the raiders made the final assault, which destroyed the German force and repelled all enemy counterattacks. The last of the German resistance at Falaise had been defeated. While the 1st and 2nd Battalions were destroying the German forces to the east, the 3rd Battalion was making its own push into Brittany in the west. The raiders took the fortress of Saint-Malo and pushed towards the port of Brest. The raiders surrounded the city, and stormed it in the Battle for Brest. Fighting was difficult, as the German paratroopers were well dug in, and artillery and airstrikes were of little help. After three days of fighting, with tank support, the raiders took the heavily fortified Fort Montbarey. The rest of the battle was urban combat and bitter house-to-house fighting, with the city eventually being razed to the ground. The city surrendered in late September, but only after the Germans had wrecked the strategically important port facilities. The 3rd joined the rest of the raiders just in time for the Liberation of Paris, during which they marched triumphantly into the city. After observing the last German surrender, they paraded down the Champs-Elysees, waving to large crowds of cheering Parisians. The symbolic taking of Paris brought a victorious end to the Invasion of Normandy. The main obstacle for the allies now was the Siegfried Line.
During the next phase of the war, the Allied advance from Paris to the Rhine, the raiders fought several operations simultaneously. The 1st Battalion fought across the German border, the 2nd Battalion fought in the Lorraine Campaign, and the 3rd Battalion fought in the Hurtgen Forest. The objective for the 1st Battalion was the old German city of Aachen, a target of little strategic value but important psychologically. The defenses of the Siegfried Line protected Aachen, and a major effort was needed if it was to be taken. For the beginning of September, the raiders fought small actions around the town, until they were hit by a major counterattack by German panzergrenadiers. After repelling the attack, the raiders continued their advance, pushing through strong defenses and frequent counterattacks. By the end of the month, the raiders had partially surrounded the city, and there was a lull in the fighting. Before the main attack, in the Battle of Aachen, the raiders launched a massive barrage from their artillery and air support. The German pillboxes, however, were still intact and the raiders had to destroy them individually. Beginning in early October 1944, several companies of the 1st Battalion assaulted north of the city, slowly taking out German positions. They crossed the Wurm River and moved into the town of Palenberg, destroying pillboxes as they went. After bitter house-to-house urban fighting in Palenberg, the raiders advanced to Rimburg, where the situation was largely similar. The raiders had to capture a medieval castle being used by the Germans as a fortress without critical tank support. That night and the next day, the raiders forced back a series of desperate counterattacks by the Germans and finally took Rimburg, advancing farther into the German defensive line at the town of Ubach. The raiders, now with tank support, continued to fight off counterattacks on Ubach, using artillery to inflict heavy losses on the Germans. For the rest of the week, the advance was slow, but the raiders captured Hoverdor and Beggendorf on one day and Merkstein-Herbach on the next. In the later part of the battle, a German armored counterattack pushed the raiders back from Alsdorf but was finally repulsed near Mariadorf with tank support. With the raiders advancing and inflicting heavy casualties, the Germans reinforced their position at Aachen. Meanwhile, to the south, the remaining companies of the battalion prepared for their assault. They took Verlautenheide and attacked Hill 231 near Ravelsberg and Haaren, preceeded by a large artillery barrage. The Battle of Crucifix Hill, intended to capture the summit, was launched on the first day of the southern attack. Under fire from pillboxes, the raiders charged up the slopes of the hill and destroyed the German emplacements, one after the other. They also repelled a fierce enemy counterattack on the hill. After dealing with a number of other counterattacks, the raiders pushed the Germans back and took the high ground around Aachen. The raiders fought more urban combat in the villages of Bardenberg and Birk, pushing south to link up with the companies occupying the heights above the city. Meanwhile, the raiders on Crucifix Hill were attacked by a large German force. Though the enemy took the hill and briefly pushed the raiders off the summit, the raiders counterattacked and destroyed the German force, regaining the hill. The raiders there repulsed multiple counterattacks and took an industrial center in preparation for the city assault. With the raiders closing in on Aachen, the Germans launched multiple armored attacks, but these were broken up by the raiders' artillery and air support. From the north, the raiders pushed into Wurselen. However, narrow streets and dug-in German infantry and tanks fighting from houses took a toll on the raiders, and they were forced to take a different route. This attack was a success, and 1st Battalion consolidated, with all companies linking up after the attack. With the route into Aachen clear, the raiders launched their final assault on the city in late October. They used flamethrowers to clear buildings and enemy hardpoints, but suffered from frequent ambushes. Progress was slow. To remedy this, the raiders used their artillery to destroy German fortifications as well as blast tunnels which allowed the raiders to avoid being exposed in the city streets. When the raiders had achieved most of their objectives within the city, they were ordered to take the Hotel Quellenhof, the German command center and last line of defense at Aachen. Raider tanks and artillery fired on the hotel constantly, but it still held, and a number of attacks by the raiders ended in defeat. A German counterattack outside the hotel pushed the raiders back, but they were able to stop it with concentrated mortar fire. After a barrage, a final assault by the raiders ended in the surrender of the Hotel Quellenhof. Aachen had been finally taken, but at a price. Meanwhile in Lorraine, the raiders of 2nd Battalion pushed through France and secured a crossing over the Meuse River at Verdun and Commercy. Soon after, they came across the German stronghold of Metz on the Maginot Line. In September, the raiders launched the Battle of Metz. After encircling the city, the raiders determined that Fort Driant had to be taken if Metz was to fall. Late in the month they assaulted, at the Battle of Fort Driant. After an air barrage, the raider infantry moved on the fort, taking fire from small arms and mortars. The raiders had support from bulldozers, but these weren't too much help against the trenches and pillboxes around the fort. When the raiders reached the trenches, fierce hand to hand combat ensued. Some of the raiders managed to capture the southernmost barracks and moved through a hidden tunnel. However, the tunnel was well fortified, and exploiting it was an impossibility. After taking a quarter of the fort, it was deemed not worth the casualties and the raiders withdrew in October to find another way of taking Metz. They attacked the city directly, but this failed. However, they were able to capture a bridgehead across the Moselle to the south. The Germans reinforced Metz to the south and another attack by the raiders was a failure. A flanking attack to the east in early November captured some of the outer defenses, and by the middle of the month, most of the forts were isolated and the raiders were seeing success in direct assaults on the city. By the middle of the month, the Germans began a retreat and the raiders had succeeded in taking the city. One by one the surrounding forts began surrendering, beginning with Fort Verdun and ending with Fort Jeanne d'Arc in early December. With the city captured, the raiders were clear for their advance to the Sarre River. The 3rd Battalion was experiencing difficulties of its own, in the Hurtgen Forest. With the objective of taking the Rur Dam, the raiders were forced to advance through the heavily-defended woods. The raiders first kicked off the Battle of Hurtgen Forest with a preliminary attack to secure the Roer River crossings at Düren. They took Schevenhutte with relative success, but other parts of the battle would not be so easy. In mid September 1944, the raiders attacked on and around the Hofen-Alzen Ridge but could not dislodge the Germans. They took Lammersdorf but could not take any ground near it. The Germans in the woods behind the village as well as entrenched on Hill 554 forced back multiple assaults on the raiders. When these assaults failed, the raiders attacked the forest to the northeast to capture Hurtgen and Kleinhau. These attacks were also failures, as a result of the well prepared enemy defenses. An attack towards Schmidt also yielded little, and although the raiders cut the Monschau-Duren Road, they still faced dug-in German forces and were stopped in mid October at the Wesser Weh Creek by a number of obstacles. In early November, more attacks were planned. The raiders attempted to take Germeter, but were stopped by a minefield, artillery, and incessant enemy counterattacks. Another attack was supposed to secure the woods next to the Kall River and capture Simonskall, but these tasks proved almost impossible. A followup attack was more successful. In it, the raiders took Germeter, Vossenack, and the neighboring ridge before the attack stalled. Another assault moved across the Kall Valley and captured Kommerscheidt and Schmidt, cutting the German supply line to Monschau. However, the raiders were forced out of Schmidt due to encirclement by the enemy, and they retreated back to Kommerscheidt. At this town, the raiders, with crucial air and tank support, forced back several German armored counterattacks. In Vossenack, the raiders were nearly forced out of the town, but they were able to counterattack and retake it from the Germans. Despite holding their position along the front, the raiders were ordered to withdraw later in November. The battle had been long and costly and ended in a German victory, the first major defeat for the raiders for over a year. The fighting in the forest continued with Operation Queen, beginning in mid November with the 1st Battalion, recently returned from Aachen, mounting their own offensive. After a large aerial bombardment, the 1st attacked in a two-pronged force, encountering heavy resistance near Hamich and only capturing the town after prolonged fighting. Progress continued to be slow, with the German defenders in elevated entrenched positions. The fighting in the woods was bloody and decreased the effectiveness of artillery support. With the raiders supported by their tanks, they managed to capture the castle at Frenzerburg near Inden. With an inexperienced German unit opposing them, the raiders were able to speed up the advance, taking Langerwehe, Jungersdorf and Merode until they were counterattacked at Merode, leading to another stall in the attack. Meanwhile, other companies of the 1st Battalion had been ordered to take the industrial triangle at Eschweiler-Weisweiler and the Eschweiler woods at Stolberg. They fought hard for the Donnerberg, but took the most important hill fairly quickly. They pushed on and took Stolberg with relative ease, but encountered heavier resistance around the town of Eschweiler and decided to encircle it instead of attacking. This worked, and the Germans abandoned the village. The raiders moved along western bank of the Inde River towards Weisweiler and took it, securing Inden and the entire industrial triangle shortly after. By the beginning of December, the raiders were able to cross the Rur at Lamersdorf and pushed to Lucherberg, taking the town after a heavy German counterattack supported by tanks was repulsed. While the men at Lucherberg rested, the rest of the battalion was committed to capture Duren, a route between Hurtgen and Schevenhutte was taken. They did not have as much of a problem with actual German resistance as they had with the numerous minefields surrounding the German defensive line. The raiders attacked Grosshau in late November but failed to take it. They took Hurtgen after a tank attack failed, and they attacked and captured Grosshau and Kleinhau on the same day. With much ground captured, the raiders continued pushing eastwards towards the Brandenberg-Bergstein ridge. They took Brandenberg fairly quickly, and took cover from a German air raid, which did little damage. They captured Bergstein a few days later and repulsed a massive enemy counterattack into the town, capturing the overlooking Castle Hill. They reached the Rur a day later. In another part of the offensive, some other companies had also been advancing. They reached the town of Gey but were held up by determined German resistance. The enemy launched a counterattack which caused even further difficulty, but the raiders stopped it with artillery fire. By this point, the raiders had fought through much of the Hurtgen forest and were almost entirely at the Rur. While the 1st Battalion was in the forest, the 3rd Battalion was making a different advance through the Rur plains. Their first objective was to destroy the Geilenkirchen salient which threatened the allied advance. To reduce this salient, the raiders launched Operation Clipper, a joint operation with British forces. The raiders' objectives were to take Prummern and the surrounding high ground, east of Geilenkirchen. After an artillery bombardment, the raiders attacked, securing the high ground fairly easily. They advanced towards Suggerath the next day and pushed to take the town of Beeck, but the advance was stopped as the raiders had to stop a German counterattack on Prummern. They finally secured Prummern soon after, taking Mahogany Hill in a surprise attack. They took Geilenkirchen, advancing northeast on the Wurm towards Suggerath. Flame-throwing British tanks provided support in clearing out pillboxes. They took Tripsrath quickly and moved on Bauchem, subduing the defenders after an artillery barrage. With most of the objectives taken, Wurm was in sight. However, rain and mud bogged down the advance. The raiders attacked toward Wurm, but without tank support, the attack failed. Other advances towards Mullendorf and Beeck were similar failures in the face of reinforced German defenses. Despite the recent failures, the operation had achieved success in reducing the salient. Having succeeded, the raiders split their companies to make three separate advances. One advanced north to Linnich, another in the center towards Julich, and one in the south towards Wurselen. From there, the raiders were all to advance to the Rur. They took Wurselen within four days and captured Steerich, Bettendorf and the surroundings of Siersdorf shortly after. By late November, the raiders were in striking distance of the Rur, and the Germans reinforced their position. Due to the increase in enemy forces, the raiders were evicted from the town of Bourheim. With intense fighting up and down the line, the raiders managed a push which took Bourheim and Koslar and repelled a German counterattack on both villages. Continuing to advance, they took Kirchberg and Merzenburg and finally ended up on the banks of the Rur. By early December, the raiders had taken two bridgeheads on the river. After the 3rd Battalion's successful push, the 1st Battalion was still short of their objectives. Towards the north, the raiders reached the Rur in good order, but to the south, there was more of a struggle. Their first objectives were to take the towns of Strass and Gey. The raiders took Strass fairly quickly and reached Gey, but muddy roads and landmines prevented tank support. A fierce German counterattack on Schafberg isolated the raiders, but eventually reinforcements and tank support eventually arrived and defeated all enemy attacks on the town, as well as taking back Schafberg. To the north, the raiders took Gurzenich and Birgel and conducted an offensive which pushed the German forces to the Rur. With the objectives on the Rur mostly taken, the 1st and 3rd Battalions consolidated for a push to take the strategically important Rur dams. In mid December, the raiders pushed into the Ardennes sector, where they came across a massive German offensive about to begin.
The Battle of the Bulge, Nazi Germany's last offensive, began in mid December 1944 In the in the northern sector, the 1st Infantry Battalion went into action at the Wahlerscheid sector, where they attacked first in the Battle of Heartbreak Crossroads. The raiders moved along a road from Krinkelt-Rocherath through the Monschau Forest to the strategically important Wehlerscheid crossroads. They attempted an attack which would surprise the Germans, but as the raiders attacked, they encountered German forces entrenched in pillboxes, bunkers, and other buildings. The advance was slowed by barbed wire and strategically placed enemy machine guns. After pulling back, the raiders used their heavy artillery to destroy the pillboxes and advanced to remove the barbed wire. On the south side of the road, some of the raiders were able to clear a path in the German defense and held off German reinforcements, before pushing forward and exploiting the breakthrough. A renewed, reinforced attack by the raiders captured the crossroads and its road network. A German attack began, and though this was seen as a simple retaliatory counterattack, it marked the beginning of the offensive. The Battle of Elsenborn Ridge began in this sector, and the first fighting took place at Monschau and Hofen, preceeded by a German artillery and rocket barrage. The barrage severed many of the communication lines, and the raiders, heavily outnumbered, were forced to face a massive German attack with barely any support. Nevertheless, using small arms and mortar fire, and even resorting to hand-to-hand combat occasionally, the raiders stopped the enemy advance entirely. Later in the fighting, artillery support found the raiders' targets and delivered a devastating impact on the attacking German forces. The enemy made renewed pushes to take Monschau and Hofen, but the heavily outnumbered raiders were able to defeat every one, inflicting heavy casualties on the Germans. In order to protect Elsenborn from the German advance, the raiders pulled back from Heartbreak Crossroads in mid December and arrayed the entire force of the 1st Battalion along the Baracken Crossroads near the twin villages of Rocherath and Krinkelt. The enemy had made a push east of the twin villages, which had to be contained so that the raiders' heavy weapons could be positioned on Elsenborn Ridge. The area around the ridge suffered from problems with intelligence and coordination, but the raiders were successful in deterring the enemy advance. On another end of the line, another force of the 1st Battalion was fighting for Dom Butgenbach and a portion of the ridge in the vicinity of Kalterherberg. All German attacks in that sector were also stopped. However, in another part of the battle, the raiders could not contain the Germans' advance. The enemy took Honsfeld and Bullingen, but the raiders put up resistance on the ridge which forced the Germans to attack in other ways. The main advance against Elsenborn took place in the forest east of the twin villages, where the outnumbered marine raiders had their forward positions overrun and retreated to Krinkelt and Rocherath, where they put up a stand that stopped the Germans in their tracks. Over the next few days, the German attacks on the twin villages were uncoordinated and defeated relatively easily. The Germans then decided to shift their attacks to the south of Elsenborn, with an initial assault on the position of Domane Butgenbach with the objective of taking the Roderhohe high ground. The Germans got stuck in the soft ground before their objectives and only a limited attack towards Hofen was made, which was repulsed by the raiders. In late November, the raiders were ordered to evacuate the villages and fortify on Elsenborn ridge, which was so frozen it required explosives to dig in on. North of the villages, the withdrawal was more problematic. The raiders suffered from lack of supplies and had to raid a German ammo cache in order to gain enough ammunition to stop the enemy pursuit. A German advance from the south and east was defeated, as well as one from the southwest. Once the raiders were situated on Elsenborn ridge, the Germans prepared a massive armored assault to take the position. The enemy again tried to take Domane Butgenbach and the Roderhohe, but both assaults were beaten back by fierce resistance and artillery support from the raiders. The north side of the ridge was attacked near the Schwalm Creek Valley, but the German attacked was stopped in the mud and provided an easy target for the raiders' heavy artillery. All renewed attacks were soundly defeated with heavy losses inflicted on the enemy. An attack on the right by SS forces was also defeated by the raiders' heavy anti-tank weapons. Raider tanks, infantry, and artillery broke up the enemy infantry. The battle on the northern edge was seeming to be highly successful. Another German advance towards the Meuse river crossed Ligneuville and reached the heights of Stavelot on the left bank of the Ambleve River at nightfall before attacking in the morning. The raiders provided great resistance to the German forces attacking Stavelot, delaying the enemy from reaching their objective at Trois-Points. At Trois-Points, the raiders destroyed the bridge as well as their oil reserves to prevent the Germans from taking advantage of them. Raider air support, which had just become available, strafed the German forces, destroying many of their vehicles and killing many of their troops. Another enemy force, advancing from the southeast, attacked Stavelot again, but the raiders beat back the much larger enemy force from positions on and near the Ambleve bridge. The raiders also blew up the Stoumont and Salm bridge to prevent the Germans from advancing to the Meuse. An attack on Stoumont was repulsed, and the raiders forced the Germans to retreat to La Gleize. With the enemy trapped in the Ambleve Valley, the raiders counterattacked and retook Stavelot, while also demolishing the Ambleve bridge. With even more air support, the raiders pounded the Germans and forced them to withdraw under terrible conditions. For the rest of December, the raiders stopped all renewed German attacks. The fighting on Elsenborn Ridge was over, with disproportionately heavy casualties being inflicted on the enemy forces. Slightly to the south, the 3rd Infantry Battalion had been fighting their own battle in the Ardennes. The German forces were trying to take a long, narrow valley on the border between Belgium and Germany. The Losheim Gap, defended by the raiders of the 3rd Battalion, was overrun, and the raiders retreated east to Schnee Eifel, where they were attacked by the Germans in force in the Battle of St. Vith. The raiders, who had dug in, suffered from a German artillery barrage which did not damage their fortifications as much as it hurt their communication efforts by cutting the telephone lines. When the German attack came, the enemy took the villages in the area without much resistance except at Kobscheid, where the raiders held on to the village and drove back multiple assaults with machine guns before withdrawing to St. Vith. The raiders' defenses had prevented the German forces from reaching St. Vith as well as the bridges over the Our River at Schoenberg and Steinebruck. While the lack of favorable weather held the enemy advance up significantly, the raiders reinforced their positions at Winterspelt and Schoenberg and led a local counterattack which took back Bleialf. The German advance later in the day took Winterspelt and the Steinebruck bridge, but an armored counterattack from the raiders retook the bridge before they withdrew to positions west of the Our River. The Germans then overran Bleialf and took Andler in a tank attack. Despite the loss of the Schoenberg bridge soon after, the raiders offered as much resistance as they could to slow the German envelopment of Schnee Eifel. While most of the battalion's strength had retreated west of the Our River, a small force had remained on the east side as they had no means to cross. This force became entrapped in the Schnee Eifel pocket. When it became clear that a breakout would be the only way to escape the Germans, the raiders planned an attack which would push west to the Bleialf-Schoenberg-St. Vith road. This attack saw much initial success, as the raiders reached the ridgeline on the east portion of the Our River Valley. When a follow up attack was launched to take the Schoenberg bridge, the raiders came under heavy fire from German heavy weapons on the ridge and were flanked by German infantry from their left and right and tanks to their rear. Surrounded and low on ammunition, the raiders continued to hold, but the companies on the east side of the river trapped in the pocket surrendered relatively intact. With almost a quarter of the battalion captured by the Germans, the raiders made a huge effort to defend St. Vith. Initial attacks from the north by the enemy was repulsed by counterattacks from the raiders, but that would not be the end of the assaults. The Germans cut the Rodt-St. Vith road and threatened to surround the salient at Vielsalm. After a massive enemy artillery barrage, the Germans attacked with tanks from the Schoenberg-St. Vith road towards the raiders' positions on the Prumberg. After the enemy had forced their way into the positions, a retreat was ordered. St. Vith would fall, and the raiders would fall back. When it looked like the Germans would be able to pursue, the weather cleared up, allowing for the raiders' air support to cover the retreat to Crombach, Beho, Bovigny, and Vielsalm, west of the Salm River. Far to the south, the 2nd Infantry Battalion, having just finished the fighting Metz shortly earlier, would make an advance north to relieve US paratroopers trapped in the Siege of Bastogne. In late December, they successfully reached Bastogne from the southwest in late December, attacking from the direction of Assenois. With the German offensive in the Ardennes fully halted, the raiders counterattacked. The 2nd went on the offensive and took Recogne, the Bois de Corbeaux, and Foy in early January 1945. North of Bastogne, however, the raiders were struggling to take Bourcy. A reinforced push took Noville, Rachamps, and Bourcy later in the month. Though the German offensive was over, the fighting still went on for several weeks, during which the raiders recaptured St. Vith. After the offensive to erase the bulge, the allies were clear for a definite advance into Germany to end the war.
The Western Allied invasion of Germany would begin in March 1945. The first units to go into action for this offensive were the 1st and 2nd Infantry Battalions, selected for Operation Plunder. The 1st made use of bridgeheads on the Erft River, crossing over and taking Euskirchen and later capturing Cologne. With objectives in the sector captured, the raiders pushed towards the Ahr River Valley. The 2nd Battalion, attacking the Siegfried Line, was held up by some resistance but managed to break through the German lines at Bitburg and exploited the gap in a drive to the Rhine river in which the raiders inflicted heavy casualties on the Germans while suffering minimal losses themselves. A small force from the armored battalions managed to find and secure single bridge over the Rhine intact. More and more of the raiders were redirected to cross the Ludendorff Bridge in the Battle of Remagen. The raiders' air support managed to keep the German aircraft at bay while the infantry secured the area past the bridge. One force attacked towards Bad Honnef while another one moved to secure Bruchhausen, encountering more resistance than expected. With the objectives taken, the raiders dug in and prepared for a counterattack. Several uncoordinated attacks from German infantry were easily stopped. A massive desperate German air assault also failed, with the raiders shooting down large numbers of enemy aircraft. Several weakened enemy divisions attacked the raiders over the coming days, but these were soundly defeated and large amounts of German prisoners were taken. The Germans tried all available means to destroy the bridge, but every one failed. Over the next few weeks, the raiders of the 1st Battalion and their supporting armor and engineer battalions were able to get all of their equipment across the bridge, before it collapsed later in the month. Soon after, the 2nd Battalion crossed the Rhine on a treadway bridge at Nierstein and established a large bridgehead, capturing many of the enemy. The 3rd Battalion was cleared for Operation Plunder. In late March, after a large artillery and air barrage bombarded the German positions at Wesel, the raiders disembarked from their landing crafts south of the town and cleared up the broken enemy resistance. Having fully crossed the Rhine, the raiders' next objective was to destroy the last of the German strength in the area, in the Ruhr Pocket. The 2nd Battalion was heading east, but the 1st Battalion moved northeast and formed the southern pincer of the double envelopment. The 3rd Battalion headed southeast, forming the northern pincer. Lead forces of the two pincers met in Lippstadt in April 1945, completing the encirclement and trapping a large amount of German soldiers in the city. The raiders took the city piece by piece, finally finishing off the pocket with a large number of enemies taken prisoner. Meanwhile, the 2nd Battalion had its own objective, which it attacked in the Battle of Frankfurt. The raiders reached the outside of the city and took the Rhine-Main Airbase. They later pushed to the Main River and secured an intact bridge, crossing it under heavy fire and entering Frankfurt. They secured the city through heavy fighting in house-to-house urban combat in late March, but the fighting continued until early April. With Frankfurt and Ruhr secured, the raiders were clear for a drive to the Elbe River. The 1st Battalion advanced in the direction of Leipzig while the 3rd moved towards Madgeburg. To the south, the 2nd Battalion advanced to Chemnitz with orders to turn southeast into Austria. The raiders there captured a large amount of German treasure near the town of Merkers, and liberated the Ohrdruf concentration camp a few miles south of Gotha. Meanwhile, the 1st and 3rd Battalions reached the Leine River east of Paderborn. The drive to the Elbe began a few days later, and the 3rd Battalion was the first to reach their objectives. The raiders were eagerly anticipating a drive to take Berlin, but the allied high command ordered that this would not happen. The 3rd continued mopping up local pockets of resistance. As the 1st continued towards Leipzig, the raiders encountered one of the last bastions of organized German resistance in the area south of Magdeburg and short of the Mulde River. The raiders faced a line of enemy anti-aircraft guns turned against the infantry. Through night flanking attacks, they succeeded in destroying the guns and eliminating the pocket of resistance. They advanced and took Leipzig and moved onwards to the Mulde River, where they halted the advance. On the southern flank, the 2nd Battalion took Erfurt and Wiemar, before stopping on the Mulde River just short of the original objective of Chemnitz. With every unit of the regiment on the Elbe-Mulde line, the raiders conducted official ceremonies with adjacent units of the Soviet Red Army and took part in a grand celebration upon the End of World War II in Europe and the final surrender of Nazi Germany in early May 1945.
After the conclusion of hostilities, the 1st Marine Raider Regiment remained in Germany as a part of the occupying force in Allied-occupied Germany. The separate battalions had their own commands and were spread out among the American sector. They occupied Bavaria, Hesse, and Baden-Wurttemburg. The marine raider bases in the area continued to be a forward garrison point throughout the Cold War, with increasing deployments in times of crisis, and some are still functional to this day.
The 1st Marine Raider Regiment had not seen this continuous action for this long a period of time since the Civil War. Plans were made for elements of the regiment to be transferred to the Pacific Theatre after the Nazi surrender, but due to the exhaustion of the raiders and the surrender of Imperial Japan soon after, the plans were never followed up on. The raiders incurred casualties of 825 killed, 1,339 wounded, and 528 captured. Their estimated inflicted casualties are 8,398 enemy killed, 11,293 enemy wounded, and 9,823 captured.
Korean War (1950-1953)[]
Until 1950, the 1st Marine Raider Regiment's designated role in the Cold War was to focus on the threat posed by the Soviet Union and its satellite states in Europe. When fighting erupted on the Korean peninsula, the raiders of the 1st Regiment remained in Germany while the regiments in East Asia fought the Communist invasion. However, once the United Nations Command planned a counteroffensive to relieve the Pusan Perimeter, the 1st and 2nd Marine Raider Regiments were rerouted from Europe to Japan. They departed from Japan soon after in order to make an amphibious assault behind North Korean lines, codenamed Operation Chromite.
In mid September 1950, the raiders landed in South Korea after a preliminary bombardment in the Battle of Inchon. First to land was a force of the 1st Infantry Battalion, attacking Green Beach on the island of Wolmido, supported by tanks. After a brief firefight with the enemy, the island was taken with minimal losses. Farther north, landing directly at Inchon on Red Beach, the 2nd Infantry Battalion went into action soon after. Their objective was to hold a line extending from Cemetery Hill in the north, to Observatory Hill in the middle, to the Inner Tidal Basin in the south. Though facing increased mortar and machine gun fire from the North Koreans on Cemetery Hill, the raiders disembarked from their landing crafts and neutralized the enemy defenses while the support guns knocked out the batteries on the right flank of the beach. They also opened up the causeway to Wolmido, allowing the 1st Battalion to link up with the 2nd. The raiders attacked and captured the city of Inchon, taking it within a few hours. The next day, they ambushed a North Korean tank and infantry column, inflicting heavy casualties. The raiders were in control of much of the strategically important Kimpo Airfield shortly after. Meanwhile, the 3rd Infantry Battalion was conducting a smaller landing to the south at Blue Beach. They split at company level to take Blue Beach One, Blue Beach Two, and Blue Beach Three. Though they experienced initial fire from the enemy guns, naval and air support cleaned up most of the resistance. Upon landing, the raiders encountered little enemy resistance, and mostly mopped up before moving to link up with the remainder of the regiment. The next objective was Seoul. The 2nd Regiment had just landed at Inchon harbor, and they were able to assist the raiders of the 1st in their drive to liberate the capital. In the Second Battle of Seoul, the advance was considerably slower as the North Koreans had reinforced and were making an organized defense. After destroying a North Korean tank attack, the raiders delivered control of positions on the right flank to the south of the city to the 2nd Regiment. The raiders of the 1st fought their way through enemy resistance on the road to Seoul, arriving in the city later in the month. Intense house-to-house urban fighting ensued, and the raiders cleared sectors of the Seoul individually. A few days later, they succeeded in taking back Hotel Bando, the US Embassy, from the North Koreans. Having secured Inchon and Seoul, the raiders returned to the sea to make another amphibious landing farther to the north, continuing the UN offensive.
The raiders landed again, this time on the east coast of North Korea at Wonsan in mid October. This time they landed unopposed, and after securing their initial objectives advanced in the direction of the Yalu River. The Communist Chinese People's Volunteer Army, which had recently joined the war on the side of North Korea, had several forces defending the area north of the raiders' positions. The raiders attacked and defeated the adjacent Chinese forces, before moving on to take and occupy Sinhung-ni and Yudam-ni on the eastern and western side of the Chosin Reservoir. In late November, the Chinese attacked and encircled the raiders at Yudam-ni, Sinhung-ni, Hagaru-ri, and Koto-ri, beginning the Battle of Chosin Reservoir. The 2nd Battalion, the most forward of the raiders' infantry battalions, was ordered to attack towards Mupyong-ni but was stopped by enemy resistance, retreating to Yudam-ni and setting up defensive positions. The Chinese attacked these ridges occupied by the raiders of the 2nd, but were repulsed with heavy losses after intense close-quarter fighting. The next day, the raiders and the Chinese were locked in a stalemate. Meanwhile, the 3rd Battalion was attacked by the Communists on the road between Yudam-ni and Hagaru-ri. The successful assault prompted the 3rd to retreat to Yudam-ni and link up with the 2nd, but a small force had been left behind at Toktong Pass and were unable to break out. For the rest of the month, attempts to rescue the trapped forces failed, but the raiders at the pass were able to hold off several Chinese attacks with artillery and air support. When the attacks ceased, the raiders were ordered to break out and retreat to the port of Hungnam. The 2nd and 3rd Battalions moved southward, attacking the Chinese forces on Hill 1542 and Hill 1419. However, these attacks failed and the raiders dug in on the slopes between the road and the peaks. The 2nd was then attacked by the Chinese several times, and was forced to make a fighting retreat out of Yudam-ni. In December, the 3rd finally succeeded in taking Hill 1419 and destroyed several enemy positions on the road. Another attack the next day opened up the Toktong Pass and, by extension, the road back to Hagaru-ri. The raiders were forced to fight through multiple Chinese ambushes and endure constant harassing fire, but they reached Hagaru-ri intact within a few days. Meanwhile, at Hagaru-ri, the 1st Battalion had been in combat as well. The battalion, vastly outnumbered, was forced to defend the supply station there against the Communist Chinese assault. The raiders were surrounded on three sides at the western, southern, and northern perimeter, and were initially overwhelmed by the sheer force of numbers of the enemy attack. Although the Chinese forced open gaps in the lines, fierce counterattacks by the raiders took back the lost ground and forced the enemy out of the perimeter, retaining all previously lost ground except the East Hill. Raider air support managed to break up Chinese infantry formations and stop an impending attack the next day. The raiders made a reinforced push to retake the East Hill, but the Chinese still held it. A massive but desperate Chinese attack hit the raiders' lines shortly after, but the raiders cut down the advancing infantry with small arms fire and tank support. With the 1st Battalion having held out against all enemy attacks and destroying a Chinese division, they were joined by the 2nd and 3rd Battalions in early December 1950, and began their breakout to Hungnam. They recaptured the East Hill and forced back multiple attacks, inflicting heavy casualties on the Chinese. When the road to Koto-ri had been opened, the raiders moved through and were ambushed by Chinese forces on the peaks. The enemy slowed the raiders' retreat until air support dealt with the enemy positions. In a few days, the regiment reached Koto-ri relatively intact. The only obstacle to Hungnam was a large Chinese force at the Funchilin Pass, and the fact that the bridge there had been destroyed by the Communists. The raiders attacked the Chinese positions on Hill 1081, overrunning the enemy defenders. Faced with no other options, sections of bridge were dropped by air to the raiders and assembled by the engineers, enabling the UN forces to continue on the retreat. The Chinese launched desperate assaults and ambushes, but the raiders repelled every one of these with heavy casualties and left Funchilin Pass by mid December. The raiders reached Hungnam shortly after, with the 2nd Marine Raider Regiment providing a rearguard action supported by naval guns which halted the pursuing Chinese forces. They departed Hungnam to land again farther south in Pusan. The drive to the Yalu River had failed, and the raiders were needed to stabilize the lines at the 38th parallel. The raiders were thrown into combat again, this time to augment the crumbling South Korean forces in late December, and saw light action in the First and Second Battles of Wonju. The raiders helped establish Route 29 as a supply road and, during the First Battle of Wonju, the raiders took over the defense of a previously South Korean sector. They retreated to Line D at the 37th parallel, and endured several frontal assaults from the North Korean forces. After the main fighting in the Second Battle of Wonju, the marine raiders fought in numerous anti-guerrilla operations against North Korean guerrillas who threatened the rear of the UN lines. In early January 1951, the raiders were redeployed east of Route 29 and north of Andong and Yeongdeok. They saw much success in fighting the enemy guerrillas, blocking the North Koreans in a small salient on the hills east of Route 29. The raiders' operations took supply bases and killed or captured large numbers of the enemy guerrillas, effectively eliminating the threat to the UN line. In late February, the raiders advanced as a part of Operation Killer, driving back the North Koreans all the way past Phase Line Arizona, inflicting heavy casualties on the enemy. Beginning in March, Operation Ripper was launched as a follow up. The raiders advanced on the eastern flank towards Line Idaho, forcing back the Chinese forces in the area. However, the Communists were able to stop the raiders with delaying actions. The raiders found it especially hard to deal with these, given the muddy, mountainous terrain they had to face in their sector. However, as the offensive pushed on, the raiders were able to take Chuncheon, their original objective. By April, the operation had been a success and the raiders ended it holding the line at the 38th parallel. Later, during Operation Courageous, the raiders did not make any other attempts to advance the line and instead remained immobile for the purpose of securing the area between the Hwacheon Reservoir and the east coast of the peninsula, which they did until mid May 1951 when they were attacked in force by the enemy around the Soyang River as a part of the second phase of the Chinese Spring Offensive. The Chinese attack initially pushed back the raiders, who made a fighting retreat from the Hwacheon reservoir, but they were able to halt the Communist advance within a few days, pushing back the numerically superior Chinese forces. The raiders counterattacked, pushing to and securing Line Kansas north of the 38th parallel. During the final days of the failed Chinese offensive, the raiders helped encircle and subsequently destroy a Communist division. However, assaults north of the line were unsuccessful, and the lines stabilized by mid June, beginning the stalemate which would last until the end of the war.
Following the beginning of the stalemate, the marine raiders were to take part in a limited UN offensive aimed at straightening out the line and capturing a few hills in the north. The raiders attacked in their own sector, during the Battle of the Punchbowl in late August 1951. The first objective was Yoke Ridge, held by a substantial force of the Korean Peoples' Army. The raiders launched an assault from Hill 793 up the eastern edge of the Punchbowl, driving back the North Koreans and securing the southeastern portion of Yoke Ridge. They advanced westward the next day, clearing out KPA bunkers and repelling counterattacks. At the beginning of September, the raiders attacked towards their next objective, Hill 602. They advanced through the woods in front of the hill and, after a preliminary artillery barrage and airstrike, captured the hill, forcing back several determined counterattacks by the North Koreans. The next day, the raiders assumed defense of Hill 924, recently captured by South Korean forces. Over the next few days, the raiders consolidated their positions and established the Hays Line, preparing for the second phase of the attack. The next phase, an attack on Kanmubong Ridge, began with an assault from across the Soyang River towards Hill 680 and Hill 673, with Hill 749 as a future objective. After an artillery barrage, the 1st Battalion advanced slowly up Hill 680, eliminating enemy bunkers but being forced to dig in just short of the summit. Similarly, the 2nd Battalion, tasked with Hill 673, was forced to stop short of their objective due to strong KPA resistance. To remedy this, the 3rd Battalion made a flanking maneuver and cut off the North Koreans on Hill 673, enabling the raiders of the 2nd Battalion to capture it. From there, the 2nd and 3rd Battalions were to move on and take Hill 749, Hill 812, Hill 980, and Hill 1052. The 1st Battalion was to capture Hill 751 and later Hill 1052 to the northwest. The raiders forced their way through the enemy defenses to reach the summit of Hill 749, but fell back after a North Korean counterattack. Meanwhile, the 1st, attacking Hill 751, was held up by minefields and was forced to dig in short of the hill, enduring mortar fire and ten KPA counterattacks during the night. The 2nd and 3rd had to clear North Korean bunkers from a wooded area north of hill 749, but this attack also stalled. The 1st, with air support, managed to take most of Hill 751 and dug in to repel a KPA counter attack. After a mortar and artillery barrage, the North Koreans attacked the raiders' positions on Hill 749 in force, pushing back the raiders who were able to counterattack and force the Communists back with heavy losses. The next day, the 2nd and 3rd Battalions continued the attack against Kanmubong Ridge with an assault against Hill 812 and Hill 980. However, these assaults proved slow, and the 2nd Battalion, tasked with Hill 980, had not made any gains at all, while the 3rd Battalion attacking Hill 812 had made only a few. An artillery and mortar barrage, which was highly effective against the exposed North Korean positions, was followed up by an infantry and tank attack by the raiders against the KPA-held hills. The raiders made good progress against Hill 812, but they were then forced to clear out the enemy positions on the reverse slope which required much close quarters combat. On Hill 980, the raiders were also effective in driving the enemy back until they reached the granite point named The Rock, where machine gun fire from North Korean bunkers stalled the attack and forced the raiders to dig in. Over the next few days, the raiders ceased the general advance, and dug defensive positions on the hills. They endured attacks from the KPA for the rest of September, including several near The Rock in which the raiders were able to trap the Communists in their own minefield. After a particularly intense mortar and artillery barrage from the North Korean forces, an enemy attack cut off many of the raiders' outpost units. After a counterbarrage from the raiders, the infantry counterattacked the North Koreans and forcing them back. Some time later, the raiders peeled off a force to assist the Republic of Korea forces, who were struggling to take Hill 854. Their attack was delayed and stalled in front of North Korean bunkers, forcing the raiders to dig in. The next day, they resumed the attack and captured the summit of Hill 854. With the Punchbowl offensive concluded, the raiders advanced the line north of the hills they had taken, establishing the new Minnesota Line by the end of September 1951. In March 1952, the 1st Marine Raider Regiment was to change its position on the Main Line of Resistance. The raiders moved to the center on the Jamestown Line, where they took control of the Nevada Cities outposts, Vegas, Reno, and Carson. There, the raiders would not see action until mid October 1952 in the First Battle of the Hook. The Hook, a crescent-shaped ridge near Sami Creek west of the Samichon River, came under attack from the Peoples' Volunteer Army. The raiders repulsed the Chinese attack, but the area was to be taken over by British forces and the raiders would retire back to their bases. Beginning in March 1953, the Chinese began actively probing the raiders' defenses and launched limited attacks on them. However, they would launch a much larger and unexpected attack later in the month, beginning the Battle for Outpost Vegas. After a large volume of machine gun and small arms fire, the PVA artillery and mortars opened up on the raiders' rear lines. This barrage was succeeded by a massive Chinese infantry attack. The 1st Battalion, holding Vegas, the highest point in the sector, was hit especially hard and required artillery support to drive the Chinese back. While the artillery dealt with the Chinese, raider infantry at Vegas would take cover in the caves on the reverse slope, manning the defenses once the artillery stopped. However, the raiders, who were heavily outnumbered, were forced to give up the outer ring of trenches and fell back. After intense fighting and defensive stands by the outnumbered marine raiders, Vegas had been lost. Reno, which had been held by the 2nd Battalion, was also captured by the Chinese. Only Carson, held by the 3rd Battalion, continued to hold against the vastly more numerous PVA forces. The 1st Battalion mounted an attack to take back Vegas, but failed. The next day, the raiders reorganized and counterattacked in force. After a huge ground and air bombardment from the raiders, the 1st and 2nd Infantry Battalions attacked Vegas. Though much of the infantry was held up and pinned down early in the assault, the raiders still managed to take the outer trenches and later capture the summit after a full day of intense fighting. For the rest of the month, the raiders drove back Chinese counterattacks, inflicting severe losses every time. When raider artillery began hitting the PVA positions, the enemy attacks ceased. With the raiders having held onto most of their original ground, they were relieved in the immediate area by Turkish forces, though they continued to remain on the line. Into July, the raiders still held on to the Nevada complex. Later in the month, intense buildups of Chinese forces on the adjacent lines were reported by the raiders. At night, this materialized into a major enemy attack against the raiders' positions and the nearby Australian forces in the Battle of the Samichon River. After an initial contact with a Chinese probing force in late July 1953, waves of Communist infantry attacked the 1st Battalion's positions on Hill 111. After the raiders defeated the attacks, Chinese mortars and artillery began to fall on their positions. The raiders' heavy weapons responded, shelling the Chinese infantry. The Chinese attacked again, striking at Hill 111 as well as the 3rd Battalion defenses on Hill 119, known as Boulder City. Due to the main effort of the attack falling on Boulder City, the raiders were forced to give up some trenches in the area. They stopped the enemy's advance on Hill 111, but fighting on Hill 119 continued as the raiders were pushed back after hand to hand combat which forced them to retreat to the reverse slope. The Chinese continued the assaults in the center against the 2nd Battalion at Outpost Esther, with the raiders continuously holding back the enemy with flamethrowers, tanks, and indirect fire support. Eventually, the sheer amount of ordinance launched by the raiders broke up the Communist attack. After nearly being driven off their positions, the raiders of 1st and 3rd Battalions counterattacked, re-securing the forward trench lines on Hill 111 and Hill 119. The first night of the battle ended with the raiders retaining the positions they started with. Fighting continued the next day, with a small Chinese attack on Hill 119 stopped by raider mortars and artillery while raider tanks and fighters continued to support the infantry on Hill 111 and Boulder City. Eventually, the raiders managed to push the Chinese off of the forward slope of Boulder City. The raiders continued to endure Chinese shelling throughout the day, responding with an even larger counterbarrage every time. During the night, the 3rd Battalion on Hill 119 was attacked in force by the PVA. Raider artillery once again broke up the attack, but a much larger and fiercer attack took place against the left flank of Hill 111 and Boulder City shortly after, preceded by an artillery barrage. Chinese forces managed to take some of the trench lines, but counterattacks from the raiders drove the enemy from their positions. Sporadic fire continued throughout the night, but fighting in the sector had mostly ceased. The Chinese made a few other halfhearted attacks against the hills, but these were stopped easily. In their last action in the war, the raiders stopped multiple fierce Chinese assaults and prevented the Communists from gaining leverage at the Panmunjom peace talks. With the Korean Armistice Agreement signed, the raiders moved their lines southward to create a demilitarized zone, and later returned to their bases in the United States and West Germany.
The 1st Marine Raider Regiment had sustained casualties of 451 killed, 1,036 wounded, and lost 112 men missing in action. In all, they killed 3,245 enemies and wounded another 2,560, taking 434 prisoners.
Vietnam War (1955-1975)[]
Following their successes in Korea, the 1st Marine Raider Regiment began to take a more active role in Asia. Once the decision was made by the United States government to escalate, the raiders went ashore in the Republic of Vietnam in May 1965, the second of the regiments to do so. They set up their base with the mission of conducting operations in the provinces near the DMZ area.
In mid August 1965, the raiders saw their first real action in the war. They would take part in Operation Starlite, a search-and-destroy mission to nullify the threat to the Chu Lai Air Base. The 1st Battalion landed a force along the coast at An Thuong, establishing blocking positions with the objective of driving the Viet Cong forces into the 2nd Battalion, who had been airlifted to three landing zones west of Van Tuong. The raiders met light enemy resistance, repulsing light attacks with small arms and artillery support. A force of the 2nd Battalion attacked the Viet Cong, overwhelming the enemy with attack helicopter support, while the 1st attacked and captured the hamlet of An Cuong from the VC. The raiders found themselves in a crossfire at Nam Yen Dan Hill 30, and established a defensive position. It was not long before the raiders were ordered to attack in support of a supply train which had been ambushed by the Viet Cong. They attacked the enemy positions, but were held up by small arms and mortar fire while doing so. After artillery and air support suppressed the VC forces, the raiders continued onward. Meanwhile, 3rd Battalion had been landed to support the ongoing engagement. On their way to the fighting, the raiders were caught in an ambush and halted their advance. Come nightfall, all the raider companies committed to the battle established defensive positions. The Viet Cong retreated during the night, though pockets of resistance continued to hold out and needed to be dealt with. When it became clear where the Communists had retreated, a follow up operation was launched. Operation Piranha was launched in early September, an offensive against the Batangan Peninsula. The 1st Battalion came ashore at White Beach and pushed southward, while the 2nd was helilifted inland to set up blocking positions. The 3rd was airlifted with some South Vietnamese forces to the south at the An Ky Peninsula, where they would clear and search the territory. The landing was unopposed, with the exception of minor ground fire on the raiders' positions at An Ky. The next day, a force of the 1st Battalion discovered a Viet Cong field hospital in a cave. After taking some prisoners, they came under fire from some other VC farther into the cave. After returning the fire and unsuccessfully attempting to convince the enemy to surrender, the raiders blew up the cave. Later in the month, the raiders were assigned to another search-and-destroy mission, codenamed Operation Gibraltar, designed to eliminate Communist presence near the An Khe base. After a preliminary air raid, the raiders were dropped from their helicopters near the village of An Ninh. They came under heavy fire from North Vietnamese forces almost immediately, beginning the Battle of An Ninh. The raiders there established a defensive position and called in bombers to provide air support. Reinforcements were landed in a safe landing zone, away from the fighting, but were unable to reach the defensive positions before nightfall. Meanwhile, the raiders continued fighting the VC and North Vietnamese Army forces through the night, with the Communists withdrawing at daybreak. The marine raiders saw no other major action in their zone of operations for the rest of 1965, only patrolling the jungles near their bases and providing security. In late February 1966, the raiders were assigned to Operation New York, with the objective of eliminating Viet Cong forces in the area of the Phu Lai Combat Base. The raiders of 1st Battalion were divided up, with a force helilifted northeast of the village of Pho Lai to set up blocking position while another force swept the village itself. The raiders encountered none of the enemy and by nightfall the two forces had linked up. Meanwhile, the 2nd Battalion had been heavily engaged by the VC on the Phu Thu Peninsula east of the base. The 1st was lifted by helicopter to the northern end of the peninsula, where they swept southward with artillery support, breaking up the Viet Cong into groups and forcing them to retreat. The operation concluded successfully in early March. Later in the month, Operation Oregon was launched. A force of the 3rd Battalion was lifted near Route 597 after an artillery barrage, being delayed by a minefield and strong enemy defenses around the hamlet of Ap Chinh An. Unable to take the village, the raider infantry withdrew to allow artillery, air support, and naval gunfire to soften up the enemy defenses. The next day, with the Viet Cong having abandoned their positions, Ap Chinh An was taken with minimal resistance. The raiders were reinforced and continued the operation but saw no more action. In July, US intelligence noted the increased presence of PAVN in the South Vietnamese Demilitarized Zone. The raiders were immediately attached to Operation Hastings, a plan to repulse the enemy advance. 1st Battalion was to inserted to the southwestern part of the Song Ngan River Valley while 2nd Battalion would land at the mouth of the valley and move to Hill 208. 3rd Battalion would secure Dong Ha and protect the Cam Lo Combat Base. After a bombing run, the raiders of 1st Battalion landed at LZ Crow northeast of the Rockpile. The raiders established blocking positions and, when they came under fire, secured an enemy hospital and ammunition dump. A smaller force of the raiders continued south to their objectives, but were unable to cross the Ngan River due to heavy ground fire from the North Vietnamese and established a defensive position. The NVA counterattacked the position in force, but the raiders drove them back. Meanwhile, the 2nd Battalion was being dropped off at LZ Dove with the objective of securing Hill 208 and linking up with the 1st. However, they were unable to move long before nightfall and set up defenses. In the morning, all raider companies committed to the battle came under mortar fire and were still prevented from crossing the Ngan River. They responded with effective counterbattery fire. The raiders of the 2nd continued their advance, leveling enemy resistance with airstrikes. The raiders were attacked by the NVA forces several other times, which they repulsed. The 3rd Battalion was committed to the fighting soon after, deploying to LZ Robin and calling in airstrikes on North Vietnamese positions south and east of the Rockpile. The 3rd was redeployed the next day to the river valley near the Rockpile. The 1st and 2nd Battalions had linked up and had established joint positions, but had limited contact with the NVA. The raiders were moved northeast, with the 2nd Battalion to set up blocking positions below the DMZ and the 1st to take Hill 208. The next day, as the raiders began to move out, they came under attack by a massive North Vietnamese infantry force. They repelled the advance after heavy fighting, and reestablished their defenses. The day after, the 1st set up the blocking positions while the 2nd moved to capture Hill 208. After numerous airstrikes, the raiders moved to assault Hill 208, but when they reached the summit, they found it abandoned. In late July the 3rd Battalion was deployed to the valley below the Song Ngan and patrolled westward, eliminating scattered Communist resistance. The 1st and 2nd remained in their sectors, conducting patrols and search-and-destroy missions. Soon after, the raiders of the 3rd were setting up a radio relay station on Hill 362 north of the Rockpile when they came under attack from concealed PAVN forces. They retreated to the crest of the hill and endured enemy mortar fire for a while until helicopter gunship support silenced the mortars. The 3rd Battalion's other companies in the area attempted to relieve the raiders, but they were stopped despite establishing fire superiority. Repeated North Vietnamese assaults on Hill 326 were also repulsed, and the enemy withdrew by dawn the next day. The raiders in the valley moved south to Cam Lo while the 3rd Battalion continued patrols around the Rockpile. They operated north and east of the Rockpile, at one point calling in an artillery strike to drive off a PAVN group. Operations in this area continued through August 1966, with a renewed effort in the DMZ beginning with Operation Prairie. The raiders' first action during this operation was to fly in and relieve an American team who had been pinned down by fire from NVA troops on a ridgeline. They touched down and secured the area, evacuating the team before lifting off again. Some days later, a few companies were pinned down near Quang Tri province by a large North Vietnamese force and needed to be relieved by the rest of the regiment. They eventually broke out after a firefight that lasted several days. Concluding in late January 1967, the operation was immediately followed up by Operation Prairie II, spanning from early February to mid March and accounting for a large amount of enemy casualties. Operation Prairie III began in a similar vain, lasting from late March to mid April. Operation Prairie IV was conducted around Con Thien and east of Khe Sanh along the southern banks of the Ben Hai River. The operations in the DMZ were highly successful, preventing incursions into South Vietnam by the Communists. In late April 1967, 1st Battalion commenced Operation Beacon Star to eliminate the Viet Cong forces around the Khe Sanh Combat Base. The Hill Fights, a series of battles to secure the perimeter, began soon after. Part of the battalion first secured Hill 700, and were ordered to take Hill 861 after an ambush had occurred there. The raiders moved southeast across the hill, but were stopped by PAVN mortar fire and dug in for the night. Fighting continued the next day, with the raiders advancing on Hill 861 from multiple directions. Like the first day, however, they were hit by fire from the well-entrenched defenders and were forced to dig in. Artillery and air support arrived at the KSCB and pounded the NVA on top of the hill, forcing them to retreat. Raider infantry secured the abandoned hill shortly after. With Hill 861 secured, another part of the battalion was to advance on Hill 881S by way of a smaller nearby hill that served as a starting point. After a preliminary advance failed, the raiders' artillery and air support blasted away at the NVA bunkers on the hill. The raiders pushed up the hill again and saw much success in taking the bunkers before they came under machine gun and mortar fire. After another bombing raid in May, the raiders secured Hill 881S with minimal resistance. That same day, the raiders began their assault on Hill 881N. Part of the force encountered a PAVN position and pulled back to let artillery deal with the enemy. The raiders almost cleared the summit before an intense rainstorm forced them to dig in for the night. During the night, a North Vietnamese force attempted to attack the raiders, but concentrated recoilless rifle fire from Hill 881S broke up this attack. The raiders attacked Hill 881N from multiple directions, securing most of the bunkers and letting artillery fire deal with the enemy resistance on the crest of the hill before attacking and clearing it. After having taken the hills, the battalion split up and searched every one. They found a few scattered groups of North Vietnamese, which they dealt with, but otherwise the area was secure and the NVA forces had withdrawn. While the 1st Battalion secured the area around Khe Sanh, the 2nd and 3rd Battalions were engaged in Operation Union, a search-and-destroy operation in the Que Son Valley, beginning in late April. The objectives were to sweep the PAVN from Nui Loc Son, a mountain in the area. A force of the 2nd Battalion pushed towards and attacked Binh Son, a nearby village controlled by the North Vietnamese. They soon came under heavy fire from a treeline and requested air and artillery support, which allowed a push by both battalions to take Binh Son. 3rd Battalion landed on Nui Loc Son soon after. In early May, NVA fire from Hill 110 pinned down a force of raiders, who requested assistance. By evening most of the battalions had been committed and they were able to overrun the Communist position. A few days later, the raiders engaged and defeated a PAVN force as well as eliminating an enemy bunker complex with air and artillery strikes. In late May, Operation Union II was launched. The 3rd Battalion established blocking positions in the western area of the valley after being dropped off by their helicopters. The 2nd was dropped off at LZ Eagle and was soon pinned down by heavy fire from the North Vietnamese, but an attack from the raiders relieved the pressure on the LZ and they were soon able to take the PAVN positions. After the fighting, the raiders continued their sweep of the area. In early June, the raiders found an entrenched NVA force near the Vinh Huy Village complex. They attacked and overran the Communists, and the 2nd Battalion pushed to relieve the engaged 3rd. However, the 2nd was ambushed in a rice paddy and was heavily engaged, requiring artillery and air strikes to drive off the North Vietnamese. The next day, 1st Battalion was moved by helicopter to be committed to the ongoing battle in the valley. At night, they landed behind the enemy fortifications and attacked the NVA left flank in order to relieve pressure on the 2nd and 3rd Battalions. The advancing raiders were hit hard by small arms and mortar fire and required the helicopters that had previously dropped them off to return to evacuate their casualties. However, their mission was a success, as the pressure was taken off the two battalions and the raiders were able to rout the NVA forces. Catching the enemy in the open, the raiders' supportive fire was able to inflict heavy casualties on the North Vietnamese. Operations in the valley concluded shortly after. The raiders would go into action again in the Demilitarized Zone near Con Thien in early July 1967 in Operation Buffalo. On the first day, the 1st Battalion moved up Highway 561 and secured the crossroads before continuing north between Gia Binh and An Kha to an area known as the Market Place, where they made contact with an NVA force. The leading companies were hit hard by mortar and artillery fire, but tank and helicopter support allowed the raiders to link up and push back the North Vietnamese. The next day, artillery fired on a NVA force, killing most and dispersing the rest. The raiders attacked towards the Marketplace, meeting heavy resistance but driving off the North Vietnamese. Raider infantry north of Con Thien came under mortar and artillery fire but made no ground contact. Some days later, the raiders in that area came in contact with a PAVN force, forcing them to retreat after a firefight. When a force of NVA crossed the Ben Hai River to attack the raiders, the raiders ambushed them and called in artillery, killing many North Vietnamese soldiers. The next week, the raiders discovered a North Vietnamese bunker complex while moving southwest to the Cam Lo River. They called in artillery and air strikes before moving in and eliminating the bunkers. For the rest of the July operation, the raiders' only contact with the enemy was through harassing artillery fire and mines. Following the successful conclusion, Operation Kingfisher was launched in the same area. Mid July saw only limited conflict with the NVA, but later in the month, the 2nd Battalion made contact. The raiders were moving north along Provincial Route 606 with armor support to attack into the DMZ. After no initial fighting, they set up night defensive positions near the Ben Hai River. Upon moving the next day, the raiders tripped enemy mines and an enemy force ambushed them. They fought the North Vietnamese off until the next day. In early September, the raiders trapped and engaged an NVA force, killing many of the enemy. The 3rd Battalion supported by tanks fought and won another engagement south of Con Thien. Some days later, the raiders of the 3rd were attacked by the North Vietnamese, but they pushed them back with artillery support. An NVA force later attacked the northeast sector of Con Thien, but the 1st Battalion pushed them back with small arms and artillery fire. In late September, the raiders of the 1st swept east of Con Thien just below the trace, where they came under fire from snipers, mortars, and artillery from behind the hedgerows. The raiders pushed the enemy back in close quarters fighting, going back some time later to recover their casualties. In mid October, the 2nd Battalion was occupying a point called Washout Bridge between the C-2 Strongpoint and the Con Thien Combat Base. When they were attacked by a large NVA force, tank and machine gun fire stopped the enemy assault on most points, but the North Vietnamese managed to penetrate the raiders position in one area. However, the raiders pushed them out with a counterattack. In late October, the raiders swept north along Route 561 but encountered no enemy presence. In their night positions, the raiders suffered from an NVA rocket attack, but advanced the next morning to take the objective. Soon after, they came under NVA fire and were subject to a series of enemy attacks. Reinforcements from 3rd Battalion allowed the raiders to drive off the North Vietnamese, and the operation concluded at the end of October. With a large NVA buildup around the Khe Sanh Combat Base in December, the raiders were immediately recalled to Khe Sanh.
In late January 1968, with the beginning of the Tet Offensive, the plans for a series of large-scale attacks on the hills around the perimeter were uncovered, and the battalions split to reinforce the hills. The 1st Infantry Battalion took over the defense of Hill 861, the 2nd was posted at Hill 881S, and the 3rd remained at the base. The hills were attacked by enemy infantry in the evening, beginning the Battle of Khe Sanh. The 1st Battalion on Hill 861 pushed back the Communists through hard close-quarter fighting during a ferocious attack on their position. The base was hit hard by mortars, rockets, and artillery, causing havoc among the ammunition caches and destroying most of the above-ground structures. The 3rd Battalion struggled to get things under control, and prepared for an infantry assault that never came. The artillery, meanwhile, was pouring large amounts of shells downrange in support of the outnumbered South Vietnamese defending the Khe Sanh village, but it was lost despite the effort. The artillery later fired in support of the Laotian forces, who were fighting off a North Vietnamese armored attack at the Battle of Ban Houei Sane, but this failed as well. At the same time, NVA artillery was pounding the defending 1st and 2nd Battalions on the hills, before adjusting the bombardment to the main base, where the 3rd Infantry Battalion was holding their ground. The raiders hoped to see a respite from the action with the arrival of the Tet cease-fire, but soon enough it became clear that the siege was to continue and that no truce would occur. Massive amounts of air support, including almost the entirety of the 1st Marine Raider Air Wing, were dispatched in Operation Niagara to support the raiders fighting desperately to hold on to the base and the surrounding hills. When North Vietnamese forces attacked at the Battle of Lang Vei, the raiders' artillery fired a continuous barrage tirelessly, but still the Lang Vei base fell into enemy hands. A plan for the raider infantry to relieve the US special forces holding the camp was made, but never implemented. As the allied airstrikes continued, the Khe Sanh Combat Base was hit by eight hours worth of continuous artillery and mortar fire, wounding dozens of the raiders. They responded in kind by opening up a bombardment on all possible staging areas for an NVA attack. The raiders of the 3rd Battalion counterattacked into the North Vietnamese trenches in late March and inflicted heavy casualties before returning to the base. When Operation Scotland ended, the siege was broken and resupply routes reopened by the 2nd Marine Raider Regiment in Operation Pegasus. Operation Scotland II was launched in mid April 1968, and the raiders took part. The 1st Battalion attacked a PAVN position on Hill 689, but were unable to dislodge the enemy and retreated back to the base. In May, the 2nd Battalion attacked an NVA force which had ambushed a supply column, pushing the Communists into a bunker complex and killing them. They repeated this tactic with success a few days later. Meanwhile, the 3rd Battalion patrolled the ridgeline between Hill 552 and Hill 689, engaging in several firefights with the NVA. Later in the month, 2nd Battalion's position on Route 9 as well as 3rd Battalion's position on Hill 552 were attacked, but a counterattack from the raiders drove back the NVA. An armored patrol by forces of the 1st Battalion was ambushed, prompting a rescue mission by the rest of the battalion. This initially failed, so reinforcements and napalm support were called in, leading to an NVA retreat. Some days later, 2nd Battalion attacked a network of NVA bunkers on Foxtrot Ridge overlooking Route 9. The first attack failed, so the raiders used artillery and air support to hit the bunkers before engaging again and taking the position. After calling in artillery strikes against the enemy forces, the North Vietnamese attacked. This attack pushed the raiders back significantly, but a renewed defense coupled with increased air support repulsed the NVA with heavy casualties. In Operation Drumfire II, the raiders' artillery engaged in counterbattery fire against the North Vietnamese artillery positions in the Co Roc Range, but this had little effect. The 2nd Battalion on Foxtrot Ridge was again attacked but managed to repel the enemy assault. 1st Battalion moved to assist, but on its way it was ambushed by the NVA. However, a renewed attack by the 1st and 3rd Battalions pushed back the Communists. After fighting off NVA attacks, the raiders to withdraw from the Khe Sanh base in Operation Charlie. Under Communist artillery fire, the raiders moved their heavy equipment out of the base while a small force of the 3rd Battalion was attacked southeast of the base. The raiders managed to blunt this assault, and by the end of June 1968 had withdrawn entirely. The raiders would not see any further action in the year.
Beginning in January 1969, the next assignment for the 1st regiment was Operation Dewey Canyon. Phase 1 of the operation saw the raiders airlifted into the A Shau Valley and establish a series of firebases. Phase 2 began later in the month, during which time the raiders discovered and captured a PAVN field hospital. They took Hill 1175 after a short fight and continued building firebases. They patrolled the area in the time after, seeing very little combat. In Phase 3, the raiders repulsed multiple PAVN attacks on their bases before gearing up for a limited incursion into Laos in late February. The 2nd Battalion set up and executed an ambush on a North Vietnamese convoy, using small arms and artillery to destroy trucks and kill PAVN forces. The 3rd Battalion discovered a PAVN maintenance facility and tunnel complex around Hill 1228 while the 1st continued defending the firebases and launching counterattacks. The 2nd moved along Route 922, engaging PAVN forces and capturing enemy equipment. After a successful raid which had done damage to the enemy, the raiders were helilifted back into South Vietnam. The raiders also captured a weapon cache near Hill 1044. The successful operation concluded in mid March. In May 1969, a successive mission was launched into the strategically important A Shau Valley, codenamed Operation Apache Snow. The operation entailed establishing blocking positions to prevent the enemy from escaping into Laos. The 1st Battalion was to block the escape routes while the 2nd and 3rd destroyed the enemy forces in their own sectors. The 2nd Battalion began a reconnaissance in force on Hill 937, beginning the Battle of Hamburger Hill. The 1st, acting as reinforcements, attacked the south of the hill from Hill 916. The first assaults failed with heavy casualties, and the difficult terrain and the resistance of the North Vietnamese delayed the subsequent operations. Helicopters were shot down, and the raiders, who had committed all battalions to the fighting, had to deal with constant counterattacks on the landing zones. Raider attacks were halted by fire from NVA bunkers and defensive positions. Artillery and air support proved little use in eliminating the bunkers, so the raiders destroyed them using napalm, flamethrowers, and recoilless rifles. The next day, an assault was launched, with the 1st and 3rd Battalion attacking the south side and the 2nd Battalion assaulting the north side of the hill. The 2nd almost reached the crest of the hill, but were forced to abandon the assault after being pinned down by heavy fire. Meanwhile, the 1st and 3rd struggled to take Hill 900 to the south. After a reinforcement by other allied forces and an extensive artillery and air bombardment, the raiders launched a final assault which secured the crest. Having taken the hill and successfully concluded the operation, the controversial order was given to abandon the hill in early June. In early April 1970, another offensive into the A Shau Valley was launched. Operation Texas Star began with the rebuilding of FSB Ripcord. The base was to be used as a staging point for raids on North Vietnamese bases. In July, the raiders endured a Communist mortar attack, beginning the Battle of Fire Support Base Ripcord. After a long siege, the NVA infantry assaulted. The raiders defended four hilltops around the base, inflicting heavy casualties on the North Vietnamese with small arms and supportive fire. When the order to withdraw was given, the raiders called in air strikes and artillery to assist the raiders, who were withdrawing under heavy enemy fire. The raiders had crippled NVA forces in the area and delayed enemy reinforcements. As the only full regiment in Vietnam, the process of Vietnamization called for a drawdown. The 1st and 2nd Battalions were withdrawn from the country later in the year, with the 3rd Battalion conducting the last major operation in country, Operation Jefferson Glenn. beginning in early September 1970. The raiders defended installations around Hue and Da Nang, by patrolling around North Vietnamese rocket belts along the edge of the mountains. The raiders established firebases, inflicted many casualties, and completed most of their objectives. The operation concluded successfully in October 1971, and the raiders fully withdrew back to the United States in March 1972.
Though the US involvement in the Vietnam war was a clear defeat, the 1st Marine Raider Regiment had performed courageously and capably, and were given numerous honors and battle citations for their service in-country. The regiment had lost 382 men killed in the conflict and an additional 909 men wounded, with 140 missing in action (91 of these returned as prisoners of war). They claimed having caused enemy casualties of 2,942 killed, 3,214 wounded, and took 278 prisoners of war.
Exercise Reforger (1969-1993)[]
After the fighting in Vietnam, the 1st Marine Raider Regiment was attached to Exercise Reforger 74 in 1974, their first deployment to Germany in the decade. The raiders' exercises were run in the Stuttgart area, where the headquarters was located. If a war with the Soviet Union broke out, the marine raiders would be on the front lines. Exercise Reforger allowed the raiders to focus on Europe again. From 1974 to 1988, the raiders participated in all exercises in Germany, including some named operations, participating Exercise Certain Sentinel in 1986, Exercise Certain Strike in 1987, and Exercise Certain Challenge in 1988. After a deployment to the Persian Gulf, the raiders participated in Exercise Certain Caravan in 1992 and a final deployment in 1993, after the Cold War had ended.
Gulf War (1990-1991)[]
When Iraq invaded Kuwait in August 1990, the 1st Marine Raider Regiment was placed on high alert. At the order of the president and the request of the Saudis, the regiment was sent along with other US forces to Saudi Arabia to form a defense of the border to repel a possible invasion in Operation Desert Shield. The raiders remained in Saudi Arabia during the air campaign into 1991, and even assisted with relief efforts to help Saudi civilians affected by Iraqi missile strikes.
In January 1991, the Iraqi invasion came to Saudi Arabia. In the Battle of Khafji, Iraqi forces captured the lightly defended city and pushed back the Saudis. A counterattack was attempted, with the 1st Artillery Battalion giving heavy barrage support to the Saudi troops. The Iraqis left the city after suffering heavy casualties and it was retaken in two days. The next month, the massive counteroffensive that the Coalition had been building up was launched, beginning Operation Desert Storm. While the other marine raider regiments crossed the border into Iraq, the objective of the 1st Regiment was Kuwait itself. The raiders crossed the border, encountering light resistance from Iraqi troops who would mostly surrender after a short fight. They advanced towards Kuwait City over the course of three days, until the enemy forces were given a retreat order. An Iraqi contingent at the Kuwait Airport, however, did not retreat, so the raiders advanced with the objective of taking it. In the Battle of Kuwait International Airport, the raiders attacked and destroyed several Iraqi armored columns before meeting a large-scale enemy counterattack, inflicting heavy casualties and driving back the enemy forces. Another enemy assault, this time spearheaded by tanks, was launched on another flank. The raiders used their anti-tank weapons to destroy the armor and the attack broke almost instantly. As they advanced further, the raiders came into contact with an Iraqi brigade and poured fire into them, destroying several vehicles and forcing the enemy to retreat with heavy losses. As the raiders moved up, they came under heavy fire from the airport itself. They knocked out the few tanks defending the airfield and continued to the complex, while raider artillery launched a massive barrage on the hangers and other buildings around the airport. Once inside the complex, the raiders cleared the last of the Iraqi resistance around and inside the airport during three days of close quarter fighting. As the raiders pushed past the airport, they attacked and took the city of Al Jahra before cutting off the escape of the Iraqi forces on the heights of the Multa Ridge and forcing a complete surrender. When Kuwait City was taken, President Bush declared a victory over Iraq and that all enemy forces had been expelled.
The 1st Marine Raider Regiment remained in the Persian Gulf until March 1991, when they returned to the United States. During the fighting, they suffered casualties of 19 killed and 86 wounded, while claiming to have inflicted enemy casualties of 561 killed and 979 wounded, while having taken 253 enemy prisoners of war.
Bosnian War (1992-1995)[]
When the Dayton Peace Accords were signed between Bosnia, Croatia, and Yugoslavia, the forces of the North Atlantic Treaty Organization was assigned to implement them. This special force was known as the Implementation Force, or IFOR. The 1st Marine Raider Regiment was to be part of this force, codenamed Operation Joint Endeavor. They deployed with the North Multi-National Division to Bosnia and Herzegovina in December 1995 from Germany, where they were held up for days by the swelling of the Sava River on the Croatian-Bosnian border near Zupanja. They crossed a pontoon bridge which had been built by the engineers, moved south and set up their headquarters in the city of Tuzla. The raiders patrolled the northwest section of the occupied area and helped decrease tension between the various factions. The marine raiders departed back to Germany in December 1996 with the arrival of the supplemental SFOR, having suffered no losses and seen no real combat.
Kosovo War (1998-1999)[]
The war in Kosovo had been going for a year already before NATO's involvement. Operation Allied Force was launched as the NATO air campaign against FR Yugoslavia, and a ground force known as KFOR was to be implemented shortly after. During Operation Joint Guardian, the 1st Marine Raider Regiment landed in Kosovo in June 1999. The raiders faced a similar situation to their deployment in Bosnia four years ago, with the objectives to provide protection for the Kosovar civilians, deter threats against Kosovo by Yugoslav and Serb forces, aid humanitarian efforts, and establish and maintain general security. The raiders established their headquarters near Ferizaj in the south eastern part of Kosovo. The marine raiders saw success in their objectives in Kosovo as they had in Bosnia. As the conflict deescalated, The 1st Marine Raider Regiment left Kosovo for the United States in 2000. Again, they had suffered no fatalities and not seen any real fighting.
War in Afghanistan (2001-2014)[]
Immediately following the 9/11 terrorist attack on the World Trade Center, the 1st Marine Raider Regiment prepared for deployment. For Operation Enduring Freedom, the raiders were quickly deployed to Afghanistan in November of 2001 to assist in the war against the Taliban and Al-Qaeda. Upon the raiders' arrival, they set up an operations base near Karshi-Khanabad, where they remained until February of 2002 when they were ordered to move forward to the Bagram Airfield in Bagram and set up their headquarters there. When Operation Anaconda, a hammer-and-anvil operation in the Shahi Kot Valley, was planned shortly after, the raiders committed a medium-sized force to Task Force Anvil. In March, the raiders were airlifted to the northeastern end of the valley to set up blocking positions. They came under heavy mortar and machine gun fire from Al-Qaeda forces almost immediately, and realized that they were most likely outnumbered. The raiders delivered returning fire on the enemy in spades, causing many casualties. For the rest of the operation, the raiders traded fire with the enemy with occasional air support. After a few days, the Taliban and Al-Qaeda withdrew, having suffered heavily. The raiders consolidated for a final sweep of the valley with Afghan forces and deemed it clear of insurgents and the operation a success. After searching unsuccessfully for terrorist Osama bin Laden and and the Taliban leadership, the 1st Marine Raider Regiment returned to the United States to await a deployment to Iraq.
In 2006, the 1st Marine Raider Regiment returned to Afghanistan as part of the International Security Assistance Force, or ISAF. In May, they were assigned to Operation Mountain Fury with the objective of eliminating the Taliban in the Helmand province, near the border of Pakistan. A large Taliban force was entrenched on the mountains on the border, and the raiders were given the task of clearing them. In September, the raiders went on the offensive, clearing the Paktika, Khost, Ghazni, Paktia, Logar and Nuristan provinces. They established outposts and bases in the previously Taliban-controlled areas. These outposts and bases came under constant attack and the marine raiders were needed for around-the-clock security to keep them safe. Not a single outpost fell. The raiders rotated platoons in and out of each outpost until March 2007, when they were assigned to Operation Achilles. The first action of this operation came from an anonymous tip about the whereabouts of a Taliban officer. The raiders, with Afghan forces, raided the compound in April and killed several Taliban for no losses, but failed to find any trace of the Taliban officer. Later in the month, the raiders swept through the Sangin Valley and inflicted heavy casualties on the Taliban, pushing them out of Gereshk and the surrounding villages. They later fought a battle in the Zerkoh Valley, south of the Shindand district. In May, the raiders killed large numbers of the enemy as they attempted to counterattack. A follow-up operation, Operation Pickaxe-Handle, was launched immediately, the first objective of which was to take out a Taliban stronghold in the village of Kajaki Sofle which was threatening security in the Sangin Valley. In June 2007, the raiders assaulted the village, driving the Taliban out. For the rest of the month, the marine raiders engaged in several firefights against enemy forces, destroying several pockets of Taliban. The raiders deemed the operation a success, having cleared Sangin and Gereshk of Taliban and securing the Kajaki District. However, the Taliban were still active in the area between Heyderabad and Mirmandab, north-east of Gereshk and the upper Gereshk Valley. Operation Hammer was launched in July to clear these specific areas. The raiders attacked the Taliban, crossing the Nahr-e-Seraj canal and clearing compounds on the other side. They set up camp in just south of the Helmand River and prepared for their next assignment. The nearby town of Musa Qala had been under Taliban control for eight months, and the marine raiders were ordered to take it. The Battle of Musa Qala began in December 2007, preceded by an artillery barrage. The raiders, helilifted into the area, broke through the Taliban defenses and routed the enemy, pushing forward to the town. Though they were making progress, the raiders encountered Taliban minefields and several of the raiders were killed trying to cross them. Though the Taliban forces made one last effort to defend the town, the raiders drove them from it completely and Musa Qala was in allied hands. The months after were mostly a stalemate, with the ISAF and Taliban at a standoff in most of the Helmand Province. In April 2008, the raiders were tasked with taking the enemy-controlled town of Garmsir to break the stalemate. The Battle of Garmsir, codenamed Operation Asada Wosa, began when the raiders attacked and took the town, pursuing the Taliban southwards. When they caught up with the Taliban, the raiders found a large complex of compounds and trenches. The operation lasted into September, with the Taliban still refusing to give up their positions. Though the enemy was never completely eliminated, the raiders did manage to push them significantly farther back, as well as assisting many of the displaced Afghan civilians to return to their homes. The raiders again entered Garmsir in mid 2009 as part of Operation Strike of the Sword, after they had been helicopter-dropped near the town of Sorkh-Duz. The raiders advanced quickly with little enemy resistance, until they came under fire from a significant Taliban force near the town of Toshtay. They subdued the Taliban, and moved on to Garmsir where they erected bases and outposts. A month later, the raiders were tasked with eliminating the enemy presence in Dahaneh, as a part of Operation Eastern Resolve II. In the Battle of Dahaneh, the raiders were airdropped behind enemy lines and began to engage the Taliban. For the rest of the day the Taliban put up huge resistance with small arms and RPG fire, and progress was slow. On the second day of the battle, the raiders pushed through the Taliban defenses through heavy fighting and proceeded to secure the town. On the third day, the raiders eliminated the last of the Taliban presence in the south of the town and liberated it entirely ending four years of Taliban control. After the battle, the raiders remained in the city, helping the residents rebuild damages caused to their homes. In December, an operation was launched against Taliban supply lines in the Now Zad Valley. When the raiders landed in the valley as a part of Operation Cobra's Anger, they encountered landmines and homemade bombs before encountering strongly entrenched enemy positions at the foot of the Tangee Mountains. After three days of almost continuous fighting, the raiders had succeeded in their objectives and found no further enemy presence in the area. When the area was cleared, there remained only one major Taliban strongpoint, the town of Marjah. Operation Moshtarak was launched in early 2010, one of the largest in scope in the war so far. The offensive to take the town began when the raiders attacked the city from the north as part of the ISAF's encirclement plan. Though mines and large presence of Taliban troops slowed the advance, the raiders secured a series of canal crossings south of Nad-e-Ali. They stormed the town mere hours later and drove the enemy back, confiscating a large number of Taliban weapon caches in the process. On the second day, the raiders responded to gunfire during a flag raising ceremony by conducting house-to-house searches for the insurgents responsible. The operations against the Taliban continued as the raiders seized improvised explosive devices and illegal drugs. On the third day, they fought their way through fierce resistance from an enemy last stand in the town itself, killing a large number of the Taliban in the area. The raiders moved to assist in the securing of the Balakino Bazaar, where a force of the enemy were concentrated. Through several days of fighting, the raiders secured their objectives. Many of the raiders were present for the ceremony in which the Taliban flag was taken down and the Afghan flag was flown over the city. For the rest of the year, they gave aid to the city's inhabitants and cleared the remaining insurgent presence. Operation Moshtarak was not a total failure, but it was not the grand success that it was planned to be. The raiders left the town in 2011 and moved back to their base, where it was relatively quiet. As the years past, the regiment was withdrawn from Afghanistan bit by bit until they fully left the country in 2014 along with the rest of the ISAF.
The 1st Marine Raider Regiment lost a total of 147 killed, 379 wounded, and 14 missing. They claimed to have inflicted casualties of 823 Taliban killed, 230 wounded, and took 597 prisoners.
Iraq War (2003-2011)[]
The 1st Marine Raider Regiment, battle-hardened by its long period of combat operations in Afghanistan, moved to its infil point to prepare for the invasion of Iraq in March 2003. When a bombing campaign kicked off the invasion, the raiders fought their way through the Rumaila oil fields and pushed northwards to the city of Nasiriyah, where they encountered heavy resistance in the Battle of Nasiriyah. Attacking from the south, the raiders captured two bridges over the Euphrates River and wiped out several Iraqi units with combined-arms support. Around the Saddam Canal, the raiders were hit hard by enemy small arms and RPG fire in "Ambush Alley". They pushed through the defenses and subdued Iraqi resistance around the city before stopping a counterattack, inflicting heavy casualties and forcing the enemy to withdraw. After mopping up the remaining enemy forces, the raiders moved north to Kut, Iraq, which they reached in early April. The Iraqi contingent withing the city refused to surrender, and the marine raiders assaulted the city in the Battle of Al Kut. After advancing on the city with little resistance, the raiders encountered enemy presence within the urban areas and came under fire immediately. The raiders returned small arms and ordinance from the outskirts of the city, causing many casualties. As they advanced farther into the city, they found one enemy bunker still active with a machine gun. After neutralizing it, the Iraqi forces attempted a counterattack, but the raiders' fire cut down the infantry and forced the tanks to retreat. Fedayeen Saddam militants still hid in the city, but the road to Baghdad was otherwise clear. The raiders moved further northwest to the city of Hillah, following closely behind other US forces when they crossed the border. The raiders advanced along Highway 8 when Iraqi infantry opened fire, beginning the Battle of Hillah. The raiders engaged the Iraqi Republican Guard, who were entrenched in defensive positions in and around the Babylon Community College. Close-quarters urban combat raged for hours, with the raiders withdrawing so as not to suffer unnecessary casualties. After a bombing raid that all but eliminated the Iraqis, the raiders moved into the city again and captured it. Just days after, the raiders were given orders to advance and take the capital in the last major part of the offensive in the Battle of Baghdad. When they arrived on the outskirts, the raiders encountered resistance from an Iraqi Republican Guard division in At Tuwayhah. After a days worth of hard fighting, the raiders had annihilated the enemy division and pushed on to the city. For the days after the raiders entered the city, they were mostly concerned with mopping up and keeping order among the city's population. Some were even present during the toppling of Saddam Hussein's statue in Firdos Square. With the Saddam regime deposed and the invasion successful, the marine raiders next target was the insurgency.
Following the invasion, the 1st Marine Raider Regiment was ordered to the Al Anbar province in 2004. After four American private military contractors were killed and mutilated by the insurgents, the US forces, including the raiders, launched a large-scale military operation to clear the insurgent presence in the area. The operation, codenamed Operation Vigilant Resolve but known as the First Battle of Fallujah, began when the raiders assaulted the city after surrounding it. As they attempted to clear several large guerrilla nests in the city, the enemy still held on to major hardpoints in Fallujah. After almost a month of urban combat, the insurgents launched a massive counterattack, which was defeated by the raiders with air support. The raiders withdrew and left the city to the control of the new Iraqi Army in May. The Iraqi "Fallujah Brigade" failed to contain the guerrillas, and the insurgents' numbers swelled in the city. In November 2004, a new offensive into the city was planned, codenamed Operation Phantom Fury. The result, the Second Battle of Fallujah, began when the raiders' artillery pounded the city in a massive preparatory barrage. The raiders attacked from the northern edge of the city at night, taking the strategically important train station and moving south to clear the Hay Naib al-Dubat district, which was secured before the end of the week. Pockets of resistance still remained, and the raiders remained in the city to eliminate them until mid-December. After Fallujah, the raiders kept security in the Al Anbar sector.
It would be mid-2005 before the raiders saw another operational action. Operation Sayeed was an umbrella operation in west Al Anbar, with the objective of driving the Al-Qaeda forces in Iraq out of the Western Euphrates River Valley. In August, Operation Quick Strike was launched, an anti-insurgent operation in retaliation for the killings of five American snipers and the torturing of one. The Battle of Haditha began when the raiders of the 1st Regiment moved into Haqliniyah area, and a firefight with the insurgents ensued. The raiders pushed on to Haditha itself after eliminating the pocket, finding the bodies of the dead snipers. A large force of insurgents fired upon the raiders, and the raiders fired back, creating a large-scale firefight on the east bank of the Euphrates River. This ended in a victory for the raiders, and the raiders rested for a few months before their next assignment. In November, Operation Steel Curtain began, the biggest operation so far in Sayeed. The raiders attacked the sub-district of Karabilah, driving Al-Qaeda out of much of the area. Operation Iron Fist was launched as a follow-up operation, with the raiders pushing through the rest of Karabilah and assaulting Sadah. The raiders had killed a large number of insurgents, both Al-Qaeda and Iraqi, and took an even larger figure in prisoners.
The 1st Marine Raider Regiment was withdrawn from Iraq in December 2005 for a second deployment to Afghanistan (see above). They had suffered casualties of 251 killed, 758 wounded, and 22 missing. They had inflicted casualties of 1,041 killed, 1,390 wounded, and took 567 prisoners (both Saddam's troops and insurgents).
Syrian Civil War (2011-present)[]
In 2014, a very small undisclosed number of troops from the 1st Marine Raider Regiment were assigned to the Syrian Train and Equip Program. The raiders were actively involved in training the Syrian rebel forces, though there is uncertainty towards the future of the program.
In March 2017, a small force from the 1st Infantry Battalion as well as a few batteries from the 1st Artillery Battalion entered Syria with the objective of providing artillery support to the Syrian Defense forces to help them take the city of Raqqa from the Islamic State. The marine raiders will not be partaking in direct combat against ISIS forces but will be providing indirect support for US supported allies on the ground.
Interwar History[]
After the Revolutionary War, the 1st Marine Raider Regiment was officially assigned a sphere of influence. The northern states were assigned as the official area of operations. The raiders established bases in the states that they occupied which are still active. The northwestern territories were reassigned to the 3rd Marine Raider Regiment upon its creation in 1811.
The only time in marine raider history that operations have been undertaken without federal approval was during Shays's Rebellion, when the 1st Battalion took part in operations initiated by the Massachusetts state militia for purposes of combating the rebels.
During the time before the War of 1812, the 1st Regiment took part in a series of combat exercises around the New York area. It was coordinated with the 2nd Regiment, who were taking part in their own series of maneuvers in Western Virginia. These were the largest ever attempted by the marine raiders so far, and they attempted to simulate a war with a major European power on American land. The forces and tactics of the British, French, Prussian, Austrian, and Russian armies were taken into account, and strategies on how to defeat each one were discovered and perfected. A heavy emphasis was placed on Great Britain and Napoleonic France, as tensions were high between those countries and the United States, and a war with either one seemed a possibility. When war with Britain finally came in 1812, the marine raiders were some of the best prepared troops in the United States's military and saw a relatively high degree of success on all fronts.
Having no other mission and observing diplomatic tensions between the United States and Mexico, the 1st Regiment began running small exercises on the southwestern portion of their sector, studying Mexican Army tactics and logistics. During the Texas Revolution, all regiments were placed on high alert. When war was close to breaking out, the 1st Regiment made a hasty deployment to the Texas frontier in late April 1845, shortly after the annexation of the state.
The 1850s were relatively uneventful for the regiment, besides a few combat exercises. In 1860, the 2nd Marine Raider Regiment suffered from a desertion crisis. Although the regiment itself remained loyal to the Union, over half the men in its ranks deserted to join the Confederacy. To maintain Federal presence in the southeastern area, the 1st Regiment was deployed to Virginia and would fight in that general area for the duration of the Civil War.
In April 1986, a bomb went off at La Belle discotheque in West Berlin. The venue was a common meeting place for US servicemen, and among the victims were 13 men of the 3rd Battalion, 1st Marine Raider Regiment, who had been on garrison duty in Berlin. All 13 men were injured, some grievously, but none died. It was later confirmed that the bombing was a terrorist attack ordered by the Libyan government.
Current Mission[]
The 1st Marine Raider Regiment is still active after over 240 years of continued meritorious service. The 1st Regiment is the most commonly called-on force for most insertions within its sphere of influence. The regiment is the leading unit of EUROFOR (Europe force) and is prepared to deploy to Europe at any point in time for any duration or any mission given to them.
The current mission of the 1st Marine Raider Regiment is as follows: (A) Deter aggression from the Russian Federation in Eastern Europe, and (B) Assist allied forces in Syria in the fight against the Islamic State of Iraq and the Levant.
Active Deployments[]
The 1st Marine Raider Regiment will continue to deploy to Romania as a part of the United States component of the Black Sea Area Support Team as they have since 2014. More recently, a deployment to Syria has been made in March 2017.
Active Bases[]
United States[]
Plainfield, Hampshire County, Western Massachusetts (Regimental headquarters and main operating base)
Ashby, Middlesex County, Central Massachusetts (1st Infantry Battalion headquarters)
Summerhill, Cayuga County, Central New York (2nd Infantry Battalion headquarters)
Mount Airy, Carroll and Frederick Counties, Central Maryland (3rd Infantry Battalion headquarters)
Franklin Township, Bradford County, Northeastern Pennsylvania (1st Artillery Battalion headquarters)
Europe[]
Ilsfeld, Heilbronn District, Stuttgart Region, Baden-Wurttemberg, Federal Republic of Germany
Kacanik, Ferizaj District, Republic of Kosovo
Macin, Tulcea County, Dobrudja Region, Romania
Unit Awards[]
Presidential Unit Citation
Joint Meritorious Unit Award
Valorous Unit Award
Meritorious Unit Commendation
Croix de Guerre avec Palme
Republic of Korea Presidential Unit Citation
Vietnam Gallantry Cross with Palm Unit Citation